跳转到主内容

此翻译可能不反映源指南的最新更新。 帮助更新翻译查看源指南

Joy-Con 卡扣更换指南

你所需要的

  1. Joy-Con 卡扣更换指南, 卸下外壳螺丝: 步骤 1 中的图像 1,1
    • 使用 Tri-point Y00 螺丝刀卸下 Joy-Con 背板上的四颗 6.3 毫米长的螺丝。

  2. Joy-Con 卡扣更换指南, 将 Joy-Con 的两半分开: 步骤 2 中的图像 1,3 Joy-Con 卡扣更换指南, 将 Joy-Con 的两半分开: 步骤 2 中的图像 2,3 Joy-Con 卡扣更换指南, 将 Joy-Con 的两半分开: 步骤 2 中的图像 3,3
    • 将三角撬片插入控制器底部边缘的接缝中(L 和 ZL 按钮对面)。

    • 慢慢地将开口的平边滑动到 Joy-Con 的一侧。

    • 小心不要将三角撬片滑入 Joy-Con 内太远。这可能会损坏内部组件。后面板很容易松动,因此不需要太大的压力。

  3. Joy-Con 卡扣更换指南, 打开 Joy-Con: 步骤 3 中的图像 1,2 Joy-Con 卡扣更换指南, 打开 Joy-Con: 步骤 3 中的图像 2,2
    • 让充电导轨背对你,像打开书本一样打开 Joy-Con。

    • 不要试图完全移除后面板。仍然有两条电缆将充电导轨连接到主板。

  4. Joy-Con 卡扣更换指南, 断开电池: 步骤 4 中的图像 1,2 Joy-Con 卡扣更换指南, 断开电池: 步骤 4 中的图像 2,2
    • 使用撬棒轻轻地将电池连接器从主板上的插槽中向上撬起。这将使 Joy-Con 在维修期间无法开机。

    • 撬起接口时要非常小心——如果撬棒没有找到它,请尝试轻轻地将电缆从板上直接拉出以断开连接。

    • 在重新组装过程中,将接口直接向下按入板上的插槽以重新连接电池。

  5. Joy-Con 卡扣更换指南, 拧开充电导轨: 步骤 5 中的图像 1,1
    • 使用 Phillips #00 螺丝刀卸下固定充电导轨的 2.5 毫米螺丝。

  6. Joy-Con 卡扣更换指南, 卸下后面板: 步骤 6 中的图像 1,2 Joy-Con 卡扣更换指南, 卸下后面板: 步骤 6 中的图像 2,2
    • 将后面板从充电导轨上直接拉出以将其卸下。

    • 导轨解锁按钮有可能从后面板上掉下来。在重新组装过程中,确保它安装正确,按钮上的卡舌插入后面板的槽口中。

  7. Joy-Con 卡扣更换指南, 拆下扣锁支架: 步骤 7 中的图像 1,1
    • 使用 Phillips #00 螺丝刀卸下固定扣锁固定支架的螺丝。

  8. Joy-Con 卡扣更换指南: 步骤 8 中的图像 1,3 Joy-Con 卡扣更换指南: 步骤 8 中的图像 2,3 Joy-Con 卡扣更换指南: 步骤 8 中的图像 3,3
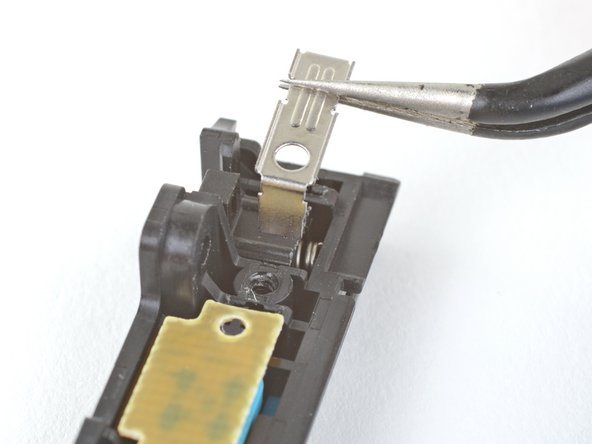
    • 将一对尖头镊子的一侧滑到扣锁支架中间的平坦部分下方。

    • 用镊子夹住支架,将支架直接拉离充电导轨,将其取下。

  9. Joy-Con 卡扣更换指南, 取下搭扣锁: 步骤 9 中的图像 1,3 Joy-Con 卡扣更换指南, 取下搭扣锁: 步骤 9 中的图像 2,3 Joy-Con 卡扣更换指南, 取下搭扣锁: 步骤 9 中的图像 3,3
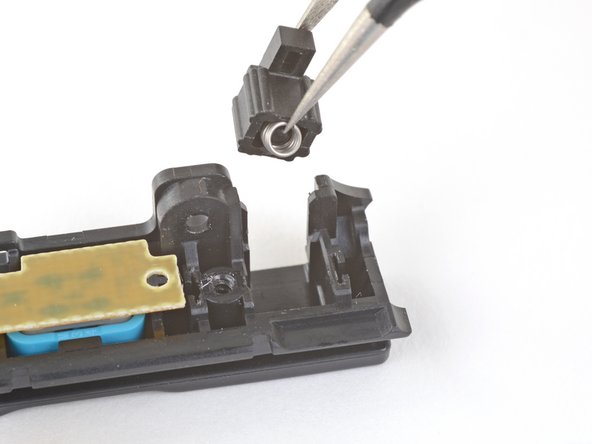
    • 将卡扣锁从充电导轨的插槽中轻轻提起,直到弹簧足够暴露,你可以用镊子抓住它。

    • 抓住带扣锁,使镊子围绕锁的两侧并将弹簧固定在锁内。

    • 当你将锁拉出时,弹簧会弹出。确保你牢牢握住镊子。

    • 将卡扣锁从充电导轨的插槽中拉出。

    • 在重新组装过程中,确保将弹簧从旧锁移到新锁上。

结论

要重新组装你的设备,请按逆序执行上述步骤。

将你的电子垃圾送到 R2 或 e-Stewards 认证的回收商

维修没有按计划进行?查看我们的 论坛 以获取故障排除帮助。

112等其他人完成本指南。

由衷感谢以下译者:

en zh

94%

这些译者帮助我们修补全世界! 您也想加入吗?
开始翻译 ›

Adam O'Camb

于04/11/15注册

196,194 声望

创作了416篇指南

34条评论

I tried to do this carefully, but I ended up removing the side rail ribbon cables and I had to disassemble the whole thing just to try to get to the inside of these babies. However it seems I messed up, and now I could use some help here. I don't want to lose my left Joy-Con.

Francisco Q. - 回复

It seems rather strange.. Its pretty easy to reattach. All I have is a $@$*!& ph00 + y00 that stripped the screws so I broke the cover. Technically not my fault. I have done multiple reshells.

[deleted] -

I tryed to do this but the 2nd at the bottom would not come out now my buckle is chiped

TAQI HASSAN - 回复

You mean the screws? Break off the shell! A perfect opportunity to put some clear ones :))

[deleted] -

I bought this kit of replacement metal buckles, and they work beautifully: https://www.amazon.com/gp/product/B07BDH...

This kit comes with four buckles, two for the left Joy Con, and two for the right. If you happen to have two sets (or plan to get a second set) of Joy Cons, a whopping $9.00 will set you up right.

I did have a bit of trouble replacing the metal cover that holds the buckle in place, but that was my own stupidity as I was trying to do this repair with insufficient light. Once I shed some light on the subject and I could see what I was doing, everything went back together smooth as silk. I replaced the buckles on both of my Joy Cons, and they’re both rock solid now.

itpurchasing - 回复

添加评论

浏览统计数据:

过去 24 小时: 45

过去 7 天: 395

过去 30 天: 1,990

总计 123,805