跳转到主内容

Jawbone Big Jambox Button Panel Replacement

你所需要的

  1. Jawbone Big Jambox Button Panel Replacement, Outer Case: 步骤 1 中的图像 1,1
    • Remove both end caps by putting a plastic opening tool in the center of the seam. Work around the edges to pry the end caps off completely.

    • Due to interior clips holding the end caps in place, use caution when applying force.

  2. Jawbone Big Jambox Button Panel Replacement: 步骤 2 中的图像 1,3 Jawbone Big Jambox Button Panel Replacement: 步骤 2 中的图像 2,3 Jawbone Big Jambox Button Panel Replacement: 步骤 2 中的图像 3,3
    • Turn the Jambox upside down. Peel the indicated rubber tabs off, using a plastic opening tool if necessary.

    • You may want to only take the tabs half way off to avoid re-gluing when reassembling.

    • Remove the three T6, 7.0 mm screws under each rubber tab.

    • Because the screws are a different length, set the screws aside.

  3. Jawbone Big Jambox Button Panel Replacement: 步骤 3 中的图像 1,3 Jawbone Big Jambox Button Panel Replacement: 步骤 3 中的图像 2,3 Jawbone Big Jambox Button Panel Replacement: 步骤 3 中的图像 3,3
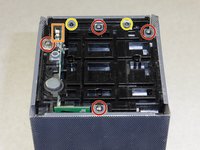
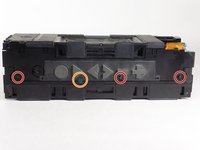
    • With the Jawbone logo facing towards you and with correct orientation, place the Jambox with the left end cap facing upward.

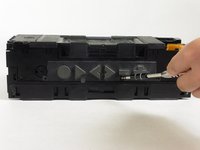
    • Unscrew indicated T6 9.7 mm screws.

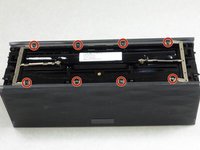
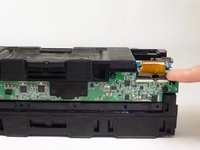
    • Gently loosen the tabs from their anchor points so the bottom may be removed.

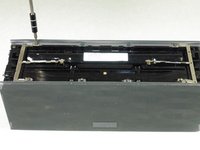
    • Flip the Jambox so the other end cap is facing up. The USB cable is on this side (metal grounding clip, indicated in orange). Repeat the above two steps.

  4. Jawbone Big Jambox Button Panel Replacement: 步骤 4 中的图像 1,1
    • Pry up the bottom panel by lifting from the device.

    • Pull the bottom up. This may take a bit of force as the bottom is glued to device.

    • Once removed, the battery will now be visible.

  5. Jawbone Big Jambox Button Panel Replacement: 步骤 5 中的图像 1,2 Jawbone Big Jambox Button Panel Replacement: 步骤 5 中的图像 2,2
    • Before unscrewing, take a picture of the top view. That way, when you're reassembling the device, you'll know the orientation of the metal grounding plates.

    • Unscrew the eight indicated T6 9.8 mm screws. Remove metal grounding plates.

  6. Jawbone Big Jambox Button Panel Replacement: 步骤 6 中的图像 1,1
    • Once all eight screws are removed, pry the sides of the Jambox to lift the body from it's shell.

  7. Jawbone Big Jambox Button Panel Replacement: 步骤 7 中的图像 1,1
    • With the battery facing forward, remove the three indicated T6 9.5 mm screws.

    • Once the screws are removed, lift up the small plastic plate, revealing the auxiliary board underneath.

  8. Jawbone Big Jambox Button Panel Replacement, Button Panel: 步骤 8 中的图像 1,2 Jawbone Big Jambox Button Panel Replacement, Button Panel: 步骤 8 中的图像 2,2
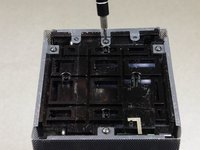
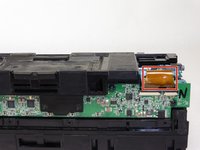
    • Turn the Jambox so that the button panel is visible.

    • Remove the indicated screws, T6 9.6 mm.

    • There is a small plastic flap obscuring the view of one of the screws, indicated in orange. In order to unscrew it, simply lift the flap out of the way.

  9. Jawbone Big Jambox Button Panel Replacement: 步骤 9 中的图像 1,1
    • Pop off the button panel.

  10. Jawbone Big Jambox Button Panel Replacement: 步骤 10 中的图像 1,2 Jawbone Big Jambox Button Panel Replacement: 步骤 10 中的图像 2,2
    • Remove the colored ribbon that connects the green button circuit board to the blue auxiliary board by using your finger to lift the small black tabs that clamp down the ribbon.

结论

To reassemble your device, follow these instructions in reverse order.

Gabriella Graham

于04/01/15注册

1,160 声望

创作了3篇指南

团队

Cal Poly, Team 24-5, Lancaster Spring 2015 Cal Poly, Team 24-5, Lancaster Spring 2015 的会员

CPSU-LANCASTER-S15S24G5

4 名成员

创作了9篇指南

一条评论

where can you get the replacement buttons?

lance_adriel01 - 回复

添加评论

浏览统计数据:

过去 24 小时: 1

过去 7 天: 2

过去 30 天: 20

总计 3,627