跳转到主内容

当前版本的文档还未经巡查,您可以查看最新的已查核版本

你所需要的

  1. 这个步骤还没有翻译 帮忙翻译一下

    : 步骤 1 中的图像 1,2 : 步骤 1 中的图像 2,2
    • Using a metal spudger, peel back the foam pad on the bottom of the device to reveal six screws.

  2. 这个步骤还没有翻译 帮忙翻译一下

    : 步骤 2 中的图像 1,1
    • Remove the six 20 mm T6 screws from the bottom of the device.

  3. 这个步骤还没有翻译 帮忙翻译一下

    : 步骤 3 中的图像 1,2 : 步骤 3 中的图像 2,2
    • Remove the back plate and the grey foam underneath.

  4. 这个步骤还没有翻译 帮忙翻译一下

    : 步骤 4 中的图像 1,3 : 步骤 4 中的图像 2,3 : 步骤 4 中的图像 3,3
    • Use a small, pointed metal spudger to release the plastic tabs connecting the faceplate to the bottom of the speaker.

    • A small cable connects the faceplate to the device. Carefully disconnect the cable before fully opening the device.

    • Slowly flip the device open like a clam shell.

    • There are several wires soldered to the motherboard that prevent the faceplate from detaching completely.

  5. 这个步骤还没有翻译 帮忙翻译一下

    : 步骤 5 中的图像 1,2 : 步骤 5 中的图像 2,2
    • Once you have carefully separated the bottom case from the top case, locate the two batteries attached to the motherboard.

    • Notice that each battery has two wires, one red and the other black, soldered to the board. Make a careful note of which is soldered to which pad.

    • Desolder the battery connections using the heated soldering iron.

    • You can find soldering tips in the How To Solder and Desolder Connections guide.

  6. 这个步骤还没有翻译 帮忙翻译一下

    : 步骤 6 中的图像 1,1
    • The battery is glued to the motherboard. Take care not to damage it in any way with excessive force in removing it.

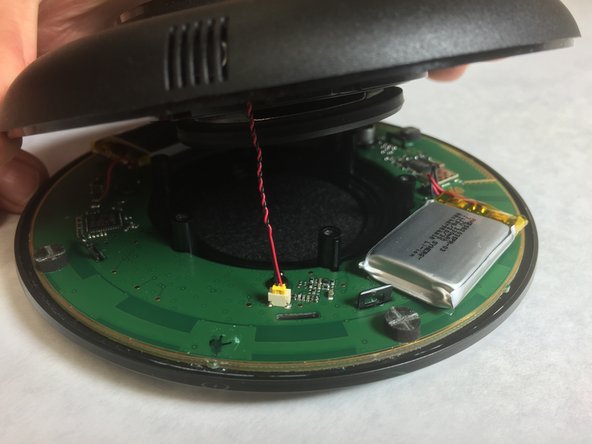
    • Carefully pry the battery away from the motherboard using a plastic opening tool. The glue gives very slowly under constant pressure and cannot be hurried. As the battery starts to lift you can insert the prying tool further as you continue to lift the battery.

    • The adhesive may still have sufficient stickiness to hold the new batteries, but if not, replace it with double sided tape.

    • Solder the wires of the new batteries to the board, making sure that the red and black go to the correct pads.

终点

20等其他人完成本指南。

Edgar Tavares

于02/16/16注册

468 声望

撰写一个指南

团队

IUPUI, Team 2-3, Harley Spring 2016 IUPUI, Team 2-3, Harley Spring 2016 的会员

IUPUI-HARLEY-S16S2G3

4 名成员

创作了8篇指南

9条评论

Thanks pal!

Freezing the headset in an airtight bag for 24 hours worked.

Best wishes,

Ronny

Norway

Ronny - 回复

Very precisely described steps, super well written - excellent job Ed, thanks

Rafael Benitez - 回复

Thank`s so much! Great job!

Artur Michalski - 回复

Very helpful. If I want to bypass the battery, how can I do? Thanks a lot.

Bruce.Hsu - 回复

Is it possible to change the USB cable?

publicidad publicidad - 回复

添加评论

浏览统计数据:

过去 24 小时: 21

过去 7 天: 102

过去 30 天: 421

总计 30,359