跳转到主内容

本指南有最近更改,您可查看未经巡查的最新版本

Iomega Z100S2 Motherboard Replacement

你所需要的

  1. Iomega Z100S2 Motherboard Replacement, Case: 步骤 1 中的图像 1,2 Iomega Z100S2 Motherboard Replacement, Case: 步骤 1 中的图像 2,2
    • Push in the plastic tab that can be seen through cracks in the front left corner using a spudger.

  2. Iomega Z100S2 Motherboard Replacement: 步骤 2 中的图像 1,1
    • Move down the same side and push in the plastic tab.

  3. Iomega Z100S2 Motherboard Replacement: 步骤 3 中的图像 1,1
    • Move to the front right side and once again push in the plastic tab.

    • There is not a fourth tab to push in after this one.

  4. Iomega Z100S2 Motherboard Replacement: 步骤 4 中的图像 1,2 Iomega Z100S2 Motherboard Replacement: 步骤 4 中的图像 2,2
    • Grab the cover by the front side and pull upwards.

    • You might encounter some resistance. Pull firmly, but don't yank it.

  5. Iomega Z100S2 Motherboard Replacement: 步骤 5 中的图像 1,2 Iomega Z100S2 Motherboard Replacement: 步骤 5 中的图像 2,2
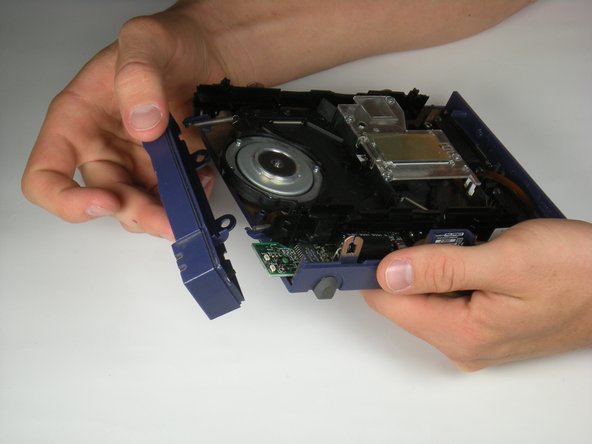
    • Tilt the front case down until the pegs detach from the bottom of the case.

    • Lift up and outward.

    • The motherboard will be loose at this point.

    Easy button and status light repair:

    button and plastic piece both need just 2 tiny drops of super glue.

    Donald Fournier - 回复

  6. Iomega Z100S2 Motherboard Replacement, Disk Reader: 步骤 6 中的图像 1,2 Iomega Z100S2 Motherboard Replacement, Disk Reader: 步骤 6 中的图像 2,2
    • Unhook the two springs from the front plastic hooks.

    • The black side rails of the reader should easily slide forward and off.

  7. Iomega Z100S2 Motherboard Replacement: 步骤 7 中的图像 1,1
    • There is a white tab connected to the motherboard. Pull it upward by gently rocking it back and forth.

    • The tab does not come completely out, it only slides up slightly, so don't rip it out!

  8. Iomega Z100S2 Motherboard Replacement: 步骤 8 中的图像 1,2 Iomega Z100S2 Motherboard Replacement: 步骤 8 中的图像 2,2
    • Grab the reader by its sides and gently pull it upward.

    • There are two wires still connected to the bottom of the reader that haven't been detached.

  9. Iomega Z100S2 Motherboard Replacement: 步骤 9 中的图像 1,1
    • Disconnect the white wires by using tweezers to gently pull the bottom connector toward you.

  10. Iomega Z100S2 Motherboard Replacement: 步骤 10 中的图像 1,2 Iomega Z100S2 Motherboard Replacement: 步骤 10 中的图像 2,2
    • Disconnect the thin ribbon wire by using tweezers to gently pull the connector at the bottom toward you.

  11. Iomega Z100S2 Motherboard Replacement: 步骤 11 中的图像 1,1
    • Lift the reader up and out from the device.

  12. Iomega Z100S2 Motherboard Replacement, Motherboard: 步骤 12 中的图像 1,2 Iomega Z100S2 Motherboard Replacement, Motherboard: 步骤 12 中的图像 2,2
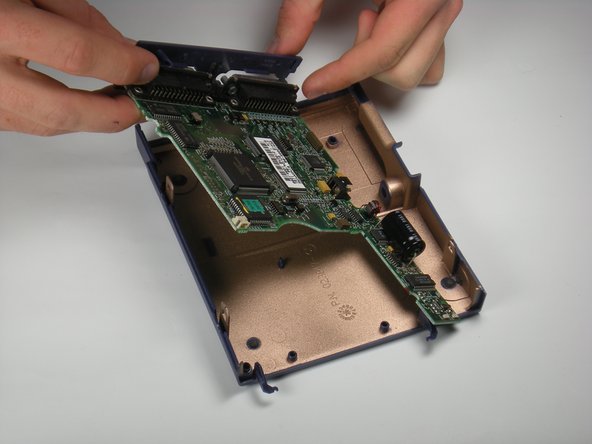
    • Use a T6 Torx Screwdriver to remove the 1.3 mm screw at the back of the motherboard.

  13. Iomega Z100S2 Motherboard Replacement: 步骤 13 中的图像 1,2 Iomega Z100S2 Motherboard Replacement: 步骤 13 中的图像 2,2
    • Gently lift the motherboard and back case out from the bottom case.

结论

To reassemble your device, follow these instructions in reverse order.

Ezery Kennedy

于10/05/10注册

288 声望

创作了2篇指南

团队

Cal Poly, Team 7-53, Amido Fall 2010 Cal Poly, Team 7-53, Amido Fall 2010 的会员

CPSU-AMIDO-F10S7G53

4 名成员

创作了6篇指南

一条评论

how to fix the motherboard if booth leds stay lit when powering up?

ACIDGREEN TECHNO - 回复

添加评论

浏览统计数据:

过去 24 小时: 2

过去 7 天: 5

过去 30 天: 8

总计 3,426