跳转到主内容

当前版本的文档还未经巡查,您可以查看最新的已查核版本

你所需要的

  1. , 检修门: 步骤 1 中的图像 1,2 , 检修门: 步骤 1 中的图像 2,2
    • 松开固定iMac底部的三个十字螺丝。

    • 这些螺丝将保留在检修门上。

    • 从你的iMac拿开检修门

    • 重新组装时,将检修门松开,并将其与iMac外壳上的检修门口对齐,然后再拧紧螺钉。

  2. , 内存: 步骤 2 中的图像 1,1
    • 使用你的手指或者撬棒的一段来滑动黑色塑料内存槽并将内存槽拉出。

  3. : 步骤 3 中的图像 1,2 : 步骤 3 中的图像 2,2
    • 把黑色的塑料拿出iMac以便于把内存芯片从内部拿出。

    • 内存模组会牢固的放置在里面, 可能需要使用一些力气才能移除。

    • 使用你的手指来把内存芯片从内部拿出。

    • 如果需要的话,在其他的内存模组上重复这个步骤。

  4. , 玻璃面板: 步骤 4 中的图像 1,3 , 玻璃面板: 步骤 4 中的图像 2,3 , 玻璃面板: 步骤 4 中的图像 3,3
    在这个步骤中使用的工具:
    Heavy-Duty Suction Cups (Pair)
    $14.95
    购买
    • 将两个大吸力吸盘分别吸附在玻璃面板的左右上角。

    • 在将吸盘吸附在玻璃面板上时,请将吸盘放置在玻璃面板上然后按照图二方法将拉环横置。

    • 然后将拉环扶住,接着抬起拉环,使之与另外一个拉环平行。(如图三)

    • 如果您的吸盘无法吸住面板,请使用潮湿柔软的无绒布清洁玻璃面板和吸盘。(使用蒸馏水浸泡,如果有需要的话请使用等比例的蒸馏水和白醋配置成溶液来浸泡以取得最佳效果[1]。)

    • [1]: 译者注:不必非使用蒸馏水,也可以使用饮用纯净水。

    • 切勿使用吸盘来移动显示屏,如果其中一个没有吸附牢固的话可能会打碎屏幕。

    • 您购买iMac时的包装盒是临时放置玻璃面板的好地方。 不然就需要放在一个水平的表面之上,比如铺有毛巾的桌子上。

  5. : 步骤 5 中的图像 1,3 : 步骤 5 中的图像 2,3 : 步骤 5 中的图像 3,3
    • 小心的抬起玻璃面板,抬升起足够的高度,来让面板与卡扣相分离。

    • 小心的将iMac玻璃面板拉离iMac外壳,放在一边。

    • 切勿使用吸盘来移动显示屏,如果其中一个没有吸附牢固的话可能会打碎屏幕。

    • 将玻璃面板安放好后请释放掉吸盘,因为随着时间的推移吸盘可能会弄破玻璃。

    • 在重新安装时请确保玻璃面板内部以及LCD显示屏内部的清洁,以防止日后使用时被屏幕内部的指纹和灰尘所困扰。

  6. , 显示屏: 步骤 6 中的图像 1,1
    • 移除8个固定显示器外壳的T10 Torx螺丝。

  7. : 步骤 7 中的图像 1,3 : 步骤 7 中的图像 2,3 : 步骤 7 中的图像 3,3
    • 小心的将iMac放倒在水平的表面上。

    • 由于制造时严格的公差,你有可能需要使用钩子来将显示屏提起。 如图三,我们用回形针制作了一个小工具。

    • 用小工具从显示器顶端一侧将显示器从外框中抬出。

    • 在抬起一侧的显示器后。扶住它,在您要去提起另一侧显示器时。 将铅笔或笔平行放置在刚刚提起的一侧显示器下,来支撑刚才提起的那一面。

    • 不要将显示器本体从外框中提起过远,这样将有可能损坏电缆。

  8. : 步骤 8 中的图像 1,2 : 步骤 8 中的图像 2,2
    • 用手小心的将位于iMac左上角的LED驱动板上的垂直同步带状电缆从基座中拔出。

    • 确保与LED驱动板平行地将线缆从插座中拉出。

  9. : 步骤 9 中的图像 1,1
    • 将显示数据连接器臂同时挤压来将其从逻辑板上分离。

    • 将显示数据线缆从逻辑板上的插座中拉离。

  10. : 步骤 10 中的图像 1,1
    • 将显示屏从外框中提升足够的高度来在LED驱动板上切断LED背光电源排线。

  11. : 步骤 11 中的图像 1,1
    • 将显示屏抬起到足够高的高度,来分离LCD热传感器与逻辑板插座所连接的线缆。

    • 如果您的风扇在组装完成后全速运行,请检查本连接线路或硬盘热传感器线路。

  12. : 步骤 12 中的图像 1,1
    • 小心地从您的iMac顶部提起屏幕外框然后移除屏幕。

  13. 这个步骤还没有翻译 帮忙翻译一下

    , 光驱: 步骤 13 中的图像 1,1
    • Remove the four T10 Torx screws securing the optical drive to the outer case.

  14. 这个步骤还没有翻译 帮忙翻译一下

    : 步骤 14 中的图像 1,1
    • Pull the optical drive thermal sensor connector straight away from its socket on the logic board.

  15. 这个步骤还没有翻译 帮忙翻译一下

    : 步骤 15 中的图像 1,2 : 步骤 15 中的图像 2,2
    • Insert a spudger between the optical drive connector and the optical drive.

    • Twist the spudger to slightly separate the optical drive connector from the optical drive, then use your fingers to pull the connector away from the drive.

  16. 这个步骤还没有翻译 帮忙翻译一下

    : 步骤 16 中的图像 1,1
    • Lift the left edge of the optical drive slightly and pull it away from the right side of the outer case.

    • During reassembly, note that there are two holes in the optical drive face plate into which two stubby plastic posts must engage for proper positioning.

  17. 这个步骤还没有翻译 帮忙翻译一下

    : 步骤 17 中的图像 1,1
    • Carefully move the rear I/O board ribbon cable to reveal the optical drive fan connector hidden underneath.

    • Disconnect the optical drive fan by pulling its connector away from the socket on the logic board.

  18. 这个步骤还没有翻译 帮忙翻译一下

    : 步骤 18 中的图像 1,2 : 步骤 18 中的图像 2,2
    • Remove the single T10 Torx screw securing the optical drive fan to the outer case.

    • Pull the optical drive fan away from the outer case to lift it off the three plastic posts around its perimeter.

    • Carefully maneuver the optical drive fan out of the iMac, minding any cables that may get caught.

  19. 这个步骤还没有翻译 帮忙翻译一下

    : 步骤 19 中的图像 1,3 : 步骤 19 中的图像 2,3 : 步骤 19 中的图像 3,3
    • Using your fingernails or the flat end of a spudger, remove the three connectors from the right side of the logic board.

    • SD card reader

    • Rear I/O board

    • Left and Right Speakers

  20. 这个步骤还没有翻译 帮忙翻译一下

    : 步骤 20 中的图像 1,3 : 步骤 20 中的图像 2,3 : 步骤 20 中的图像 3,3
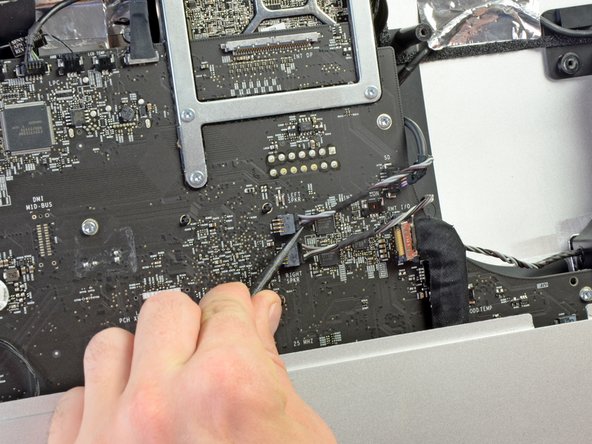
    • Remove the six parallel connectors from the top of the logic board using your fingernails, pulling parallel to the logic board.

    • Skin Temperature

    • Hard Drive Temperature

    • Hard Drive Fan

    • Camera

    • Bluetooth

    • Ambient Temperature Sensor

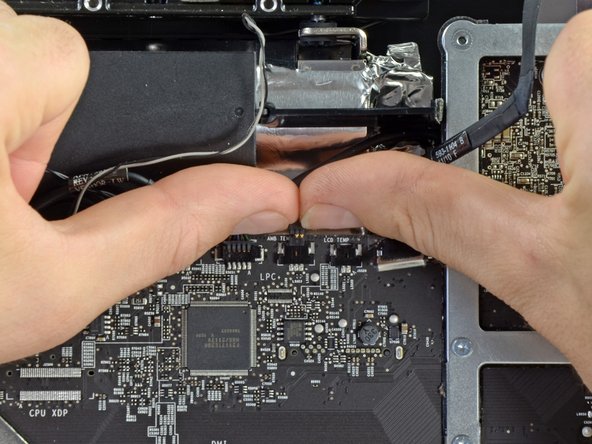
    • Remove the airport cable from the logic board by prying straight up with a spudger.

  21. 这个步骤还没有翻译 帮忙翻译一下

    : 步骤 21 中的图像 1,1
    • In the same manner described above, use your fingernails to remove the two cable connectors from the left side of the logic board.

    • Power Button

    • CPU Fan

  22. 这个步骤还没有翻译 帮忙翻译一下

    : 步骤 22 中的图像 1,2 : 步骤 22 中的图像 2,2
    • In the same manner described above, remove the IR sensor board cable from its socket on the logic board.

    • Carefully pull the IR sensor board straight up, out of the iMac.

  23. 这个步骤还没有翻译 帮忙翻译一下

    : 步骤 23 中的图像 1,1
    • Remove the following eight T10 Torx screws securing the logic board to the iMac:

    • Four 25 mm screws

    • Two 21.4 mm screws

    • One 9.3 mm screw

    • One 7.2 mm screw

    • When reassembling the iMac, make sure that none of the cables are trapped underneath the logic board before replacing the screws.

  24. 这个步骤还没有翻译 帮忙翻译一下

    : 步骤 24 中的图像 1,1
    • Using the flat end of a spudger, remove the SATA power cable from its socket on the hard drive.

  25. 这个步骤还没有翻译 帮忙翻译一下

    : 步骤 25 中的图像 1,2 : 步骤 25 中的图像 2,2
    • Simultaneously, lift and rotate the logic board out of the iMac.

    • Do not try to completely remove the logic board. It is still attached by several cables on the back side.

    • Carefully lean the logic board against the front of the iMac, so that it leans out of the iMac.

  26. 这个步骤还没有翻译 帮忙翻译一下

    : 步骤 26 中的图像 1,2 : 步骤 26 中的图像 2,2
    • Attach the male junction of the SATA power splitter to the original hard drive power cable.

    • Plug one of the branches into the hard drive.

    • The cable is shaped so that it can only be attached in a certain orientation. Do not try to force the cable onto the hard drive.

  27. 这个步骤还没有翻译 帮忙翻译一下

    : 步骤 27 中的图像 1,2 : 步骤 27 中的图像 2,2
    • Carefully route the other branch of the SATA power splitter underneath the GPU heat sink.

    • There is a cutaway in the plastic near the optical drive frame. Route the power cable through this cutaway.

  28. 这个步骤还没有翻译 帮忙翻译一下

    : 步骤 28 中的图像 1,1
    • Carefully lean the logic board forward, just enough to access the rear side.

    • Connect one end of the SATA data cable to the secondary SATA data socket on the logic board.

  29. 这个步骤还没有翻译 帮忙翻译一下

    : 步骤 29 中的图像 1,3 : 步骤 29 中的图像 2,3 : 步骤 29 中的图像 3,3
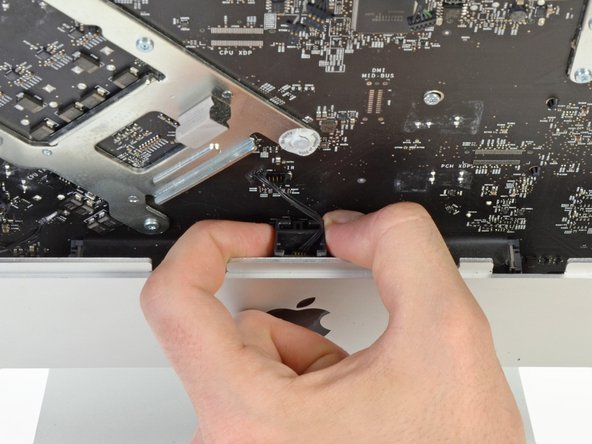
    • Start leaning the logic board back into the iMac.

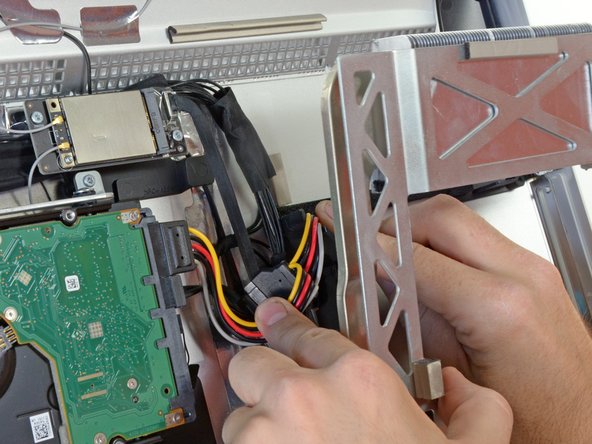
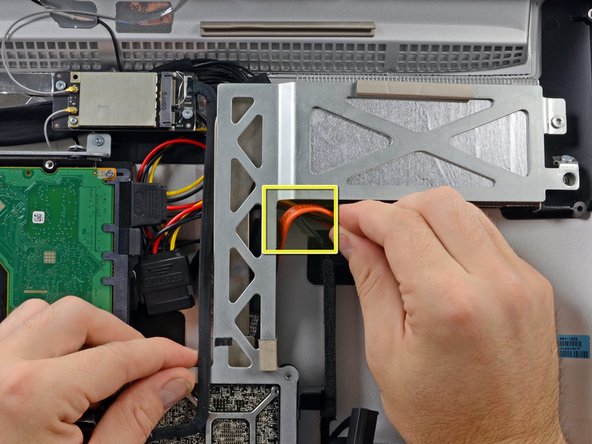
    • Route the SATA data cable underneath the edge of the metal plate behind the logic board.

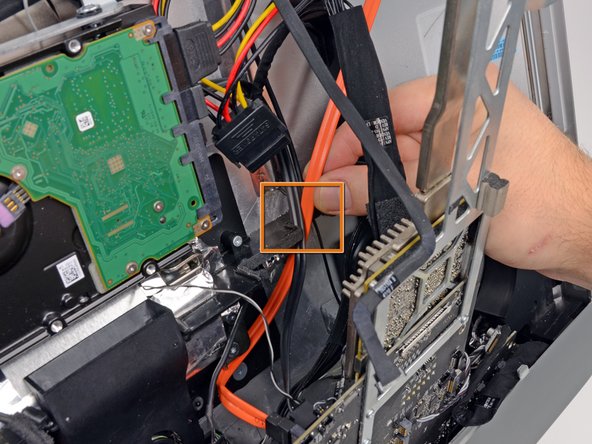
    • Continue routing the SATA cable up through the cable slot in the plastic frame.

    • Finish routing the SATA cable though the cutaway in the plastic frame near the optical drive, just below the GPU heat sink.

    • The SATA data cable should be laid over the SATA power cable that is already routed through this cutaway.

  30. 这个步骤还没有翻译 帮忙翻译一下

    : 步骤 30 中的图像 1,2 : 步骤 30 中的图像 2,2
    • Connect the SATA power and data cables to the secondary hard drive.

  31. 这个步骤还没有翻译 帮忙翻译一下

    : 步骤 31 中的图像 1,2 : 步骤 31 中的图像 2,2
    • After removing the backing from the adhesive pads, press the secondary hard drive firmly against the aluminum frame of the iMac.

终点

114等其他人完成本指南。

Brett Hartt

于04/12/10注册

127,941 声望

创作了143篇指南

团队

iFixit iFixit 的会员

Staff

136 名成员

创作了17,299篇指南

27条评论

Adding a SSD drive for the system was a simple process and has completely transformed my old i3 iMac - definitely worth the money and effort

adrianpearmund - 回复

5 hours an IT support officer. This task is not for the feint hearted. A guide from OWC suggested locating SSD near HDD and this proved easier for me. This guide was accurate and the many images were very helpful. Thanks.

KrazeyNKrusty - 回复

<i>Apple never sold the 2010 27" iMac with the option of having a second hard drive,</i>

This isn't true. Mine has a 256GB Apple-installed second drive.

seligerj - 回复

Great guide. I followed it but found after removing the logic board there was no secondary sata port!!! Either way I hooked up the original hard drive to power and temp sensor to stop the fan spin up and used the sata for the SSD so works great. One problem! My sound is now greyed out? Any physical reason for this? When the imac powers on it makes a sound but no sounds in Mac OS. I feel it must be physical not software related.

Damian Wright - 回复

I had a 15cm SATA cable, which is too short to reach an SSD under the Optical Drive. I ended up putting the SSD right on top of the hard drive (then 15cm is just enough).

oluc - 回复

添加评论

浏览统计数据:

过去 24 小时: 7

过去 7 天: 72

过去 30 天: 333

总计 169,961