跳转到主内容

Installing iMac Intel 24" EMC 2111 Dual Hard Drive

你所需要的

  1. Installing iMac Intel 24" EMC 2111 Dual Hard Drive, Access Door: 步骤 1 中的图像 1,2 Installing iMac Intel 24" EMC 2111 Dual Hard Drive, Access Door: 步骤 1 中的图像 2,2
    • Loosen the two Phillips screws securing the access door to your iMac.

    • Both screws remain captive within the access door.

    • Remove the access door.

  2. Installing iMac Intel 24" EMC 2111 Dual Hard Drive, Front Bezel: 步骤 2 中的图像 1,1
    • Remove the following screws along the lower edge of your iMac:

    • Three 6 mm T8 Torx screws

    • One 8 mm T8 Torx screw

  3. Installing iMac Intel 24" EMC 2111 Dual Hard Drive: 步骤 3 中的图像 1,2 Installing iMac Intel 24" EMC 2111 Dual Hard Drive: 步骤 3 中的图像 2,2
    • Lay your iMac stand-side down on a flat surface.

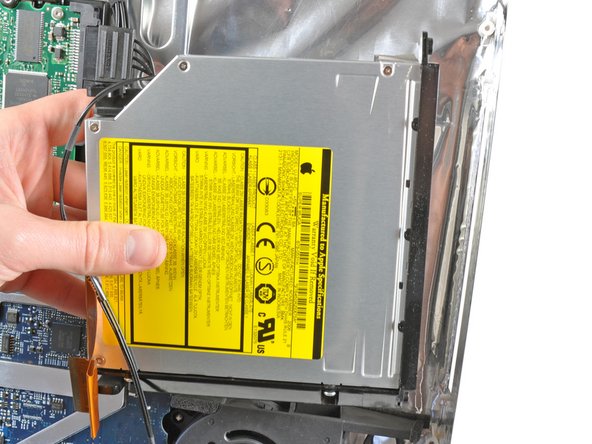
    • To lift the front bezel off the iMac, simultaneously:

    • Use your thumbs to press in the RAM arms and hold the iMac down.

    • Use your index fingers to pull the small bridge of material on the front bezel toward yourself.

    • Pull the front bezel up with your index fingers.

    • Once the small bridge of material has cleared the RAM arms, lift the front bezel by its lower edge just enough to clear the bottom edge of the rear case.

  4. Installing iMac Intel 24" EMC 2111 Dual Hard Drive: 步骤 4 中的图像 1,3 Installing iMac Intel 24" EMC 2111 Dual Hard Drive: 步骤 4 中的图像 2,3 Installing iMac Intel 24" EMC 2111 Dual Hard Drive: 步骤 4 中的图像 3,3
    • Lift the front bezel off the rear case and rotate it away from the bottom edge of the iMac, minding the camera and microphone cables still attached to its upper edge.

    • The third picture shows the top front bezel brackets and their slots cut into the top edge of the iMac's rear case.

    • Do not completely remove the front bezel, as it is still attached by the camera/microphone cables.

  5. Installing iMac Intel 24" EMC 2111 Dual Hard Drive: 步骤 5 中的图像 1,1
    • If necessary, remove the strip of tape covering the microphone cable connector.

    • The microphone connector is located near the inside of top edge of your iMac.

  6. Installing iMac Intel 24" EMC 2111 Dual Hard Drive: 步骤 6 中的图像 1,3 Installing iMac Intel 24" EMC 2111 Dual Hard Drive: 步骤 6 中的图像 2,3 Installing iMac Intel 24" EMC 2111 Dual Hard Drive: 步骤 6 中的图像 3,3
    • Disconnect the microphone cable.

    • Disconnect the camera cable by pulling its connector away from the socket on the camera board.

    • The camera cable connector and socket are delicate and easily bent. Remove with caution.

  7. Installing iMac Intel 24" EMC 2111 Dual Hard Drive, Display Assembly: 步骤 7 中的图像 1,2 Installing iMac Intel 24" EMC 2111 Dual Hard Drive, Display Assembly: 步骤 7 中的图像 2,2
    • Peel the two highlighted EMI shield tabs off the frame of the LCD.

  8. Installing iMac Intel 24" EMC 2111 Dual Hard Drive: 步骤 8 中的图像 1,1
    • Remove the two T6 Torx screws securing the display data cable to the logic board.

  9. Installing iMac Intel 24" EMC 2111 Dual Hard Drive: 步骤 9 中的图像 1,1
    • Pull the black plastic tab attached to the display data cable connector to disconnect it from the logic board.

  10. Installing iMac Intel 24" EMC 2111 Dual Hard Drive: 步骤 10 中的图像 1,2 Installing iMac Intel 24" EMC 2111 Dual Hard Drive: 步骤 10 中的图像 2,2
    • Use your fingertips to pull both sides of the wide inverter cable connector out of its socket on the logic board.

    • De-route the inverter cable from its location next to the CPU fan.

  11. Installing iMac Intel 24" EMC 2111 Dual Hard Drive: 步骤 11 中的图像 1,1
    • Before attempting this step, we recommend laying your iMac stand-side down on a table to avoid the display falling down.

    • Remove the eight T8 Torx screws securing the display assembly to the rear case.

    • It is helpful to use a thin magnetized screwdriver to remove these screws.

  12. Installing iMac Intel 24" EMC 2111 Dual Hard Drive: 步骤 12 中的图像 1,1
    • Remove the display assembly from the iMac.

  13. Installing iMac Intel 24" EMC 2111 Dual Hard Drive, Optical Drive: 步骤 13 中的图像 1,1
    • Remove the strip of tape covering the optical drive cable connector.

  14. Installing iMac Intel 24" EMC 2111 Dual Hard Drive: 步骤 14 中的图像 1,2 Installing iMac Intel 24" EMC 2111 Dual Hard Drive: 步骤 14 中的图像 2,2
    • Gently pull the cable retainer on the optical drive cable ZIF socket toward the right side of the iMac.

    • The retainer should move about 1 mm and stop. Do not attempt to remove the retainer.

  15. Installing iMac Intel 24" EMC 2111 Dual Hard Drive: 步骤 15 中的图像 1,1
    • Pull the optical drive ribbon cable out of its socket, being careful not to rip it in the process.

  16. Installing iMac Intel 24" EMC 2111 Dual Hard Drive: 步骤 16 中的图像 1,1
    • Pull the optical drive thermal sensor connector toward the right side of the iMac to disconnect it from the logic board.

  17. Installing iMac Intel 24" EMC 2111 Dual Hard Drive: 步骤 17 中的图像 1,1
    • Peel off the strip of EMI tape attaching the right side of the optical drive to the rear case.

  18. Installing iMac Intel 24" EMC 2111 Dual Hard Drive: 步骤 18 中的图像 1,1
    • Push down on the optical drive bracket retaining clip while pulling the top edge of the optical drive away from the rear case.

  19. Installing iMac Intel 24" EMC 2111 Dual Hard Drive: 步骤 19 中的图像 1,2 Installing iMac Intel 24" EMC 2111 Dual Hard Drive: 步骤 19 中的图像 2,2
    • Rotate the optical drive slightly toward the bottom edge of the iMac while pulling it away from the rear case to release the lower retaining clip.

    • Pull the optical drive away from the right side of the rear case and remove it from the iMac.

  20. Installing iMac Intel 24" EMC 2111 Dual Hard Drive, Optical Drive Cable: 步骤 20 中的图像 1,1
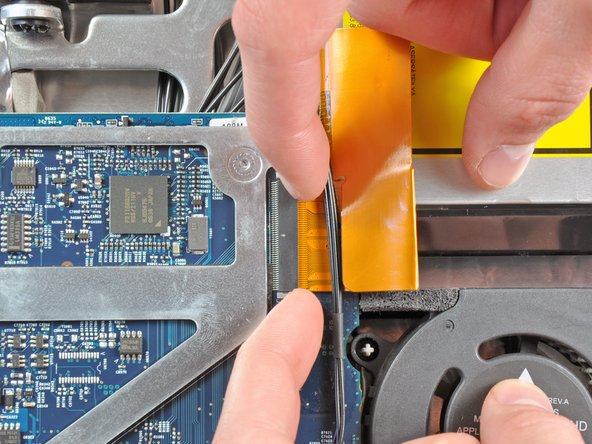
    • Remove the two T6 Torx screws securing the optical drive cable to the optical drive.

  21. Installing iMac Intel 24" EMC 2111 Dual Hard Drive: 步骤 21 中的图像 1,1
    • Insert the flat end of a spudger into the gap between the optical drive cable connector and the optical drive.

    • Twist the spudger to separate the connector from the optical drive.

    • Repeat this process for both sides of the connector.

  22. Installing iMac Intel 24" EMC 2111 Dual Hard Drive: 步骤 22 中的图像 1,1
    • Pull the optical drive cable connector away from the optical drive.

  23. Installing iMac Intel 24" EMC 2111 Dual Hard Drive, Optical Drive: 步骤 23 中的图像 1,1
    • Use the flat end of a spudger to remove the pieces of EMI foam from the underside of the optical drive.

    • Don't forget to transfer these to your new drive.

  24. Installing iMac Intel 24" EMC 2111 Dual Hard Drive: 步骤 24 中的图像 1,1
    • Remove the two T10 Torx screws from the side of your optical drive.

  25. Installing iMac Intel 24" EMC 2111 Dual Hard Drive: 步骤 25 中的图像 1,1
    • Remove the two T10 Torx screws from the side of your optical drive.

  26. Installing iMac Intel 24" EMC 2111 Dual Hard Drive: 步骤 26 中的图像 1,1
    • Use the tip of a spudger to push the two optical drive bracket tabs out of their slots in the top of the optical drive.

  27. Installing iMac Intel 24" EMC 2111 Dual Hard Drive: 步骤 27 中的图像 1,1
    • Using the tip of a spudger, press the optical drive bracket tab out of its slot on the side of the optical drive.

  28. Installing iMac Intel 24" EMC 2111 Dual Hard Drive: 步骤 28 中的图像 1,1
    • Use the tip of a spudger to press the optical drive bracket tabs out of the slots in the top of the optical drive.

  29. Installing iMac Intel 24" EMC 2111 Dual Hard Drive: 步骤 29 中的图像 1,1
    • Pull the optical drive bracket toward the open end of the optical drive to free it from the optical drive.

  30. Installing iMac Intel 24" EMC 2111 Dual Hard Drive: 步骤 30 中的图像 1,1
    • Use the flat end of a spudger to pry the optical drive thermal sensor off the adhesive securing it to the optical drive.

    • Don't forget to transfer the optical drive thermal sensor to your new drive.

    • If you have a disk or anything else stuck inside your optical drive, we have a guide to remedy the situation.

  31. Installing iMac Intel 24" EMC 2111 Dual Hard Drive, Optical Drive Enclosure Faceplate: 步骤 31 中的图像 1,1
    • Remove the three 3.0 mm Phillips screws from the optical bay enclosure.

  32. Installing iMac Intel 24" EMC 2111 Dual Hard Drive: 步骤 32 中的图像 1,3 Installing iMac Intel 24" EMC 2111 Dual Hard Drive: 步骤 32 中的图像 2,3 Installing iMac Intel 24" EMC 2111 Dual Hard Drive: 步骤 32 中的图像 3,3
    • Starting from the left edge, gently pull open the optical bay enclosure.

    • Continue to pull open the two halves of the enclosure until they separate.

  33. Installing iMac Intel 24" EMC 2111 Dual Hard Drive: 步骤 33 中的图像 1,1
    • Remove the two 3.0 mm Phillips screws securing the faceplate to the optical bay enclosure.

  34. Installing iMac Intel 24" EMC 2111 Dual Hard Drive: 步骤 34 中的图像 1,3 Installing iMac Intel 24" EMC 2111 Dual Hard Drive: 步骤 34 中的图像 2,3 Installing iMac Intel 24" EMC 2111 Dual Hard Drive: 步骤 34 中的图像 3,3
    • Lift the black plastic faceplate out of the optical bay enclosure.

    • You will no longer need the faceplate or the two Phillips screws that held it in place. Set those parts aside if you ever wish to put the faceplate back into the enclosure.

    • Reassemble the optical bay enclosure without the faceplate, reusing the original three 3.0 mm Phillips screws to keep it intact.

  35. Installing iMac Intel 24" EMC 2111 Dual Hard Drive, Dual Hard Drive: 步骤 35 中的图像 1,2 Installing iMac Intel 24" EMC 2111 Dual Hard Drive, Dual Hard Drive: 步骤 35 中的图像 2,2
    • Remove the plastic positioner from the optical bay hard drive enclosure by pressing in on one of the clips on either side and lifting it up and out of the enclosure.

  36. Installing iMac Intel 24" EMC 2111 Dual Hard Drive: 步骤 36 中的图像 1,3 Installing iMac Intel 24" EMC 2111 Dual Hard Drive: 步骤 36 中的图像 2,3 Installing iMac Intel 24" EMC 2111 Dual Hard Drive: 步骤 36 中的图像 3,3
    • Make sure that the hard drive connectors are facing down before placing it into the enclosure.

    • Gently place the hard drive into the enclosure's hard drive slot.

    • While firmly holding the enclosure in place with one hand, use your other hand to press the hard drive into the enclosure connectors.

  37. Installing iMac Intel 24" EMC 2111 Dual Hard Drive: 步骤 37 中的图像 1,2 Installing iMac Intel 24" EMC 2111 Dual Hard Drive: 步骤 37 中的图像 2,2
    • Once the hard drive is snug, reinsert the plastic positioner while holding the hard drive against the bottom of the enclosure.

    • Reconnect any cables you have removed from the original optical drive onto the optical bay enclosure.

结论

To reassemble your device, follow these instructions in reverse order.

10等其他人完成本指南。

Brittany McCrigler

于03/05/12注册

88,898 声望

创作了131篇指南

团队

iFixit iFixit 的会员

Staff

136 名成员

创作了16,558篇指南

0条评论

添加评论

浏览统计数据:

过去 24 小时: 0

过去 7 天: 5

过去 30 天: 21

总计 14,393