简介
这个指南会帮助您在您的21.5英寸iMac上安装第二块2.5英寸SATA接口的机械或者固态硬盘。需要注意的是,本指南仅适用于2011年中期EMC 2428版本的iMac。
Youtube视频:
你所需要的
视频概述
-
-
轻轻地将黑色塑料记忆体拉片从记忆体插槽中滑出。
-
将黑色塑料卡舌从iMac的底部边缘拉出,以弹出记忆体托架另一侧的模块。
It is far harder than I thought you have to pull REALLY hard and then there will be a little click and than you can gently pull out the RAM.
Press really hard, to the point you think you’ll cut your thumb, you’ll hear a slight ‘click’. If it’s not properly installed, the iMac will ‘beep, beep, beep’ In protest upon booting…
Brian -
I found it best to make use of the factory ‘pull tabs’. Much much easier than trying to pull the ram out by hand. It may seem like a good idea but, don’t be tempted to use pliers.
Brian -
Thanks for your Useful guide …. iMac Intel 21.5" EMC 2428 RAM Replacement was performed step by step on my Imac and every thing is perfect right now.
I was able to remove one side of the ram, but the other side would not budge. I was afraid that I was going to rip the plastic tab out of the computer. Any suggestions?
is it completely manditory to take out the ram? why not just keep it in? for some guides for replacing other components you dont have to, but in some you do. why is this the case? does it have to do with not getting shocked because there is power stored in there or some other reason? i was just wondering tho...
-
-
-
記憶體金手指上會有一個小凹槽(如圖一),請確認它與記憶體槽的突起位置相符
-
當你定位好記憶體後,輕輕地將其放入插槽內,並用拇指用力地將其卡進插槽裡
When reinstalling RAM in this machine or any iMac with upgradable RAM slots push hard to get them to go in (Apple really did make this one harder than it needed to be). If you don't push hard it won't go in and your computer won't work. (trust me on this learned the hard way)
I am having trouble with bottom 2 slots. As I get beeping sounds when using them. When removed it boots properly. I tried & tried to push the 2 , 2GB ram modules into the bottom slots BUT all get is beeping. Guess I have to settle for 4GB Rather than 8 unless someone has a suggestion.
Try swapping the to the other slots & don’t forget to press really hard until you hear the ‘click’.
Brian -
Is there an expirience to settle 1600 MgH Ram instead 1333 MgH manual required?
Added 16GB for a total of 20GB, runs great, do make sure of the “click”, the beep is disturbing
2x2 GB 1333 MHz RAM were installed as delivered. I couldn’t manage to get those two out of their slots. I don’t want to damage anything. So, I put 2x8 GB RAM 1333 MHz RAM bars in the other two empty spare slots to have 20 GB RAM in total. The iMac runs fine with it. As described above, make sure to push RAM until they ‘click’ in completely.
Why are we taking out the RAM modules just to put them back in on the next step ?
-
-
-
在玻璃面板顶部的两个角上放置吸盘。
-
如果您的吸盘无法吸住,尝试使用温和溶剂清洁玻璃面板和吸盘。
Another comment on DATA & LCD Temp. Sensor cables: I had to remove the vertical sync, and the backlight cable, however, if you have an assistant or/can carefully rotate the screen clockwise/and then have it held up about 5" to 6" at a slight angle, you do not need to remove LCD data cable or LCD thermal cable, however - IMPORTANT: you must have a second pair of hands/or way to securely prop up the LCD. Also, don't rotate too much, since then you will pull out LCD data cable, and it renders the whole exercise moot, or can damage the cable or connector.
You don't need suction cups. The screen, held by magnets, can simply be pried off using a very thin blade such as a screw driver and fingers.
That's a bad idea. using a metal tool to pry off glass is likely to end with an expensive broken front glass.
Suction cups are common. Find a couple and do it the safe way. I use some cheap ones that came with iPhone repair kit.
No need for suction cups, I just stuck my nails (short like guys usually have) between the top part of the screen and body, and it came off easily. I've never done it before, so it seems to be very easy.
Just completed the replacement of the optical drive with an SSD using an OWC Data Doubler kit. Attempted to remove the optical drive without disconnecting any cables but found it a bit fiddly to orient the screen for good access. I bit the bullet and disconnected them and found the process less daunting than I imagined. Reconnecting them was similarly straightforward if you're careful.
Tip: you can skip the step for removing the optical drive thermal sensor connector from the motherboard. Still need to remove the sensor from the optical drive but you can leave that hanging and reattach it to the SSD later.
I’ve just successfully installed a 1TB SSD in place of my optical drive thanks to the information here- thank you to everyone who has contributed!
3 comments- the procedure described here seems to vary between HD replacement and dual HD/optical drive replacement. This can be confusing at times.
Expect there to be minor differences between the layout described and what you find when you open up your iMac. There are also, surprisingly, differences between the HD enclosure description, and the article provided by ifixit.
I was able to replace the DVD/HD enclosure single-handedly without fully removing the LCD, or deconnecting any of the cables (steps 5-11). It’s a bit cramped, and fiddly, but I was not happy removing any of the cables despite watching videos, etc., since they all seemed to involve applying more force than I was comfortable with. A more detailed description of how to release them might have helped, but even here, there may be minor variations even within the 2389 model.
Good luck!
ivan birks - 回复
Fingernails are all you need to free the glass from its magnetic hold. If you don’t have them, slip something thin and plastic, like a spudger, at a top corner.
Max Powers - 回复
Minha dúvida é a seguinte: após o técnico trocar o HD do meu iMac de 21,5 polegadas, a câmera parou de funcionar. Seria por causa da troca do HD? Tem solução?
Creio que o cabo da camera não foi plugado ou deu mau contato… ou até danificado.
glecyo@gmail.com
I can’t get my glass to budge. I’m replacing a cracked one and now it’s about to shatter.
I know that I'm replying really late but I advise to use clear tape over any cracks so the cracks don't get bigger
Check for chips in the glass BEFORE you do this step. If there is a chip when you pull up with the suction cups you will wind up with a jagged mess. If you do have a chip I would advise covering the screen near the chip with clear tape of some kind before lifting out. Mine shattered right at the chip and the resulting glass dust cloud got all over. My solution was buying a new glass screen.
-
-
-
轻轻地竖直提起玻璃面板到足够高的高度来接触玻璃面板顶部下的卡扣。
-
将玻璃面板拉离iMac的下部,并将面板放在一边。
What's the best product to clean the face of the LCD?
Microfiber Cloth
Try your best not touch it in the first place
Brian -
Wearing Nitrile or regular surgical gloves helps prevent finger prints if you accidentally touch the glass.
amiller770 - 回复
I use a Swiffer duster from above at the last moment before I let the magnets grab the glass cover. This has worked so well the last dozen or so times I’ve replaced a glass cover since I never have access to a “clean room” and don’t wear a “bunny suit”.
Also, more dust will shed from your skin if you’ve just taken a shower, so I like to finish these repairs in the morning before a shower.
-
-
-
移除8颗将显示屏与外壳固定的8mm T10 梅花螺丝。
The metal near the screws is VERY magnetic. Honestly, the hardest and by far most frustrating step was trying to put these screws back in.
I ran into the same problem - easily the most frustrating part of this process. To help deal with it, I took a drinking straw, cut it to be about 2 inches long, and used it as a chute to guide the screw to the hole. Dropping the screw down the straw, it'd still stick to the side due to the magnets, but using my screwdriver, it was easy to push the screw down to where it needed to go, and the straw kept the screw from being pulled out of place by the magnets.
josh -
Hmm… yes, the magnets sucks - literally. But if you use a normal screwdriver or a bit, the screwdriver tip or the bit can be “loaded” by the magnets too. Just move the screwdriver (or bit) over one of the magnets and then “plug” the screw onto the screwdriver’s tip (or bit). It will be held by magnetic force. Just enough to move the screw vertically and very slowly into the whole.
There are some special screwdriver on the market with “claws” to hold screws, but they are hard to find/to buy and expensive. I sometimes use superglue (a LITTLE) to temporary fasten the screw at the screwdrivers tip. This technique can be used with destroyed screw heads too to optimize adhesion.
Replacing these screws was like playing the most difficult game of “Operation” imaginable. I wish I’d seen the tip about using a straw before I started playing!
-
-
-
小心地从顶部将显示屏从外壳中提起。
The harddisk can be removed WITHOUT the next steps. The opening angle of the partially lifted LCD display gives enough room to untighten the two Torx T9 screws of the hard disk bracket, to unplug the two SATA connectors and to carefully lift out the harddisk. There is absolutely no need to dismantle the whole thing.
All you need is a screwdriver which fits into the room. I’ve used the “Pro Tech Toolkit” from iFixit. The screwdriver with Torx T9 bit fits perfectly.
The other “tool” you need is either someone who holds the LCD plate or the inner leftover of a kitchenroll, a scrunched paper, a small towel or similar which has to be stuffed between the logic boards and the LCD plate to keep the LCD at its lifted place (careful! don’t unplug any of the cables).
I’ve opened and changed the harddisks of those 21,5 iMacs a dozen times with the help of the “Pro Tech Toolkit” and a kitchen roll.
If i want to replace the HD with a SSD, can i still skip the next steps? I think i can’t because i need to change the termal censor, but i would like an other opinion please.
Danois -
“Kitchen Roll” - paper towel core.
kyoder11 -
You can absolutely replace the drive without removing any cables. It's a little tight, you need your torx driver to be short enough to fit in the limited space. Be careful not to put any pressure on the cables (the one nearest the front is a good guide of how much space you have to play with). It's helpful to have another set of hands to hold it up while you remove the drive, but I just did it by holding the display up with one hand and it wasn't that hard to remove and replace the drive.
I wouldn't install any thermal sensor, just use something like Macs Fan Control (free) to adjust the fans so they don't race out of control.
Hia,
thx to IFIXIT and 20+ years of computer repair and building experience (all PC) there was no problem at all to remove a 500 Gb HDD from a mid 2011 iMac and replace it with an 500 Gb SSD Drive (with help from Comtec EDV, where i bought the upgrade kit).
Skip the steps where people are advised to remove the display. Due to my experience it is def better to leave cables and plugs where they are. I lifted the display 12 cm and fixed this position w/ one pencil in each front corner of the case where the other end of the pencil sticked in ascrew hole of the display-frame. Very easy to operate afterwards! No probs w/ the screws of the hdd-frame.
Some care-taking of static electricity is advised - wear a wrist cable. And don’t forget to press start button after having removed power chord. I had an Android Tablet on the right side, where i could watch these ifixit pages :-)
thx to IFIXIT!
w/ regards from cantbtroo from Berlin
Thank you ifixit for the guide. Like so many others I jumped from step 4 to step 10 and left all the cables intact. Felt much safer doing so. Papertowel cores secured the LCD to higher position. There was enough room to remove the old HDD and replace it with a SSD drive.
Cheers!
-
-
-
将垂直同步电缆连接器从iMac左上角附近的LED驱动板上的插座中拔出。
Tried doing this on my iMac, but this cable would not come out for love or money. No matter what I did, I could not unplug this cable. My iMac is the same 21inch 2011 as this one. Any advice would be greatly appreciated.
louis.barr - 回复
I was tempted to forgo steps 4-10 but found the inside of the case to be very dusty and decided to do the full disassemble. I struggled getting this vertical sync cable connector out. The trick that worked for me was to prop the display up using a pair of toilet paper tubes then using the fingernails of both thumbs, one on each side of the connector and it came out easily.
-
-
-
将显示器从外壳旋转到足以将LED背光电源电缆从LED驱动板上断开。
Slip a thumbnail under the “front” (toward the top of the iMac) of the connector to release its clamp from the retaining ridge. Then push toward the “back” (bottom of iMac).
-
-
-
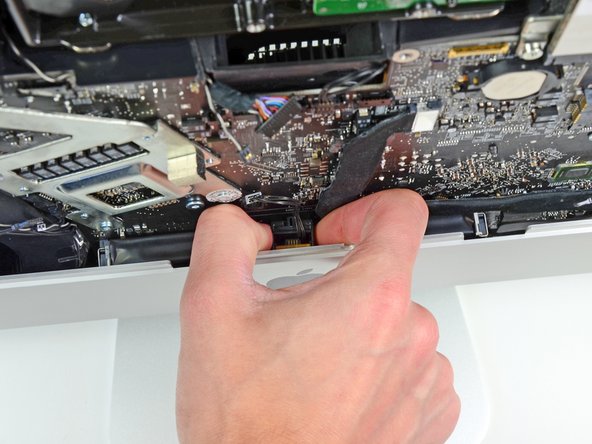
抓住固定在显示数据电缆锁上的塑料拉片,并向上旋转。
-
将显示数据线直接从逻辑板上的插座中拔出。
I am having a difficult time reattaching the LCD cable. A better description or any tips would be useful here.
Me too — ditto that.
https://eshop.macsales.com/item/OWC/DIDI... —> abt. 5:30 into the vid. Handle up to slide in, then flip it down to lock the connector in place.
The connector needs to be carefully pushed in parallel to the board with a surprising amount of pressure and the pull tab must be folded back. Not super fragile, but not strong either.
I really wish that the fagility of this connector was mentioned in Step 10 or 11.. When i rotated the screen on step 11.. It pulled this connector out and now I can't get it back in.. I hate computers.. HA!
This is the most painful part of the whole event. Replacing this cable took me around 30 minutes !
I have tried and tried to get this cable back in. How do I know if I have messed it up?
Mine seems to be…upside down? Looks like the little flappy lock thing is on the bottom as opposed to it being in top as pictured?
I agree with everybody that this is the critical step in this fix. Removing it is not that difficult, the description is quite accurate, but I would highlight that the “rotate” part of the step could be detailed: the black plastic tab is attached to the metal lock (golden colored) , which should rotate into the direction of the cable almost 180 degrees to unlock the connector. After doing this you can pull the cable out of the connector, PARALLEL to the board and away from the connector. It travels a very short distance to disconnect. After going through the rest of the steps to remove the display, take some time to examine closely the connector and understand what you have to do to reconnect it on assembly. It helps to fully visualize beforehand, since on reassembly it is difficult to see properly.
Magnifying glasses are needed for this step. Carefully study the cable and how it attaches to the connector. Take a few pictures to help. This is the most difficult step.
-
-
-
断开LCD热传感器电缆连接器与逻辑板上的插座的连接。
I managed to damage the LCD thermal sensor socket in the logic board. Now the connector won’t stay in place. I know the missing thermal sensor should cause the fans to spin up (they do spin up after a while), but the screen is blank.
I connected an external monitor and it works fine, so it doesn’t seem to be a graphics or logic board issue. I also replaced the LED driver board with one from a working iMac, to no effect.
Can the missing thermal sensor be causing this?
Having the same problem. Black screen, works fine with external display.
Passerby -
-
-
-
小心地将显示器拉向iMac的顶部边缘,然后将其从外壳中取出,注意可能被卡住的任何电缆。
Btw, I was pretty safe (& content) with two suction cups - i bought 3 for less than 7 Euros. They were a good help for a glass that hasn’t been removed since 2011. But i am sure fingernails will do a good job, too (of course not mine, cos i have short ones).
At the end of the job it was even possoible to clean the fan that sucks cool air into the iMac (w/ a paintbrush and a controllable vaccuum cleaner). After that, it’s also a good opportunity to clean the air inlet that is part of the aluminium case (behind the stand - it’s always dusty).
w/ regards from cantbtroo, Berlin
-
-
-
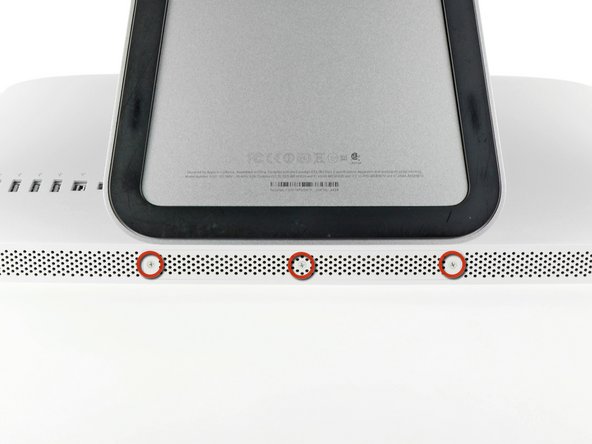
將以下4顆螺絲移除
-
一個頂端比較大的9.3mm T10六角星型螺絲
-
三個頂端為正常大小的9.3mm T10六角星型螺絲
In my case the red screw was on the lower left side near the power-data cable!
Same for me.
-
-
-
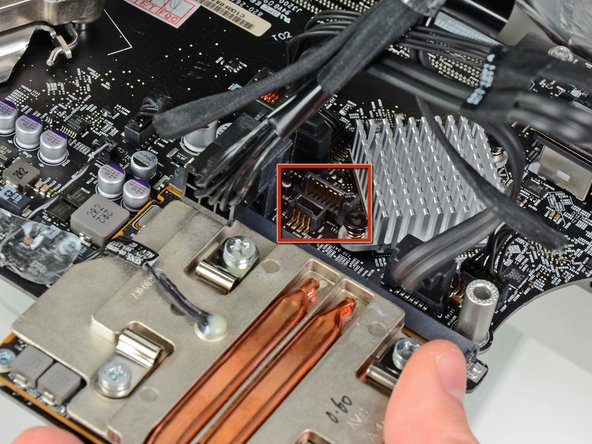
將光碟機的溫度感應器從主板上圖片位置的插槽上拔下,請平行於主板拔出
The thermal sensor connector shown in the red box is the one for the hard drive, not the optical drive. The optical drive sensor attaches to motherboard near bottom left of optical drive fan.
The guide was correct in my case that this is the Optical Drive sensor. The board has “ODD Temp” written on it. Original HD has it’s own built in temperature sensor without a separate cable to the Motherboard, which is why OWC sells a special “In-line Thermal Sensor” SATA cable with a Temp. sensor that attaches to any new hard drive itself.
amiller770 - 回复
When I was removing the optical drive cable sensor the connector came loose from the board. Is there any way to repair this?
-
-
-
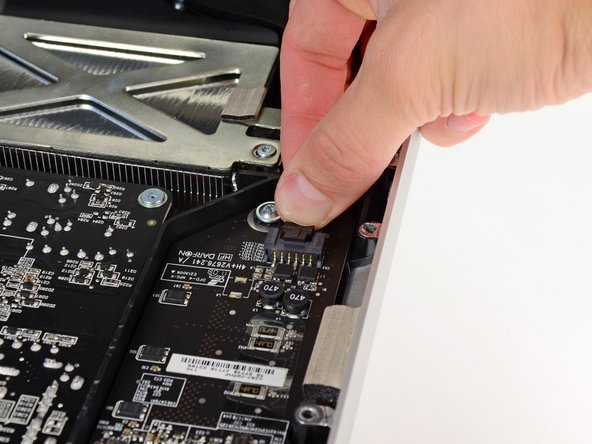
將光碟機從顯卡熱管旁的縫隙抬起,並將其連著線移出
-
小心的將光碟機從機殼右側的固定扣抽出,以騰出空間拔除光碟機連接線
-
當你拔掉光碟機溫度傳感器後,你可以讓光碟機垂下來
On the reassembly, I found threading the optical drive cable back under the GPU frame trying. Here’s some advice: Take some dental floss, form a loop, and feed that loop under the GPU frame. Put the cable into the loop of floss, tighten the loop, and pull the loop back through. This is much easier, faster, and far less frustrating.
-
-
-
-
將光碟機傳輸線拔除
-
將光碟機從iMac上拿出
I have already installed the second SSD drive, but due to the size of the drive I need to change it with another SSHD 1 TB drive. Am I right that I have to follow the instructions up to Step 18? Because The SSD is already behind the optical drive, so what I need to do is remove it and install the new SSHD drive and put everything back again. Please confirm.
This was my only error on reassembly. The SATA cable must be under the black plastic prong. I did not want to pull to logic board again. I managed to bend the black plastic bits and get the cable in the right place.
-
-
-
將插在主板上的風扇供電線取下
-
將風扇取下
If you happen to forget to plug the fan in before you re-install the fan, instead of trying to plug it in while it's in there just take the fan back out...I've heard from a friend who did that... :-D
-
-
这个步骤还没有翻译 帮忙翻译一下
-
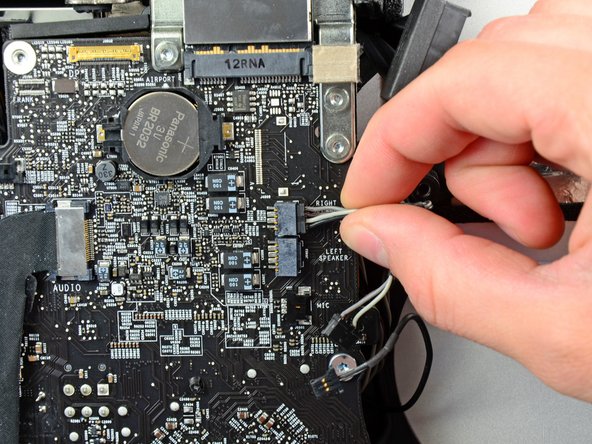
In the proceeding steps, you will disconnect the following cables:
-
SD Board
-
Left/Right Speaker and Microphone
-
Audio Port
-
Wi-Fi Antenna
-
Right Temperature Sensor, Bluetooth/Ambient Light Sensor/Camera/Left Temperature, and Hard Drive Fan
-
CPU Fan/Ambient Temperature and Power Button
-
IR Sensor
-
-
这个步骤还没有翻译 帮忙翻译一下
-
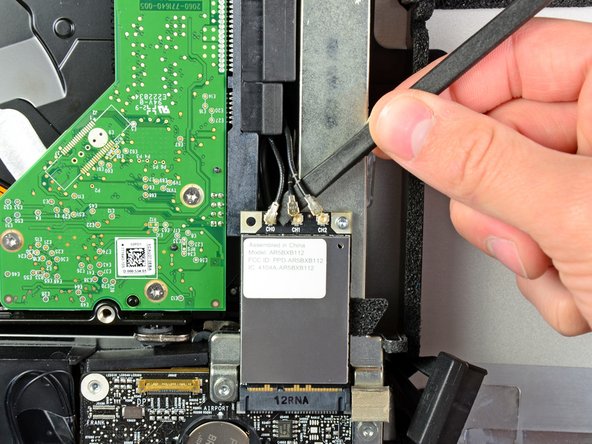
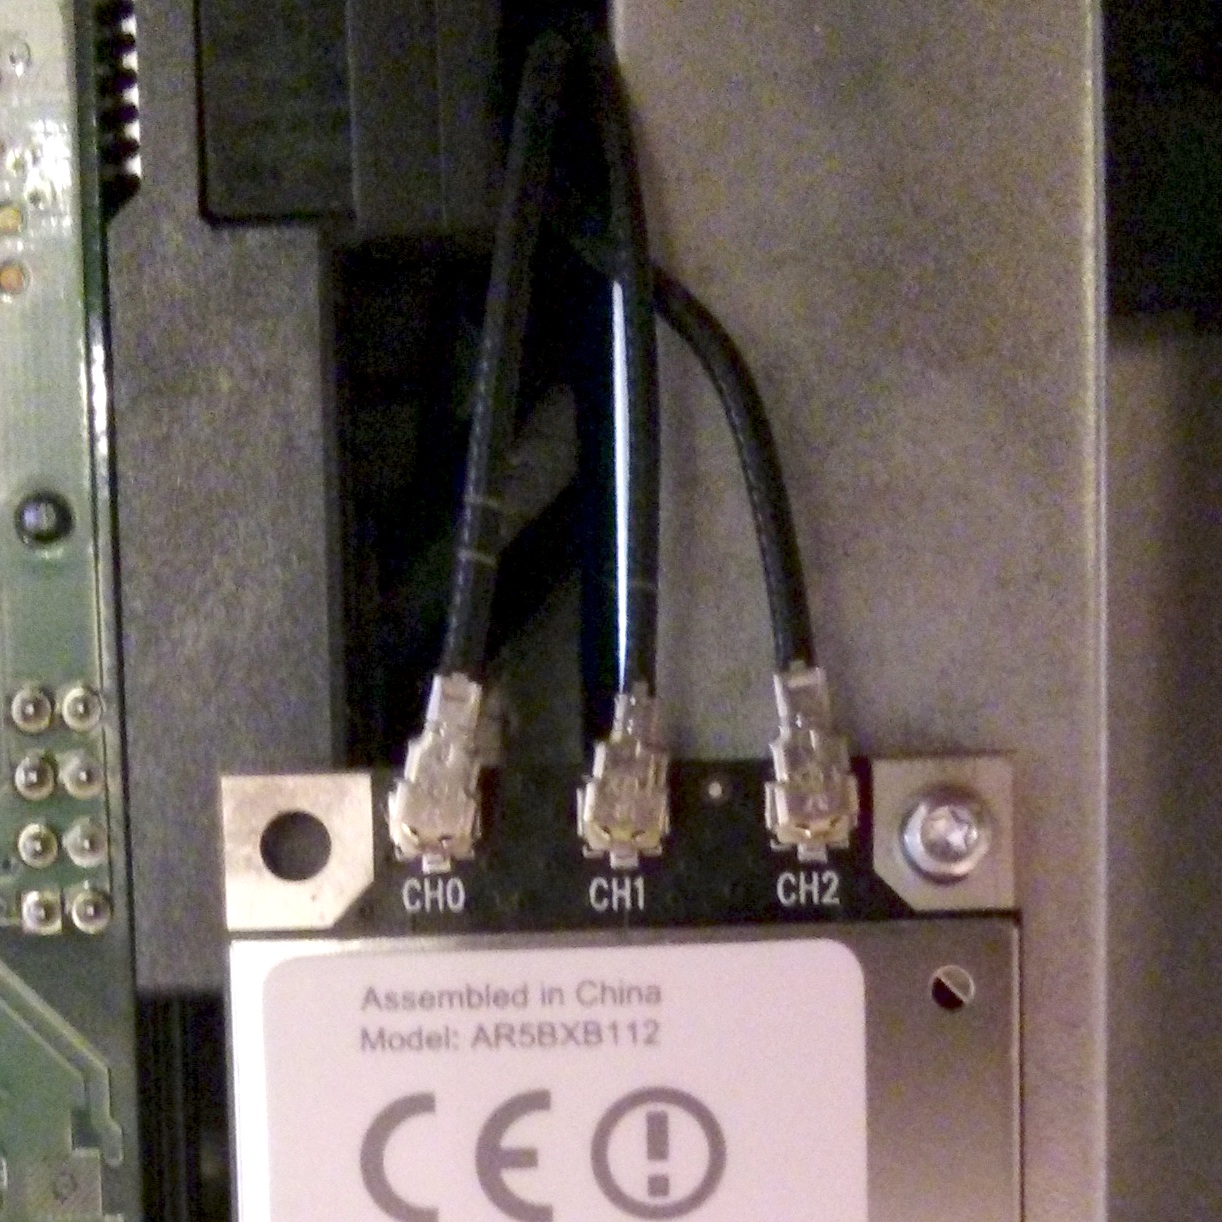
Use the flat end of a spudger to pry all three AirPort antenna connectors up from their sockets on the AirPort board.
For me it was originally the reverse order. No stripes for ch2, one for ch1 and two for ch0
As another user already posted, cables can be in the reverse order as depicted on the guide. Pay attention before disconnecting them.
E.g.:
To simplify this and since there seems to be some variable set ups, take a digital picture of the way it is before following this step so that you can put it back the way it was. (If no digicam then draw yourself a note with paper and pen).
Also for me reversed.
Also reversed for mi
I broke the pins, how can I repair it? Or where can I buy a new module? My pins are reversed as well
-
-
这个步骤还没有翻译 帮忙翻译一下
-
Use your thumbnails to push the right temperature sensor connector toward the top edge of the iMac and out of its socket.
Yeah, my wires came out without the socket connector. Then I tried pulling out the connector to fix and it was damaged. I’m going to try putting the wires back in independently. We’ll see how that goes…
John Knoop - 回复
-
-
这个步骤还没有翻译 帮忙翻译一下
-
Pull the power button connector toward the bottom left corner of the iMac to disconnect it from its socket on the logic board.
Mine broke as well. At least it is only 50/50 chance. Plan to put together at the end - screen without screws - to check.
Mine came off bare ends as well. Managed to put them back. Seems like the connector on the cable is very fragile as my one came out in two pieces. The iMac is now up and running again!
-
-
这个步骤还没有翻译 帮忙翻译一下
-
Use your thumbs to push the IR sensor connector toward the top edge of the iMac and out of its socket on the logic board.
-
Pull the IR sensor board up from behind the front face of the outer case.
-
Remove the IR sensor and set it aside.
For some reason this connector was refusing to come out. I ended up just removing the IR sensor board, putting it in a tiny ziploc bag to protect the logic board and sensor and working around it. No worries at all.
-
-
这个步骤还没有翻译 帮忙翻译一下
-
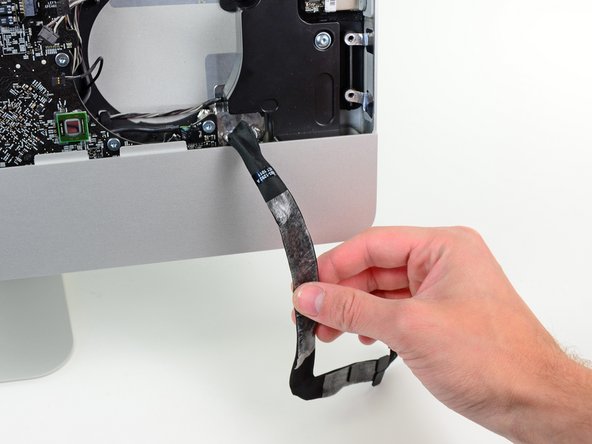
Pull the audio port cable connector toward the left side of the iMac to disconnect it from the logic board.
-
Peel the audio port cable off the front face of the logic board and let it hang down as shown in the second picture.
-
-
这个步骤还没有翻译 帮忙翻译一下
-
Remove the following four screws from the power supply:
-
One 9.3 mm T10 coarse-threaded screw
-
One 25 mm T10 coarse-threaded screw
-
Two 22 mm fine-threaded screws
-
Pull the upper right and lower left corners of the power supply away from the rear case to dislodge the mounting posts attached to the power supply's corners.
I agree with kyoder11, no need to remove the power supply. But pay attention to not damage it when pull the logic board.
-
-
这个步骤还没有翻译 帮忙翻译一下
-
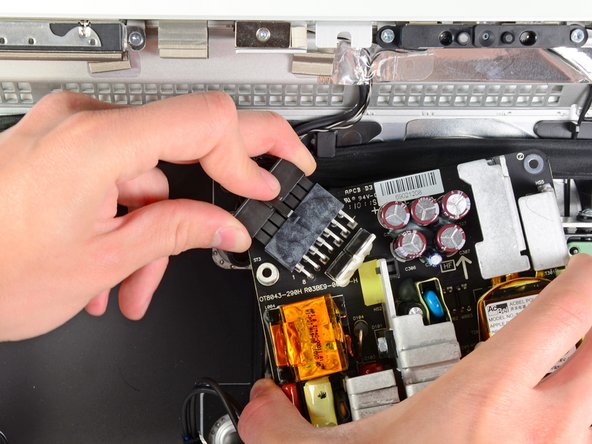
Carefully lift the power supply out of the outer case and rotate it to expose the cable lock as shown, minding the DC-out and AC-in cables still attaching it to the iMac.
-
Disconnect the DC-out cable by depressing the locking mechanism on the connector while you pull the connector away from its socket on the power supply.
-
Once the locking mechanism has cleared the socket, pull the DC-in connector away from the power supply.
-
-
这个步骤还没有翻译 帮忙翻译一下
-
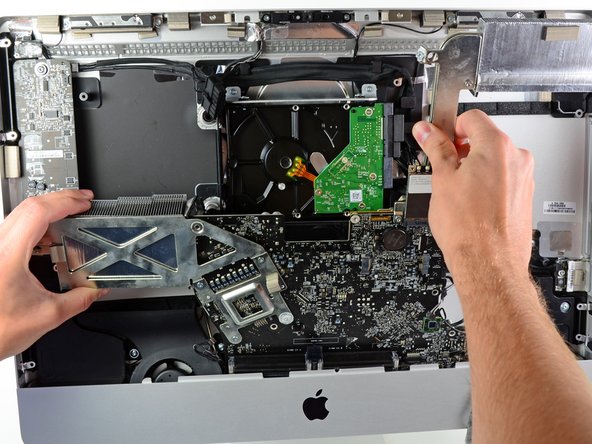
Slightly pull the logic board away from the back of the outer case, then lift it upward to clear the lower front face of the outer case.
Be careful when balancing the mother board here, you can damage the RAM bays if not careful. (Had a friend do this, good by motherboard and iMac.) Just be careful and aware of how you have it sitting.
Before you lift the logic board, remove the infra-red receiver ( have a look at the logic board replacement guide )! It will make your life a lot easier.
Like stated also in the video, it's easier if you put the iMac on its foot again.
This was a great tip. Removing the IR made my life easier when putting the board back in place.
fansntt -
-
-
这个步骤还没有翻译 帮忙翻译一下
-
In the following steps, you will hold the logic board slightly away from the outer case as you connect the new hard drive cables included with the dual hard drive kit.
-
-
这个步骤还没有翻译 帮忙翻译一下
-
Connect the small plug on the SATA power cable to the socket labeled SSD Power on the logic board.
J'ai eu un petit doute à l'heure de plugger le câble, en effet le détrompeur présent sur mon câble ne servait pas....
J'ai joué avec les niveaux de la photo du tutoriel pour vérifier... Il y a trois fils sur le câble d'alim SATA, le côté du câble où il y a deux fils va du côté où est indiqué "V" sur la carte mère.Ce tutoriel est juste magnifiquement bien fait!
-
-
这个步骤还没有翻译 帮忙翻译一下
-
Next, while holding the new hard drive cables against the GPU heat sink, lower the bottom edge of the logic board back down into the outer case.
-
Before pushing the logic board against the back of the outer case, first route the hard drive cables in the channel near the bundle of power cables.
-
As you place the logic board into its recess, route the hard drive cables through the small channel cut into the plastic pressure wall near the fins of the GPU heat sink.
-
-
这个步骤还没有翻译 帮忙翻译一下
-
In the next few steps, you'll install your new drive into the case of your EMC 2428 iMac.
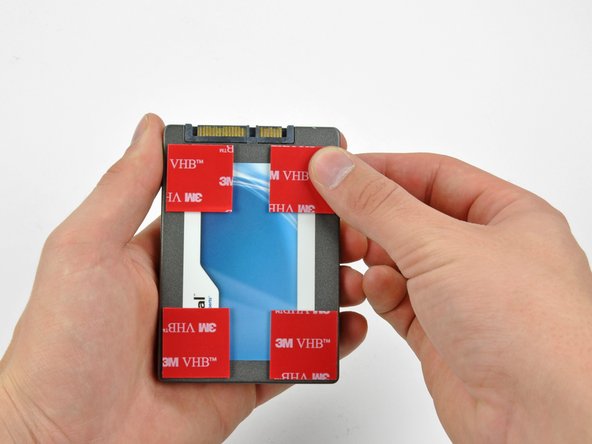
Isn't there a way to fix the SSD by screws?
No. Its just flat aluminum. The adhesive pads will work well. You may even be able to use the picture hanging velcro strips by 3M that you can find any where (they now have ones with stronger adhesive). If using the velcro ones it would make it easier for removal later. I personally have not done it this way, but I think it would work. I just used the red ones they gave (i could find my box of the velcro ones).
Wonderful info and explanations, as usual.
Hope the answer to my question is not very obvious, but can a normal SATA 500GB be installed instead of a SSD drive. The reason being, appart from the cost difference, is that I currently have a PC Laptop that I'd like to "Recycle" into my iMac, meaning memory and HD. Potentially also my Windows 7 with Parallels. Currently have XP, it would be upgrade every way you see it.
Many thanks
-
-
这个步骤还没有翻译 帮忙翻译一下
-
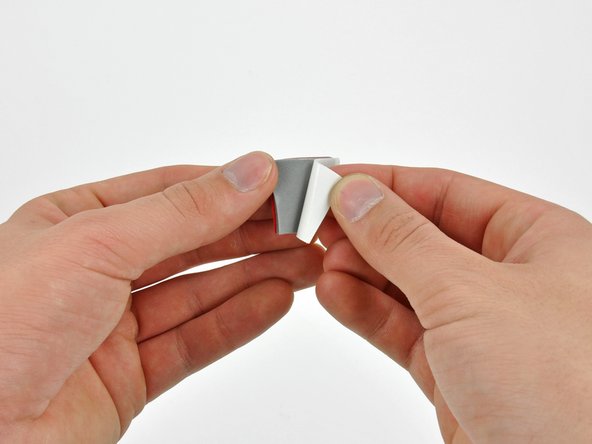
Peel the backing off one side of the double-sided tape and place the pieces at the four corners of the hard drive.
They have crucial here pictured (we used crucial and it works phenomenal). Also Samsung has a great line of SSDs called EVO (we used it in our Macbook Pro and it works just as good if not better than crucial). {here is their website, http://www.samsung.com/us/computer/solid...) Its a second option for ssd hard drives.
Also when installing SSDs make sure to enable TRIM support (crashes can and probably will occur if you don't) TRIM enabler is available free and the pro version is $10 http://www.cindori.org/software/trimenab... It is the easiest solution for this issue.
Hello Robert I have a question, I have an Imac 21.5 mid 2011 and I want to add a second ssd drive (Crucial or Samsung Evo) ....I want to know if the second port is Sata 2 (3Gb/s) or Sata 3 (6Gb/s)
??? Could you check the¨link velocity¨? Thank you Robert !!!
Leonardo -
-
-
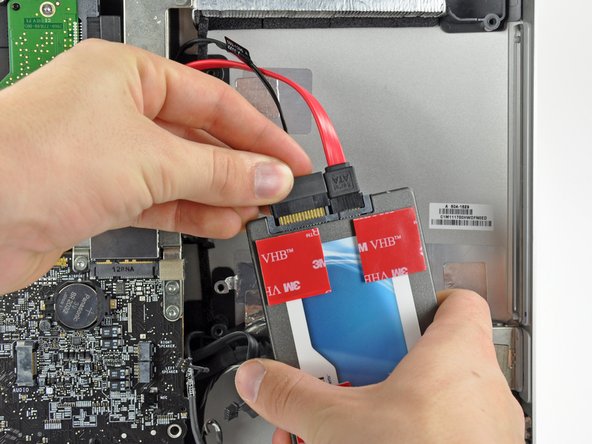
这个步骤还没有翻译 帮忙翻译一下
-
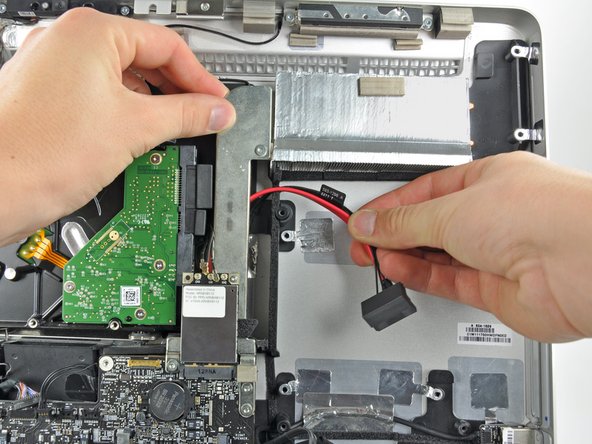
Connect both the SATA data and SATA power connectors to your new hard drive.
Do I not need to add a digital sensor cable here as well?
I had to change my HDD to a new one, and decided to add an SSD as well. However I only added the sensor cable to the HDD, not SSD. Now the fan is on full speed, and I’m suspecting that it is due to the SSD not having a thermal sensor as well. Can anybody confirm this?
Thank you
The SSD runs a lot cooler than a HDD! You don’t need a second thermal sensor
Dan -
-
-
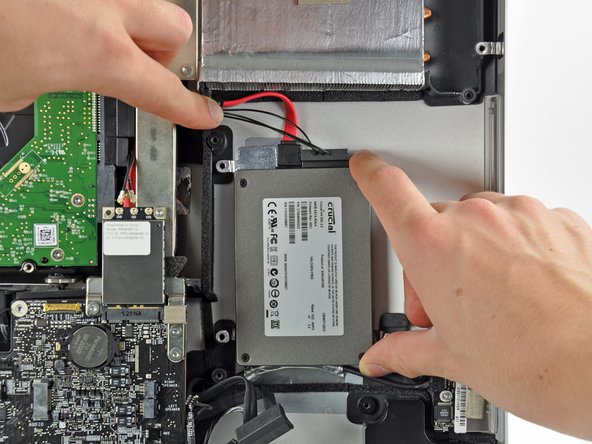
这个步骤还没有翻译 帮忙翻译一下
-
Remove the backing from the double-sided tape and place the hard drive inside the iMac.
-
Carefully set the drive into the iMac optical bay as close to the lower left corner as possible.
-
Once you are happy with the hard drive's placement, firmly press down along its edges to ensure full adhesion.
-


272等其他人完成本指南。


72条评论
It should be noted to anyone doing this that RAM should be removed first. When you get towards the end things go bad if your RAM is still in there and you start moving the mainboard around.
You are correct. I followed the ifixit guide on youtube and it was not mentioned to remove the RAMs. But in fact the RAMs should be removed in order to pull the logic board.
Seconded ... remove ram first! Spent more time reinstalling main board than anything else.
Added bigger HDD as well as SSD. Buy HDD Fan Control to fix fan speed.
A curse on Jobs & Apple for making it this tedious to add SSD & HDD.
Cudos to ifixit!
Did it, my imac is extreamly speedy now with the ssd compared with the origional hdd.
Tool me about two hours to do, had to have my brother help me when i was removing the logic board and screen.
Found that the logic board was extreamly hard to remove.
Good tip is to selotape the cables before removing / inserting the logic board as i traped my microphone connector underneath. Luckely i could reach it with a pair of tweesers.
Over all glad i did it.
Can anybody explain why the PSU module needs to be removed (steps 34-37)? I saw a similar guide elsewhere and it skipped this completely. Is this not required? If so, that might explain why this guide says that to re-assemble do the reverse from step 33 and not 38 as expected!
I can confirm that you do not need to remove the power supply to do this - you can safely skip these steps! Anyway, this install went well for me, not as scary as I thought it would be. You just need to be prepared, remain calm and keep track of all the screws!
markbart -
Having read this comment, I initially skipped the PSU removal steps. While removing the logic board was a bit difficult, putting it back in place seemed impossible until I figured one of the plastic walls (step 37, although it was the one on the other side) was getting in the way: some pieces have a diagonal cut from top to bottom and they have to fit together, and the diagonal shape forces one to be placed before the other (one on bottom, then the other on top, so to speak). I had to remove the PSU to be able to remove the plastic walls, get the logic board in place properly, and then put the plastic walls back "on top" of a piece attached to the PCB.
So while I guess it could be possible to skip the PSU removal steps, I found it easier to put everything back into place by removing it. YMMV, just keep it in mind, and you can always do as I did, skip the steps and do them afterwards if needed.
How long is the Sata data cable?
Is a 10" too short for the job??
Help asap would be awesome!
Thanks
The cable is a standard length, but I feel it was too long as it needed to be folded to fit. A 10 inch cable will be fine.
markbart -
Very helpful guide, easy to follow. Took me around an hour and a half to install an SSD.
For the record, instead of using them independently I configured them as a Fusion Drive. Works like a charm, more info here:
The article you link to isn't describing a fusion drive. The whole areticle is a mistake. Read the comments over there...
Very helpful guide. I did it in 1 houre without removing the PSU.
Thank´s for the help!!!
sorry if it's been asked already.
I was wondering, why not just connect DVD drives cable, i thought there is a power and same as SSd, SATA.
The optical drive SATA connection is only SATA II (3.0 Gb/s) so you won’t gain the full benefit of your SSD drive. In some cases the SSD drive won’t even work as its only a SATA III (6.0 Gb/s) drive Vs a dual speed supporting both.
Dan -
Be advice, I buy the kit and try. It cost me 800$ to repair it after. Yes, I broke the logic board!!!!
Also, after you get your drive installed and try to create your own Fusion Drive volume, you'll need to make a bootable USB drive and boot from that by holding down Option on a boot. If you try to boot from the internal drive and then create the Fusion drive you'll get a "Error: -69879: Couldn't open disk" error which basically means the disk is in use. Of course, when you do this, all your data will be wiped so be sure to backup via Time Machine before you create the Fusion Drive!
Installation d'un SSD samsung 500go avec le kit d'installation Fixit sur iMac 21 mi-2011
L'installation s'est très bien passé. Ce n'est pas si difficile que cela même si c'est assez impressionnant au début.
L'accès au cablage du SATA (coté opposé de la carte mère) est délicate (avoir des petites mains c'est mieux).
La différence une fois l'OS installé sur le SSD est impressionnante... ce n'est plus la même machine!
Couple more comments:
1. This is a really long, laborious process. To keep track of screws, I drew a little chart and taped them to a piece of paper.
2. Make sure when reinstalling the logic board that the RAM slots line up correctly. They didn't for me, so had to undo the whole thing.
3. When my Mac restarted, the fans ran at full speed. Thought I'd broken something. Turns out, just needed to do SCM reset (see Apple docs)
4. If I was going to do this again, I wouldn't. It's a huge pain -- very annoying project.
I gave my iMac to a local Apple store. They offered to place the SSD for about 200 € … a lot of money but I thought it would be better, because they have done it not only once.
Unfortunately they called me and told me that the second SATA port must be broken because they couldn't get the SSD at work. Have you ever heard of such problems?
What do you think? Do I have to switch to a new logic board??
Thanks.. OWC has a much much better step-by-step video. Successfully added a 240G Crucial M500 disk.. created a fusion drive and it's beautiful!
Tips:
- Plan well, clean surface, use anti-static band, be very very very careful and gentle
- Can use almost any “cheap” suction cups (like ones in car window shades) http://bit.ly/1oGzHIe
- Ensure 6G SATA cable
- Power cable is unique (SD Power Cable 593-1296 922-9862) and can be bought from AliExpress: http://bit.ly/1oGAjOd
- You’ll need Torx T10, T6 screw-driver bits
- Use tape to put cables in place when putting the logic board back
- Having someone to hold the logic board while putting in SSD cables can be useful
Thanks man for the powercable Part number
peter94 -
Excellent guide! Easy to follow, step by step with great pictures that you can zoom in and go at your own pace - THANK-YOU, you've just added a few more years to my iMac!
Note: It was a bit of a pain undoing all those connections, and even more putting them all back, and kind of stressful having it all apart on my coffee table, but I did it! I put my new 240 PNY SSD drive from Best Buy (on sale for $109) in and also upgraded my old main HD to a 2TB SATA, not including the 16GB of RAM upgrade to perk things up, I used Disk Utility to shrink down my old 500GB to 240GB and did a restore on my new drive and boom, it boots up so dang fast I don't know what the heck just happened.
again, many thanks!!!
Oh yea, I also installed a free fan program called Macs Fan Control from crystalidea to help with some of the weird fan issues I was getting in Windows- plus they make it for both platforms.
Completed this install today. I was kind of nervous, because I didn't want to screw up my Mac. Being really careful and meticulously keeping track of every single screw, I installed a 256GB Samsung 850 Pro and it works like a charm. I think I've messed up the ODD though. That one doesn't seem to be available anymore. The other thing is that my speakers didn't work anymore. While I had just arrived at the point where I was going to take the Mac apart again, I decided to check my settings. My iMac was sending sound to my external display, which doesn't have speakers. I'm not sure if I'm going to open it up again to try to fix the ODD. I never use it, but if I'm ever selling it, it should definitely work...
I did that upgrade last weekend, with help of my son in law. All ran right, no problem, and now my iMac is working very fast!! I put a SSD OCZ Vertex 460A 480GB under the optical drive. We take three hours to do it.
The most difficult step was step 10, just the first cable to disconnect. This cable have a very small conector and was a little hard to remove, but at the end all was fine.
This guide was extremely important to me, so I translated it to study carefully before start the upgrade. At the same way, the video was very important to show the correct way to do each step.
So, thank you very much for IFIXT team and the author, Andrew Bookholt.
Carlos Sgrillo, June 01, 2015 - from Porto Alegre, Brazil.
Hi Guys,
I have 2 original hdd cable (data and power) from a damaged imac. These two cable are long enough to add an ssd? maybe using a different path for the cables?
I have successfully installed a Samsung 840 Pro Series SSD 256 GB inside my Mid 2011 iMac following this great guideline. However, I am thinking of replacing the SSD with Seagate 1TB SSHD because of the capacity. I am not sure whether I need to put it in an enclosure or I can attach it as a bare drive? Please advise.
After ADDING an aditional SSD (samsung evo 850 1TB) to my 21.5inch imac mid 2011, I was having a problem with the speed of my cpu fan.
After adding this SSD I upgraded to El Capitan. I also added a OWC thermal cable on the SSD to solve the problem but my fan continued to turn very fast (4000RPM)
Nothing worked, so I installed Mac Fan control based on temperature of other sensors. This worked for one month untill last week my fan started turning fast again.
This time I checked my activity monitor. I noticed that my cpu was running at 700% because of my HP printer driver.
After deleting the driver I put all the fans on "auto" and my mac is now behaving like before the ssd upgrade.
I hope this will help someone who is having the same problem.
Daniel
That was far and away the hardest computer upgrade I've ever done. So many little cables that I didn't notice were trapped until I had the motherboard back in, had to redo it so many times. And a couple of times I couldn't get the mobo lined up right and had to redo some more. I'm a little shocked the computer still works. 2 hours!
best guide for repairing and upgrading your iMac with an SSD.
I tried this but now my imac is not starting where could i have gone wrong ?
My power cable was loose. Also lcd data cable disconnected
Bonjour,
Sur mon iMac (EMC 2428), les trois connecteurs d'antenne AirPort étaient inversés!
Est-ce normal ?
Merci
Hi,
On my iMac (EMC 2428), the three AirPort antenna connectors were inverted!
Is it normal ?
Thanks
Done on my iMac mid-2011 !
I have shot one of the 3 AirPort antenna slots -the third one- and wifi still works great at high speed. (gdarri01: mine were inverted too, it is not a problem).
More over I have disconnected the fan dedicated to the CD player because it was too noisy and again, everything works great.
Is there a preferred SSD brand that works best for this? Can you install 2 SSD drives for maximum speed and capacity?
joemangrum - 回复
Had a few minor mistakes, like having a couple of connectors hidden, but overall it when pretty well. Thank you for creating this guide! I would have never attempted this without the guide. Now I'm enjoying the SSD performance. I appreciate you taking the time to do this.
Can you just replace the optical drive with a hard drive caddy like in the dual hard drive macbook pro (pre 2015) upgrade?
Not really, The optical drive’s SATA port runs slower (3.0 Gb/s) than the spare SATA port(6.0 Gb/s) which you want to use for your second drive.
Dan -
I didn't want to invest in an SDD, but I still wanted to expand the storage on my 21.5" iMac mid-2011 for storing additional photos, the original 1TB drive was full so I added a 2nd 2TB drive (Seagate FireCuda). The iFixIt kit and upgrade guide were great. Just take your time, follow the guide and pay attention.
Thanks a lot for this instruction.
If you don't know pinout of "pwr ssd" (j4531):
- v pin (first) - 5v
- second and fourth pins - ground
- third pin - blank
Awesome, using an Apple SSD (for TRIM support) from eBay, I now have a Fusion Drive as if I'd bought one from Apple.
just to know: could I reinstall the dvd-drive at the end? thanks in advise.
Yep DVD can be installed as well as dual hard drives.
Be extremely careful when removing the lcd connectors, specifically the large connector with the plastic pul tab. It is extremely fragile so handle with care.
Tape all the wires you remove from the logic board down, use a pencil and write the names or the colours of the wires on the tape. This saves you hours of time looking for wires or messing up and letting wires get hidden.
And lastly, something that is missing from this guide is the next steps. After you install your ssd you obviously want to change the boot drive to the ssd. For me personally, I wanted to copy all my hdd contents onto the ssd.
Firstly I launched the mac in recovery mode, and went into disk utility. From there the ssd wasnt picked up, you need to click file and show devices. Once the device shows up, you then have to format the drive.
Once its formatted, start your mac and use “carbon copy cloner” to clone your hdd to ssd. Once thats done, delete the hdd contents and voila job done.
Did the upgrade in November 2017, added a Samsung 850 EVO 500gb ssd drive as well as replaced the original (somewhat sketchy) 500 gb drive with a new 1tb drive.
Thanks for the concise step by step and especially all of the comments and helpful suggestions, combined, you saved a lot of potential grief.
I purchased the thermo sensor for the hard drive from OWC as the new 1tb drive caused the fan for the hard drive to run at max speed, it fixed that issue.
Now my aging iMac is much faster and more capable.
Dears
thank you so much for the precious and precise guide.
I’ve just finished the operation hoping hat this will rejuvenate my iMac.
Gabriele
Thank you so much for this guide. With the offered Toolkit it was really no hassle. I use a Samsung 850 EVO 1 TB SSD in my iMac 21,5 Mid 2011 (12 GB RAM) now, and everything works as planned. The iMac is super super fast now, like a totally new computer. I advise you really to be careful with the logic board, tape all the free cables wisely, to not hide/forget one of those below the logic board when reassembling. It happened to me for 1 small cable, but fortunately could be fixed within minutes ;) … So be careful. For the rest, I just followed all the steps, and had all screws on a safe place, numbers attached (#step = #screws)… It took me about 2 hours, just those steps here, from closed iMac SLOW to closed iMac with SSD :) - No software reinstallation/backup time included. I do have a technical background from my school time, don’t work in this field now. It is not easy to do, but also with less tech background you can do it properly, following this guide. Thanks a lot and Kudos iFixit Team!! You rock!
This is a great guide and kudos to iFixit for posting it. I’d done the same procedure before on my 27” iMac and added a 500 GB SSD but this was for a friend. It took me about 2 hrs but I was fairly meticulous about putting screws in labeled bags, labeling connectors &etc. Once I had everything out but before I added the new SSD I took it outside, blew out everything with canned compressed air and lastly replaced the PRAM battery.
I’ve had a fair amount of experience building and maintaining computers and if I would suggest anything to anyone looking to do this I would say just go slowly, be gentle and bag and tag the screws. One fingernail and the point of a plastic spudger generally gets the connectors out…take it easy and don’t be ham-fisted and it will work out OK.
Really good guide, thank you. I would not have undertaken this upgrade without this guide. Took me about 2 hours for the whole job.
Thanks for this great guide and especially the German translation. It is the first guide I ever followed on ifixit. Took pretty exactly two hours in my case like for many others.
The comments on many steps were also really helpful (especially concerning the different looking cables at the airport express card).
Great guide, thanks a lot! I’ve moved the SuperDrive temperature sensor to the new SSD enclosure to have its temperature reading, just to have it under control.
How do i get the RAM out after i’ve taken the logic board out. I see the comments now about RAM being removed before and unfortunately I simply upgraded my RAM in the beginning and put more in and now I can’t get the logic board seated correctly and I am losing my mind. HELP!
I got it! Holy crap that was nothing short of a miracle.
Great article! As others have noted, my main issue was getting the logic board back into the housing only to realize that the issue was the RAM not seating correctly. I ended up using my fingers to guide them back into their slots and there are not issues now. Runs great. Thanks!
Merci beaucoup pour ce tutoriel qui m’a permis d’ajouter un SSD CRUCIAL de 1 To.
J’ai mis 3h45 ; je précise que je n’avais jamais démonté un iMac auparavant.
J’ai du démonter et remonter la cartes-mères 3 fois !
- Attention à vérifier que tous les câbles sont bien sortis pour être re-branchés
- Attention à bien passer le câble du lecteur optique au bon endroit.
Mon iMac a retrouvé une seconde jeunesse.
Because this is a dual drive addition rather than a disk to SSD replacement, does that mean you don’t have to copy everything onto the SSD beforehand? I’m guessing not. Is this correct? thanks
You’ll want to format and install the macOS onto it and then use Migration assistant to copy over your user account and app’s. Leave your data where it is. That way you have the fastest drive setup as your bootable drive and holding your apps. leave the rest of the drive empty so your system has space for virtual RAM, caching & paging. If your apps uses a scratch space you’ll want that here as well.
Hopefully you have 1/4 or better 1/3 of the drive free. This will make your system a real speed demon!
Dan -
I finished this in about an hour. The video left out a LOT of steps and looking at the written/pic guide was essential. If I hadn’t done it backwards or looked at the pics/written guide first I probably wouldn’t have broken the power button connector…either way you can put it back on after broken and it works fine…but it would have been better not to have to do that. Learned my lesson…learn from the comments!!! Also I did NOT take out my ram the whole repair…and my iMac is fine but listen to the experts dont do what I did…you may not be as lucky!
Hi. What SSD specification do I need with this kit? Thanks.
Any SATA III (6.0 Gb/s) 2.5” SSD will work
Dan -
Great. Thank you!
I hope to find some clear instructions added with detailed photos on how to reattach the display cable. I run in problems here
What did you find confusing in Step 12?
The cable just slides into the slot, you do need to go in squarely.
The best way of thinking it is sliding a letter into an envelope resting on your desk.
Dan -
I didn't want to dissassemble the whole iMAC, so I chose just to change the original HDD to a SSD.
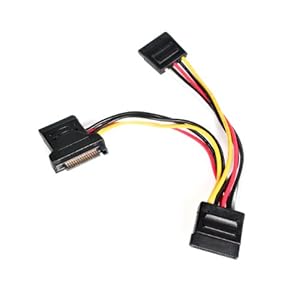
Important for mentioning is therefore that I bought a SATA cable 1x to 2x (Y-cable),
connected it to the original cable the HDD was connected to and the new SSD.
One end stays unused but that's fine. Just fix it with some tape.
Now the fan control works fine without trouble and I don't need any fan control software anymore.
I'm in Germany, so:
Einfach ein SATA Y-Kabel zwischen Originalkabel u. neuer SSD klemmen und die Lüfterprobleme haben sich auch ohne zusätzliche Software erledigt. Ein Ende bleibt dabei natürlich frei, das kann mit ein wenig Klebeband gesichert werden.
Before beginning unplug your iMac.
Henry Barnett - 回复
The screws are not phillips #1 as implied above. My phillips#2 bit fit.
John McWilliams - 回复
Yes phillips #2 is the correct Bit
Heath - 回复
Whenever I go this “deep” into any computer that has a motherboard battery, like the CR2032 for this iMac, I’ll add a new battery to my workflow. I’m in the “neighborhood” anyway.
The battery is in a spring-loaded compartment, which requires patience and persistence.
I make sure to test the new battery before installation. (The “3-2-1 Rule” applies: 3 of something means 2, 2 means 1, and 1 means none - I keep spare batteries on hand.)
When I took part in my dual-drive adventure, I also added a thorough dusting (outside/outdoors) - phew!
Carrick - 回复