跳转到主内容

此翻译可能不反映源指南的最新更新。 帮助更新翻译查看源指南

在iMac(英特尔处理器,21.5英寸,EMC 2428版本)上安装双硬盘套件

你所需要的

视频概述

  1. 在iMac(英特尔处理器,21.5英寸,EMC 2428版本)上安装双硬盘套件, 記憶體插槽保護蓋板: 步骤 1 中的图像 1,2 在iMac(英特尔处理器,21.5英寸,EMC 2428版本)上安装双硬盘套件, 記憶體插槽保護蓋板: 步骤 1 中的图像 2,2
    • 將任何連接於iMac上的電源線與設備從裝置上拔下

    • 將桌面清理乾淨,並將iMac螢幕朝桌面平放

    • 确保工作表面没有任何污垢或碎屑,因为它可能会划伤iMac正面的玻璃面板。我们建议在iMac和工作台面之间放一条毛巾。

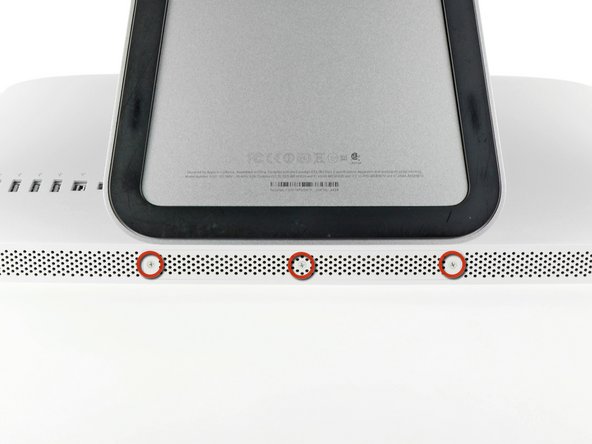
    • 拧松将维修孔盖固定到iMac底部边缘的三颗十字螺钉。

    • 三個螺絲皆為系留螺絲,所有螺絲鬆下後皆會在保護蓋板上。

    • 取下保護蓋板。

  2. 在iMac(英特尔处理器,21.5英寸,EMC 2428版本)上安装双硬盘套件, RAM: 步骤 2 中的图像 1,3 在iMac(英特尔处理器,21.5英寸,EMC 2428版本)上安装双硬盘套件, RAM: 步骤 2 中的图像 2,3 在iMac(英特尔处理器,21.5英寸,EMC 2428版本)上安装双硬盘套件, RAM: 步骤 2 中的图像 3,3
    • 轻轻地将黑色塑料记忆体拉片从记忆体插槽中滑出。

    • 将黑色塑料卡舌从iMac的底部边缘拉出,以弹出记忆体托架另一侧的模块。

    • 这可能需要一点力。

  3. 在iMac(英特尔处理器,21.5英寸,EMC 2428版本)上安装双硬盘套件: 步骤 3 中的图像 1,1
    • 將RAM從插槽中取出 ,並放在旁邊

  4. 在iMac(英特尔处理器,21.5英寸,EMC 2428版本)上安装双硬盘套件: 步骤 4 中的图像 1,3 在iMac(英特尔处理器,21.5英寸,EMC 2428版本)上安装双硬盘套件: 步骤 4 中的图像 2,3 在iMac(英特尔处理器,21.5英寸,EMC 2428版本)上安装双硬盘套件: 步骤 4 中的图像 3,3
    • 重複前項步驟將旁邊插槽的RAM拔出

  5. 在iMac(英特尔处理器,21.5英寸,EMC 2428版本)上安装双硬盘套件: 步骤 5 中的图像 1,3 在iMac(英特尔处理器,21.5英寸,EMC 2428版本)上安装双硬盘套件: 步骤 5 中的图像 2,3 在iMac(英特尔处理器,21.5英寸,EMC 2428版本)上安装双硬盘套件: 步骤 5 中的图像 3,3
    • 當安裝記憶體模組時,正確地將它們定位好十分重要

    • 記憶體金手指上會有一個小凹槽(如圖一),請確認它與記憶體槽的突起位置相符

    • 你的 iMac 擁有 4 個記憶體槽,插入記憶體時請水平於記憶體槽放入,以免記憶體卡在兩個槽之間

    • 當你定位好記憶體後,輕輕地將其放入插槽內,並用拇指用力地將其卡進插槽裡

  6. 在iMac(英特尔处理器,21.5英寸,EMC 2428版本)上安装双硬盘套件, 玻璃面板: 步骤 6 中的图像 1,2 在iMac(英特尔处理器,21.5英寸,EMC 2428版本)上安装双硬盘套件, 玻璃面板: 步骤 6 中的图像 2,2
    在这个步骤中使用的工具:
    Heavy-Duty Suction Cups (Pair)
    $14.95
    购买
    • 在开始之前,将您的iMac如图所示放倒在柔软的表面上。

    • 在玻璃面板顶部的两个角上放置吸盘。

    • 要使用我们的吸盘时,首先将吸盘的活动手柄扳动到与玻璃面板平行位置。 在吸盘轻轻地吸在玻璃面板上时,扳动活动手柄使其与另外一个手柄平行。

    • 如果您的吸盘无法吸住,尝试使用温和溶剂清洁玻璃面板和吸盘。

  7. 在iMac(英特尔处理器,21.5英寸,EMC 2428版本)上安装双硬盘套件: 步骤 7 中的图像 1,2 在iMac(英特尔处理器,21.5英寸,EMC 2428版本)上安装双硬盘套件: 步骤 7 中的图像 2,2
    • 轻轻地竖直提起玻璃面板到足够高的高度来接触玻璃面板顶部下的卡扣。

    • 将玻璃面板拉离iMac的下部,并将面板放在一边。

    • 在重新组装时,请确保已经清理了玻璃面板内部,和LCD表面。当打开电脑时,没人希望看到屏幕里面满是 灰尘和指纹,这样你会抓狂的。

  8. 在iMac(英特尔处理器,21.5英寸,EMC 2428版本)上安装双硬盘套件, 显示屏: 步骤 8 中的图像 1,3 在iMac(英特尔处理器,21.5英寸,EMC 2428版本)上安装双硬盘套件, 显示屏: 步骤 8 中的图像 2,3 在iMac(英特尔处理器,21.5英寸,EMC 2428版本)上安装双硬盘套件, 显示屏: 步骤 8 中的图像 3,3
    • 移除8颗将显示屏与外壳固定的8mm T10 梅花螺丝。

    • 最后两张照片是显示屏每一侧的细节照片。

  9. 在iMac(英特尔处理器,21.5英寸,EMC 2428版本)上安装双硬盘套件: 步骤 9 中的图像 1,1
    • 小心地从顶部将显示屏从外壳中提起。

    • 切勿将显示屏抬起太多。此时 仍然有许多线缆将显示屏与主板相连。将屏幕排线抬起太多或者扭曲到排线都有可能导致你的电脑损坏

  10. 在iMac(英特尔处理器,21.5英寸,EMC 2428版本)上安装双硬盘套件: 步骤 10 中的图像 1,2 在iMac(英特尔处理器,21.5英寸,EMC 2428版本)上安装双硬盘套件: 步骤 10 中的图像 2,2
    • 将垂直同步电缆连接器从iMac左上角附近的LED驱动板上的插座中拔出。

  11. 在iMac(英特尔处理器,21.5英寸,EMC 2428版本)上安装双硬盘套件: 步骤 11 中的图像 1,2 在iMac(英特尔处理器,21.5英寸,EMC 2428版本)上安装双硬盘套件: 步骤 11 中的图像 2,2
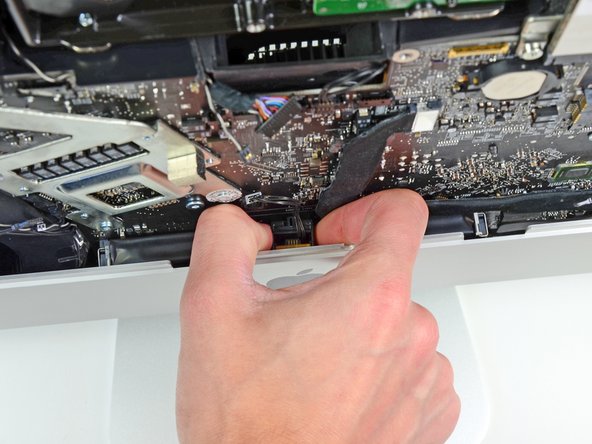
    • 将显示器从外壳旋转到足以将LED背光电源电缆从LED驱动板上断开。

    • 将连接器从插槽(朝向iMac的底部边缘)拉出,同时按下锁定机构,断开LED背光电源电缆的连接。

  12. 在iMac(英特尔处理器,21.5英寸,EMC 2428版本)上安装双硬盘套件: 步骤 12 中的图像 1,3 在iMac(英特尔处理器,21.5英寸,EMC 2428版本)上安装双硬盘套件: 步骤 12 中的图像 2,3 在iMac(英特尔处理器,21.5英寸,EMC 2428版本)上安装双硬盘套件: 步骤 12 中的图像 3,3
    • 抓住固定在显示数据电缆锁上的塑料拉片,并向上旋转。

    • 将显示数据线直接从逻辑板上的插座中拔出。

    • 请勿抬起显示器的数据线,因为其插口非常脆弱。 将电缆平行于逻辑板的表面拉动。

  13. 在iMac(英特尔处理器,21.5英寸,EMC 2428版本)上安装双硬盘套件: 步骤 13 中的图像 1,2 在iMac(英特尔处理器,21.5英寸,EMC 2428版本)上安装双硬盘套件: 步骤 13 中的图像 2,2
    • 断开LCD热传感器电缆连接器与逻辑板上的插座的连接。

  14. 在iMac(英特尔处理器,21.5英寸,EMC 2428版本)上安装双硬盘套件: 步骤 14 中的图像 1,1
    • 小心地将显示器拉向iMac的顶部边缘,然后将其从外壳中取出,注意可能被卡住的任何电缆。

  15. 在iMac(英特尔处理器,21.5英寸,EMC 2428版本)上安装双硬盘套件, 光碟機: 步骤 15 中的图像 1,1
    • 將電腦底座朝向你,會使維修更方便

    • 將以下4顆螺絲移除

    • 一個頂端比較大的9.3mm T10六角星型螺絲

    • 三個頂端為正常大小的9.3mm T10六角星型螺絲

  16. 在iMac(英特尔处理器,21.5英寸,EMC 2428版本)上安装双硬盘套件: 步骤 16 中的图像 1,2 在iMac(英特尔处理器,21.5英寸,EMC 2428版本)上安装双硬盘套件: 步骤 16 中的图像 2,2
    • 將光碟機的溫度感應器從主板上圖片位置的插槽上拔下,請平行於主板拔出

  17. 在iMac(英特尔处理器,21.5英寸,EMC 2428版本)上安装双硬盘套件: 步骤 17 中的图像 1,2 在iMac(英特尔处理器,21.5英寸,EMC 2428版本)上安装双硬盘套件: 步骤 17 中的图像 2,2
    • 將光碟機從顯卡熱管旁的縫隙抬起,並將其連著線移出

    • 小心的將光碟機從機殼右側的固定扣抽出,以騰出空間拔除光碟機連接線

    • 當你拔掉光碟機溫度傳感器後,你可以讓光碟機垂下來

  18. 在iMac(英特尔处理器,21.5英寸,EMC 2428版本)上安装双硬盘套件: 步骤 18 中的图像 1,1
    • 將光碟機傳輸線拔除

    • 將光碟機從iMac上拿出

  19. 在iMac(英特尔处理器,21.5英寸,EMC 2428版本)上安装双硬盘套件, 光碟機風扇: 步骤 19 中的图像 1,1
    • 將固定光碟機風扇的13毫米T10六角星型螺絲取下

  20. 在iMac(英特尔处理器,21.5英寸,EMC 2428版本)上安装双硬盘套件: 步骤 20 中的图像 1,1
    • 將光碟機從機殼的固定扣取下

  21. 在iMac(英特尔处理器,21.5英寸,EMC 2428版本)上安装双硬盘套件: 步骤 21 中的图像 1,1
    • 將插在主板上的風扇供電線取下

    • 將風扇取下

  22. 这个步骤还没有翻译 帮忙翻译一下

    在iMac(英特尔处理器,21.5英寸,EMC 2428版本)上安装双硬盘套件: 步骤 22 中的图像 1,1
    • In the proceeding steps, you will disconnect the following cables:

    • SD Board

    • Left/Right Speaker and Microphone

    • Audio Port

    • Wi-Fi Antenna

    • Right Temperature Sensor, Bluetooth/Ambient Light Sensor/Camera/Left Temperature, and Hard Drive Fan

    • CPU Fan/Ambient Temperature and Power Button

    • IR Sensor

  23. 这个步骤还没有翻译 帮忙翻译一下

    在iMac(英特尔处理器,21.5英寸,EMC 2428版本)上安装双硬盘套件: 步骤 23 中的图像 1,1
    • Pull the SD board cable out of its socket on the logic board.

  24. 这个步骤还没有翻译 帮忙翻译一下

    在iMac(英特尔处理器,21.5英寸,EMC 2428版本)上安装双硬盘套件: 步骤 24 中的图像 1,3 在iMac(英特尔处理器,21.5英寸,EMC 2428版本)上安装双硬盘套件: 步骤 24 中的图像 2,3 在iMac(英特尔处理器,21.5英寸,EMC 2428版本)上安装双硬盘套件: 步骤 24 中的图像 3,3
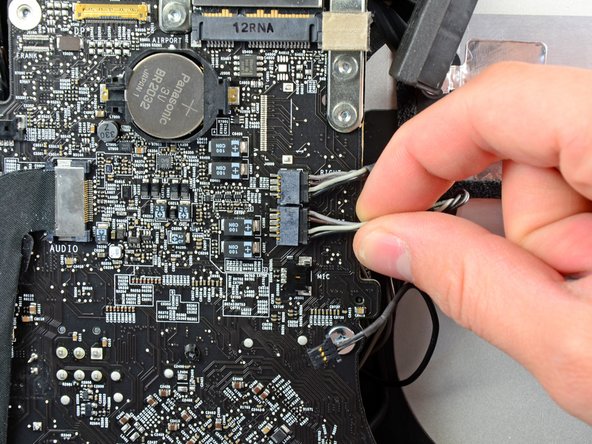
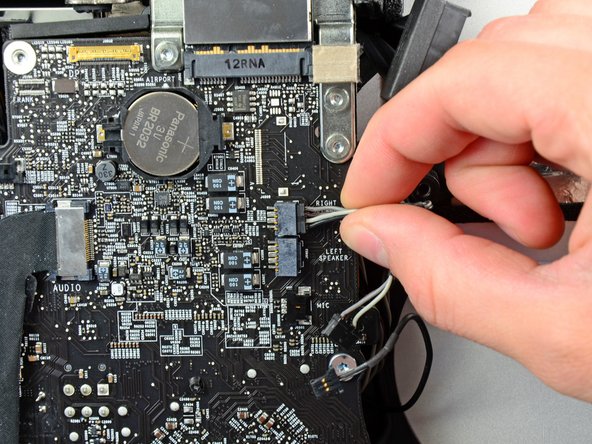
    • Disconnect the microphone, left speaker, and right speaker cables by pulling their connectors toward the right side of the iMac.

  25. 这个步骤还没有翻译 帮忙翻译一下

    在iMac(英特尔处理器,21.5英寸,EMC 2428版本)上安装双硬盘套件: 步骤 25 中的图像 1,2 在iMac(英特尔处理器,21.5英寸,EMC 2428版本)上安装双硬盘套件: 步骤 25 中的图像 2,2
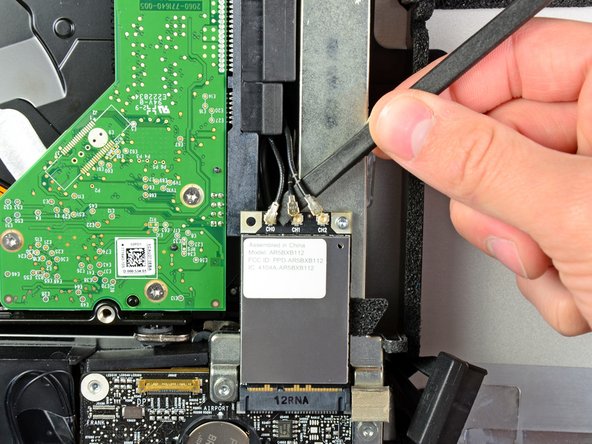
    • Use the flat end of a spudger to pry all three AirPort antenna connectors up from their sockets on the AirPort board.

    • During reinstallation, connect the cable with no stripes to the socket marked CH0, the cable with one stripe to CH1, and the cable with two stripes to CH2.

  26. 这个步骤还没有翻译 帮忙翻译一下

    在iMac(英特尔处理器,21.5英寸,EMC 2428版本)上安装双硬盘套件: 步骤 26 中的图像 1,1
    • Pull the hard drive fan connector toward the top edge of the iMac to disconnect it from its socket on the logic board.

  27. 这个步骤还没有翻译 帮忙翻译一下

    在iMac(英特尔处理器,21.5英寸,EMC 2428版本)上安装双硬盘套件: 步骤 27 中的图像 1,1
    • Use your thumbnails on both sides of the Bluetooth/ambient light sensor/camera/left temperature connector to push it toward the top edge of the iMac and out of its socket on the logic board.

  28. 这个步骤还没有翻译 帮忙翻译一下

    在iMac(英特尔处理器,21.5英寸,EMC 2428版本)上安装双硬盘套件: 步骤 28 中的图像 1,1
    • Use your thumbnails to push the right temperature sensor connector toward the top edge of the iMac and out of its socket.

  29. 这个步骤还没有翻译 帮忙翻译一下

    在iMac(英特尔处理器,21.5英寸,EMC 2428版本)上安装双硬盘套件: 步骤 29 中的图像 1,1
    • Pull the CPU fan/ambient temperature sensor connector toward the bottom left edge of the iMac and out of its socket on the logic board.

  30. 这个步骤还没有翻译 帮忙翻译一下

    在iMac(英特尔处理器,21.5英寸,EMC 2428版本)上安装双硬盘套件: 步骤 30 中的图像 1,1
    • Pull the power button connector toward the bottom left corner of the iMac to disconnect it from its socket on the logic board.

  31. 这个步骤还没有翻译 帮忙翻译一下

    在iMac(英特尔处理器,21.5英寸,EMC 2428版本)上安装双硬盘套件: 步骤 31 中的图像 1,2 在iMac(英特尔处理器,21.5英寸,EMC 2428版本)上安装双硬盘套件: 步骤 31 中的图像 2,2
    • Use your thumbs to push the IR sensor connector toward the top edge of the iMac and out of its socket on the logic board.

    • Pull the IR sensor board up from behind the front face of the outer case.

    • Remove the IR sensor and set it aside.

  32. 这个步骤还没有翻译 帮忙翻译一下

    在iMac(英特尔处理器,21.5英寸,EMC 2428版本)上安装双硬盘套件: 步骤 32 中的图像 1,2 在iMac(英特尔处理器,21.5英寸,EMC 2428版本)上安装双硬盘套件: 步骤 32 中的图像 2,2
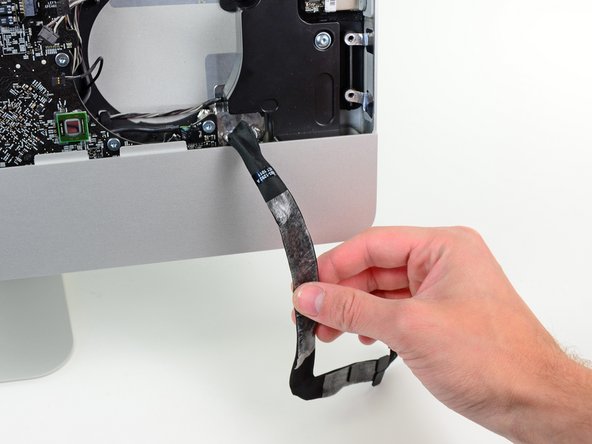
    • Pull the audio port cable connector toward the left side of the iMac to disconnect it from the logic board.

    • Do not pull the cable toward yourself (away from the front face of the logic board) as you disconnect it.

    • Peel the audio port cable off the front face of the logic board and let it hang down as shown in the second picture.

  33. 这个步骤还没有翻译 帮忙翻译一下

    在iMac(英特尔处理器,21.5英寸,EMC 2428版本)上安装双硬盘套件: 步骤 33 中的图像 1,1
    • Remove the following seven screws:

    • Two 7 mm T10 torx screws

    • One 30 mm T10 Torx screw

    • Two 25 mm T10 Torx screws

    • Two 21 mm T10 Torx screws

  34. 这个步骤还没有翻译 帮忙翻译一下

    在iMac(英特尔处理器,21.5英寸,EMC 2428版本)上安装双硬盘套件: 步骤 34 中的图像 1,2 在iMac(英特尔处理器,21.5英寸,EMC 2428版本)上安装双硬盘套件: 步骤 34 中的图像 2,2
    • Remove the following four screws from the power supply:

    • One 9.3 mm T10 coarse-threaded screw

    • One 25 mm T10 coarse-threaded screw

    • Two 22 mm fine-threaded screws

    • Pull the upper right and lower left corners of the power supply away from the rear case to dislodge the mounting posts attached to the power supply's corners.

  35. 这个步骤还没有翻译 帮忙翻译一下

    在iMac(英特尔处理器,21.5英寸,EMC 2428版本)上安装双硬盘套件: 步骤 35 中的图像 1,2 在iMac(英特尔处理器,21.5英寸,EMC 2428版本)上安装双硬盘套件: 步骤 35 中的图像 2,2
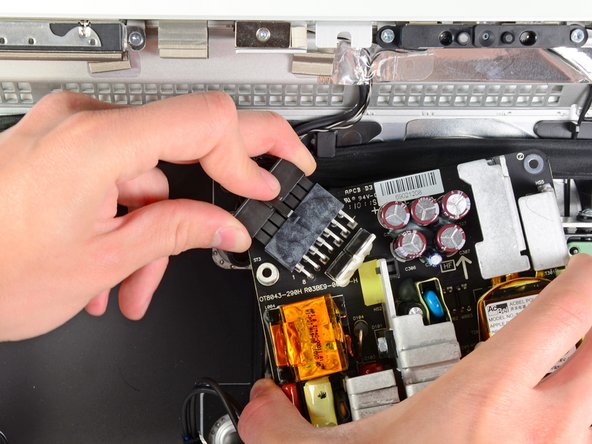
    • Carefully lift the power supply out of the outer case and rotate it to expose the cable lock as shown, minding the DC-out and AC-in cables still attaching it to the iMac.

    • Disconnect the DC-out cable by depressing the locking mechanism on the connector while you pull the connector away from its socket on the power supply.

    • Once the locking mechanism has cleared the socket, pull the DC-in connector away from the power supply.

  36. 这个步骤还没有翻译 帮忙翻译一下

    在iMac(英特尔处理器,21.5英寸,EMC 2428版本)上安装双硬盘套件: 步骤 36 中的图像 1,1
    • Disconnect the AC-In cable by depressing the locking mechanism while pulling the connector away from its socket.

    • Remove the power supply from the outer case.

  37. 这个步骤还没有翻译 帮忙翻译一下

    在iMac(英特尔处理器,21.5英寸,EMC 2428版本)上安装双硬盘套件: 步骤 37 中的图像 1,1
    • Remove the plastic wall that is installed directly to the right of the LED driver board.

  38. 这个步骤还没有翻译 帮忙翻译一下

    在iMac(英特尔处理器,21.5英寸,EMC 2428版本)上安装双硬盘套件: 步骤 38 中的图像 1,2 在iMac(英特尔处理器,21.5英寸,EMC 2428版本)上安装双硬盘套件: 步骤 38 中的图像 2,2
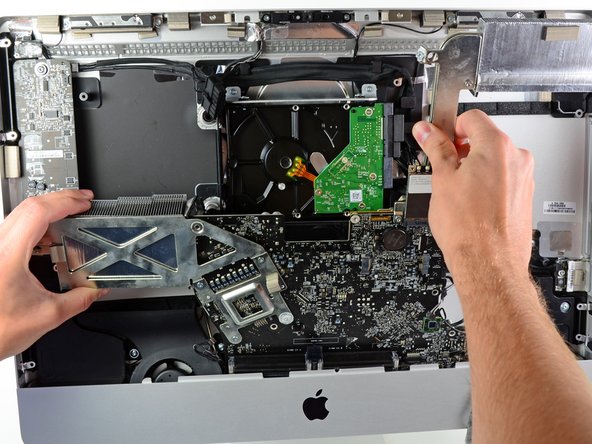
    • Slightly pull the logic board away from the back of the outer case, then lift it upward to clear the lower front face of the outer case.

  39. 这个步骤还没有翻译 帮忙翻译一下

    在iMac(英特尔处理器,21.5英寸,EMC 2428版本)上安装双硬盘套件, 双硬盘套件: 步骤 39 中的图像 1,1
    • In the following steps, you will hold the logic board slightly away from the outer case as you connect the new hard drive cables included with the dual hard drive kit.

    • As you connect the cables, do not put excessive strain on any of the other cables connecting the logic board to the outer case.

  40. 这个步骤还没有翻译 帮忙翻译一下

    在iMac(英特尔处理器,21.5英寸,EMC 2428版本)上安装双硬盘套件: 步骤 40 中的图像 1,1
    • First, locate the small connector on the SSD power cable.

  41. 这个步骤还没有翻译 帮忙翻译一下

    在iMac(英特尔处理器,21.5英寸,EMC 2428版本)上安装双硬盘套件: 步骤 41 中的图像 1,1
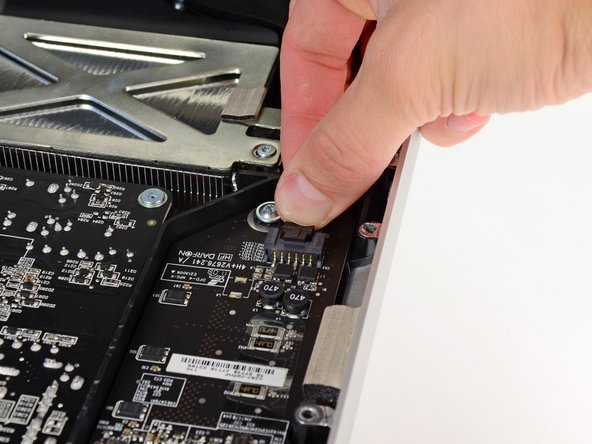
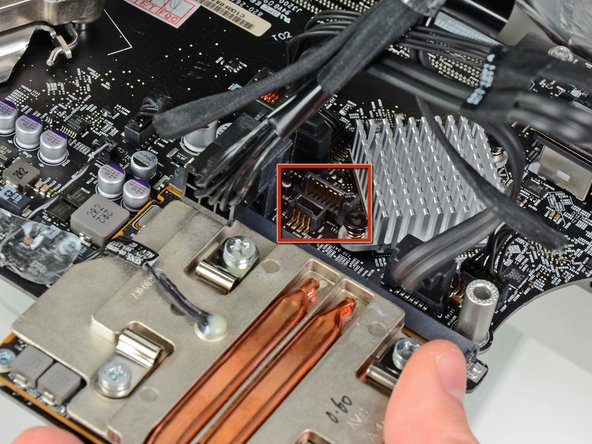
    • Connect the small plug on the SATA power cable to the socket labeled SSD Power on the logic board.

    • The socket is located just below the GPU heat sink.

  42. 这个步骤还没有翻译 帮忙翻译一下

    在iMac(英特尔处理器,21.5英寸,EMC 2428版本)上安装双硬盘套件: 步骤 42 中的图像 1,1
    • Next, locate the 90º connector on one end of the SATA data cable.

    • The color of your SATA data cable may be different than the cable shown here.

  43. 这个步骤还没有翻译 帮忙翻译一下

    在iMac(英特尔处理器,21.5英寸,EMC 2428版本)上安装双硬盘套件: 步骤 43 中的图像 1,1
    • Connect the 90º end of the SATA data cable to its socket on the logic board next to the SATA power connector.

  44. 这个步骤还没有翻译 帮忙翻译一下

    在iMac(英特尔处理器,21.5英寸,EMC 2428版本)上安装双硬盘套件: 步骤 44 中的图像 1,1
    • With both SATA cables connected, they should look like the logic board shown in the photo.

  45. 这个步骤还没有翻译 帮忙翻译一下

    在iMac(英特尔处理器,21.5英寸,EMC 2428版本)上安装双硬盘套件: 步骤 45 中的图像 1,2 在iMac(英特尔处理器,21.5英寸,EMC 2428版本)上安装双硬盘套件: 步骤 45 中的图像 2,2
    • Next, while holding the new hard drive cables against the GPU heat sink, lower the bottom edge of the logic board back down into the outer case.

    • When re-seating the logic board, it is helpful to tape the many connectors that attach to it out of the way to avoid them getting trapped beneath the board.

    • Before pushing the logic board against the back of the outer case, first route the hard drive cables in the channel near the bundle of power cables.

    • As you place the logic board into its recess, route the hard drive cables through the small channel cut into the plastic pressure wall near the fins of the GPU heat sink.

  46. 这个步骤还没有翻译 帮忙翻译一下

    在iMac(英特尔处理器,21.5英寸,EMC 2428版本)上安装双硬盘套件: 步骤 46 中的图像 1,1
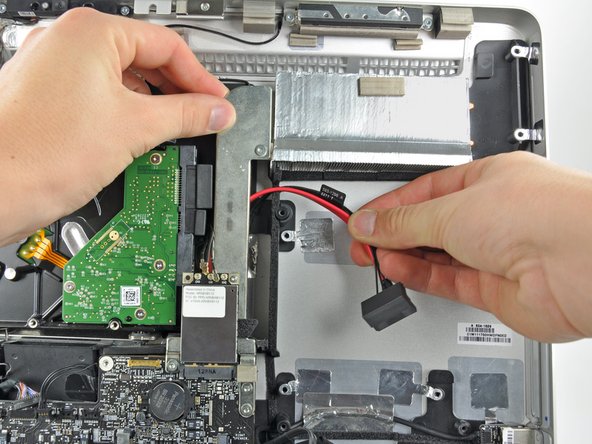
    • In the next few steps, you'll install your new drive into the case of your EMC 2428 iMac.

    • The drive will sit behind the optical drive in the space highlighted in red.

  47. 这个步骤还没有翻译 帮忙翻译一下

    在iMac(英特尔处理器,21.5英寸,EMC 2428版本)上安装双硬盘套件: 步骤 47 中的图像 1,3 在iMac(英特尔处理器,21.5英寸,EMC 2428版本)上安装双硬盘套件: 步骤 47 中的图像 2,3 在iMac(英特尔处理器,21.5英寸,EMC 2428版本)上安装双硬盘套件: 步骤 47 中的图像 3,3
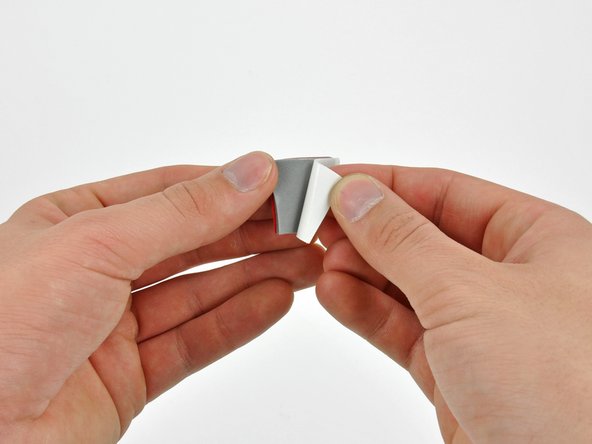
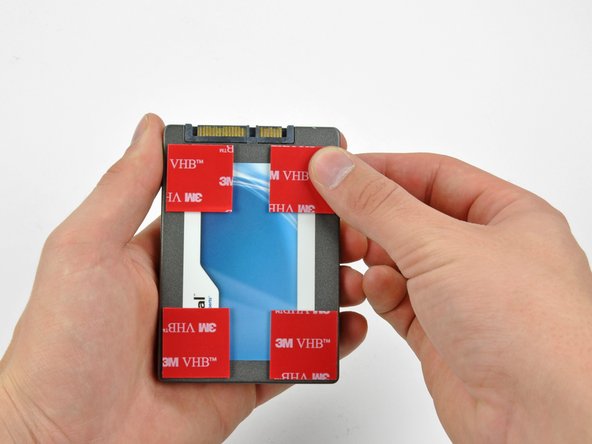
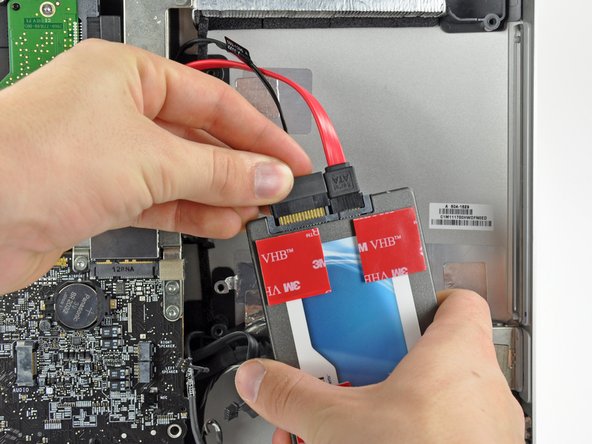
    • To secure your new drive in your iMac, you will need to place high strength double-sided tape at the four corners on the side of the drive with the SATA connectors.

    • Peel the backing off one side of the double-sided tape and place the pieces at the four corners of the hard drive.

  48. 这个步骤还没有翻译 帮忙翻译一下

    在iMac(英特尔处理器,21.5英寸,EMC 2428版本)上安装双硬盘套件: 步骤 48 中的图像 1,2 在iMac(英特尔处理器,21.5英寸,EMC 2428版本)上安装双硬盘套件: 步骤 48 中的图像 2,2
    • Connect both the SATA data and SATA power connectors to your new hard drive.

    • The SATA connectors will be nearest the top of the iMac when the hard drive is installed.

  49. 这个步骤还没有翻译 帮忙翻译一下

    在iMac(英特尔处理器,21.5英寸,EMC 2428版本)上安装双硬盘套件: 步骤 49 中的图像 1,2 在iMac(英特尔处理器,21.5英寸,EMC 2428版本)上安装双硬盘套件: 步骤 49 中的图像 2,2
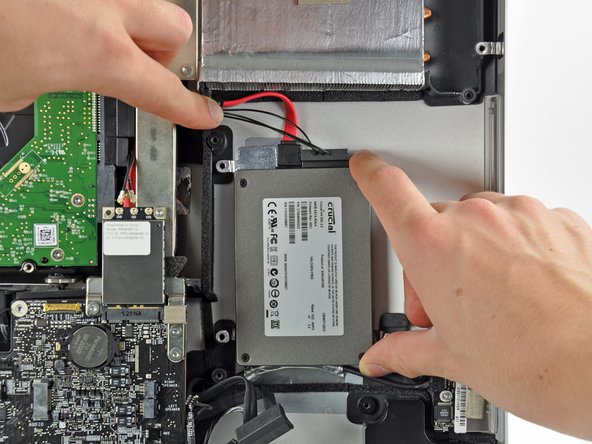
    • Remove the backing from the double-sided tape and place the hard drive inside the iMac.

    • Carefully set the drive into the iMac optical bay as close to the lower left corner as possible.

    • Do not to repeatedly stick and un-stick the tape, as the adhesive will become weaker.

    • Once you are happy with the hard drive's placement, firmly press down along its edges to ensure full adhesion.

结论

如果您需要重新装好您的设备,请从第33步开始按相反步骤操作。

272等其他人完成本指南。

由衷感谢以下译者:

en zh

23%

Evyde HF正在帮助我们修复这个世界! 您也想加入吗?
开始翻译 ›

72条评论

It should be noted to anyone doing this that RAM should be removed first. When you get towards the end things go bad if your RAM is still in there and you start moving the mainboard around.

azkaban1 - 回复

You are correct. I followed the ifixit guide on youtube and it was not mentioned to remove the RAMs. But in fact the RAMs should be removed in order to pull the logic board.

Mohamed Kamal -

Seconded ... remove ram first! Spent more time reinstalling main board than anything else.

Added bigger HDD as well as SSD. Buy HDD Fan Control to fix fan speed.

A curse on Jobs & Apple for making it this tedious to add SSD & HDD.

Cudos to ifixit!

tonybaczynski - 回复

Did it, my imac is extreamly speedy now with the ssd compared with the origional hdd.

Tool me about two hours to do, had to have my brother help me when i was removing the logic board and screen.

Found that the logic board was extreamly hard to remove.

Good tip is to selotape the cables before removing / inserting the logic board as i traped my microphone connector underneath. Luckely i could reach it with a pair of tweesers.

Over all glad i did it.
garethvincenthall - 回复

Can anybody explain why the PSU module needs to be removed (steps 34-37)? I saw a similar guide elsewhere and it skipped this completely. Is this not required? If so, that might explain why this guide says that to re-assemble do the reverse from step 33 and not 38 as expected!

markbart - 回复

添加评论

浏览统计数据:

过去 24 小时: 17

过去 7 天: 116

过去 30 天: 464

总计 317,741