跳转到主内容

当前版本的文档还未经巡查,您可以查看最新的已查核版本

你所需要的

  1. , 底壳: 步骤 1 中的图像 1,1
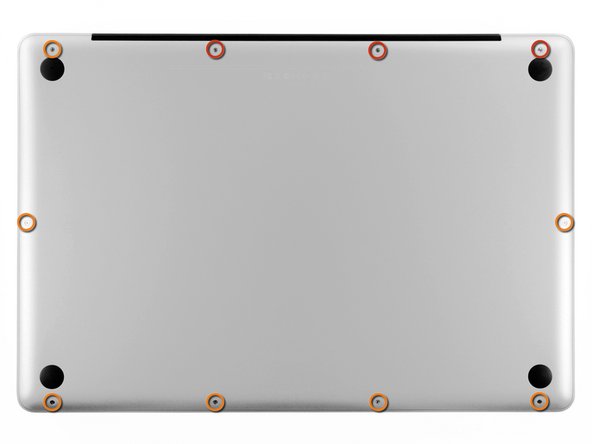
    • 拆下以下十个将背板固定在上壳上的螺丝:

    • 三颗13.5mm十字螺丝。

    • 七颗3mm十字螺丝。

  2. : 步骤 2 中的图像 1,2 : 步骤 2 中的图像 2,2
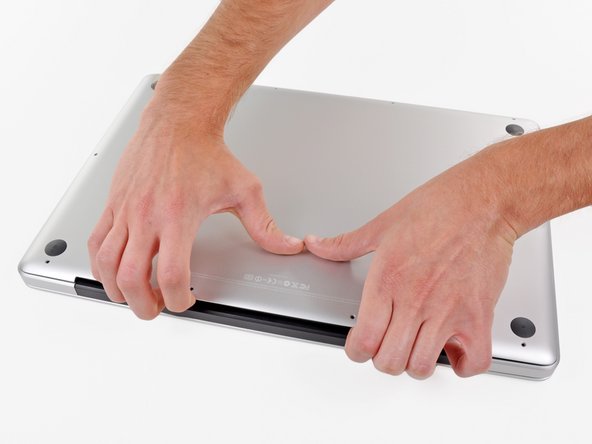
    • 将手指s塞入入下壳体和通风口之间,向上提起将夹紧下壳体的夹子离开上壳体上。

    • 移走后壳。

  3. 这个步骤还没有翻译 帮忙翻译一下

    : 步骤 3 中的图像 1,3 : 步骤 3 中的图像 2,3 : 步骤 3 中的图像 3,3
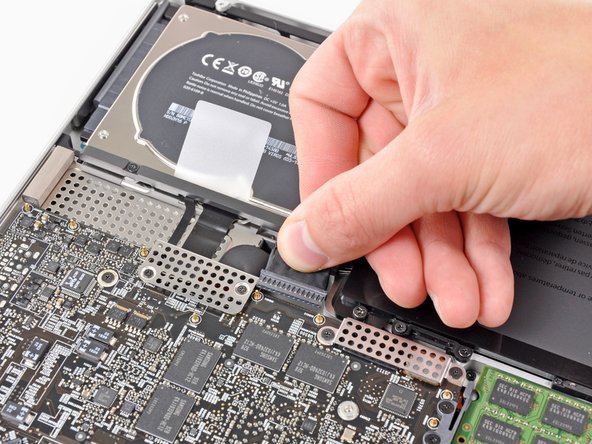
    • Whenever working near the logic board, it is always wise to first disconnect the battery to avoid short circuits.

    • If present, grab the plastic tab attached to the battery connector and pull it toward the front edge of the device. For Late-2011 models the battery connector will not have a tab and is simply a plug that inserts straight down into the motherboard--to remove pry the plug straight up.

    • If the plastic tab is missing, use a spudger to pry the connector up from its socket.

    • Pull the tab parallel to the face of the logic board.

  4. 这个步骤还没有翻译 帮忙翻译一下

    : 步骤 4 中的图像 1,1
    • Before disconnecting the camera cable, a small plastic retainer stuck to the logic board must first be moved out of the way.

    • Use the tip of a spudger to push the small plastic cable retainer away from the camera cable socket for enough clearance to remove the camera cable.

  5. 这个步骤还没有翻译 帮忙翻译一下

    : 步骤 5 中的图像 1,1
    • Pull the camera cable toward the optical drive opening to disconnect it from the logic board.

    • The camera cable socket is very fragile. Do not apply any upward force to this socket, as it may break off the logic board. Pull the camera cable parallel to the face of the logic board.

    • For Late 2011 models, the camera connector plugs straight down into the motherboard—to remove this connector, gently lift it straight up.

  6. 这个步骤还没有翻译 帮忙翻译一下

    : 步骤 6 中的图像 1,1
    • Carefully pull the Bluetooth cable toward the fans to disconnect it from the Bluetooth board.

    • Pull the cable parallel to the face of the optical drive.

  7. 这个步骤还没有翻译 帮忙翻译一下

    : 步骤 7 中的图像 1,1
    • Use the flat end of a spudger to peel the thin plastic cover off the top and sides of the Bluetooth board housing.

  8. 这个步骤还没有翻译 帮忙翻译一下

    : 步骤 8 中的图像 1,1
    • Use the flat end of a spudger to pry the Bluetooth antenna connector up and off its socket on the Bluetooth board.

  9. 这个步骤还没有翻译 帮忙翻译一下

    : 步骤 9 中的图像 1,2 : 步骤 9 中的图像 2,2
    • If present, remove the small piece of EMI foam near the Bluetooth board.

    • De-route the camera cable from the slot molded into the Bluetooth board housing.

  10. 这个步骤还没有翻译 帮忙翻译一下

    : 步骤 10 中的图像 1,1
    • Use the flat end of a spudger to pry the optical drive connector up and out of its socket on the logic board.

  11. 这个步骤还没有翻译 帮忙翻译一下

    : 步骤 11 中的图像 1,1
    • Remove the three 3.5 mm Phillips screws securing the optical drive to the upper case.

    • To remove the screw closest to the battery, it may be helpful to use a T6 Torx screwdriver to first remove the upper case bracket directly above it.

  12. 这个步骤还没有翻译 帮忙翻译一下

    : 步骤 12 中的图像 1,1
    • Remove the optical drive from the upper case, minding any cables that may get caught.

  13. 这个步骤还没有翻译 帮忙翻译一下

    : 步骤 13 中的图像 1,3 : 步骤 13 中的图像 2,3 : 步骤 13 中的图像 3,3
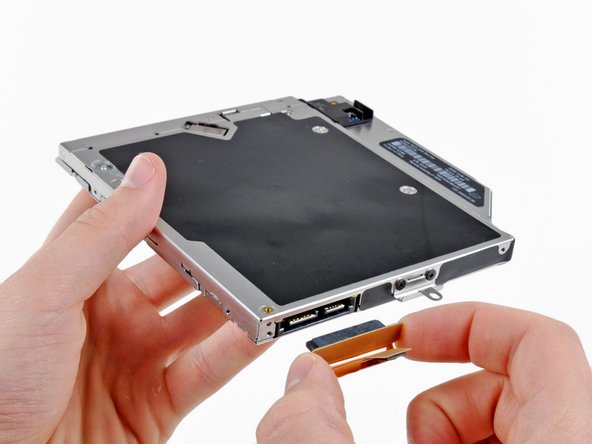
    • Grab the optical drive cable by its connector and pull it away from the body of the hard drive.

    • Pulling on anything but the connector may damage the optical drive cable.

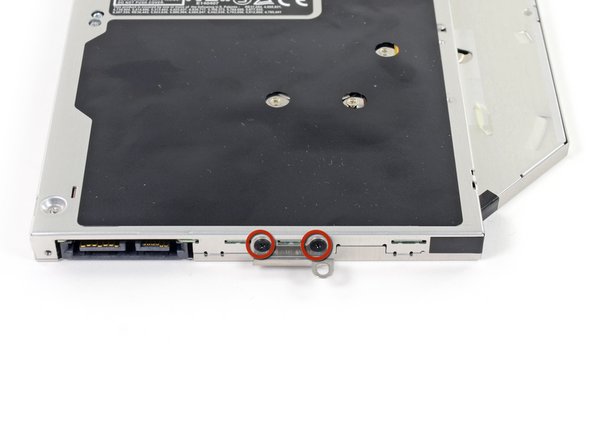
    • Remove the two black Phillips #0 screws securing the small metal mounting bracket. Transfer this bracket to your new optical drive or hard drive enclosure.

  14. 这个步骤还没有翻译 帮忙翻译一下

    : 步骤 14 中的图像 1,1
    • Remove the two 2.2 mm Phillips screws securing the Bluetooth board to the side of the optical drive.

  15. 这个步骤还没有翻译 帮忙翻译一下

    : 步骤 15 中的图像 1,1
    • Remove the Bluetooth board from the optical drive.

    • Optical drive remains.

  16. , 双硬盘: 步骤 16 中的图像 1,2 , 双硬盘: 步骤 16 中的图像 2,2
    • 利用塑料板上的间隙,使用手或工具,通过按压夹扣的一边来提起板子。

  17. : 步骤 17 中的图像 1,3 : 步骤 17 中的图像 2,3 : 步骤 17 中的图像 3,3
    • 确保硬盘接口是朝下的。

    • 轻轻地把硬盘放置在槽内。

    • 在使用单手拿稳的同时,使用你的另一只手把硬盘按入接口。

  18. : 步骤 18 中的图像 1,2 : 步骤 18 中的图像 2,2
    • 硬盘装上了后,重新插入塑料板来固定硬盘。

  19. : 步骤 19 中的图像 1,2 : 步骤 19 中的图像 2,2
    • 使用两颗菲利普斯 #1 号螺丝来固定硬盘。

  20. : 步骤 20 中的图像 1,1
    • 把硬盘支架用 2 颗菲利普斯 #0 号 螺丝连到新的盒子上。

    • 重新连接电线。

  21. : 步骤 21 中的图像 1,3 : 步骤 21 中的图像 2,3 : 步骤 21 中的图像 3,3
    • 不要扔掉硬盘!你仍然可以在SATA USB 电线的帮助下作为外置硬盘使用。

    • 把SATA 接口插入硬盘。

    • 把 USB 接头插入你的笔记本电脑。

终点

68等其他人完成本指南。

团队

iFixit iFixit 的会员

Staff

135 名成员

创作了17,243篇指南

8条评论

I went through these steps. I dint really have any trouble but now my computer won't turn back on. I have a fair bit of experience opening macbook pros, but I can't figure out what happened. I retrace the steps and look through everything but I can't see why it won't turn on. Any thing I can test? Any help?

signupjordanmathis - 回复

I was able to use the original HDD for Time Machine backups and put a SSD in the original HDD spot, which is a great setup. Of course, I have backups going to a Time Capsule too. The only thing with my model MBP (mid-2011) is that I only get 3 Gigabit speeds, which isn't a huge deal since I'm mainly using the extra space for backups. I really like that I don't have to hear the DVD drive winding up and making spinning noises when I boot up anymore.

mtlangr - 回复

When these steps are completed, I should be able to turn the machine on and it just work? No formatting or configuration needed?

David - 回复

I just installed a SATA III SSD (Samsung EVO 850 1 TB) into my MBP late 2011 17” with the Highfine data doubler. It works like a clock so far - it’s been a week of booting from the optical drive at SATA III speeds. All discussions say this is impossible. It’s not and I’m getting 450 MB/s write and 500 MB/s read. It’s a miracle!

The caddy was $8.99 on Amazon

Erick McWayne - 回复

Fantástico!!! I followed The Steps …. Very easy. Thank you
vilamoura2016 - 回复

添加评论

浏览统计数据:

过去 24 小时: 0

过去 7 天: 21

过去 30 天: 90

总计 65,587