简介
There are many benefits to adding a second hard drive to your laptop such as improved speeds, greater storage space, and less heartache when installing new software. Use this guide to install one using our optical bay hard drive enclosure.
你所需要的
-
-
With the case closed, place the Unibody top-side down on a flat surface.
-
Depress the grooved side of the access door release latch enough to grab the free end. Lift the release latch until it is vertical.
-
-
-
Grab the translucent plastic tab and pull the battery up and out of the Unibody.
-
If the latch is depressed it will lock the battery in place.
Do I need to wait for the battery to charge completely before using the computer (while plugged in)?
No. You do not need to charge it completely before removing it.
-
-
-
Remove the following eight screws securing the lower case to the chassis:
-
One 5.4 mm Phillips screw.
-
Three 14 mm Phillips screws.
-
Four 3.5 mm Phillips screws.
Hi, My name is Jess I need help asap I accidentally dropped my macbook Pro and i cant find the silver screw for the top left back side, Does any one know if I can replace it with an eye glass screw?? If you can help at all Please e-mail me at Chambliss_jess@yahoo.com thx please help me my bf is going off... ;(
The fixit PH00 is the wrong screw driver for this entire job. It did not fit in the screws, it was too pointy and caused screws to be rounded off.
-
-
-
Using both hands, lift and remove the lower case off the upper case.
About midway along each edge is a snap. To release each snap, gently slide the flat edge of a Spudger under the lower case, then lift the lower case away.
-
-
-
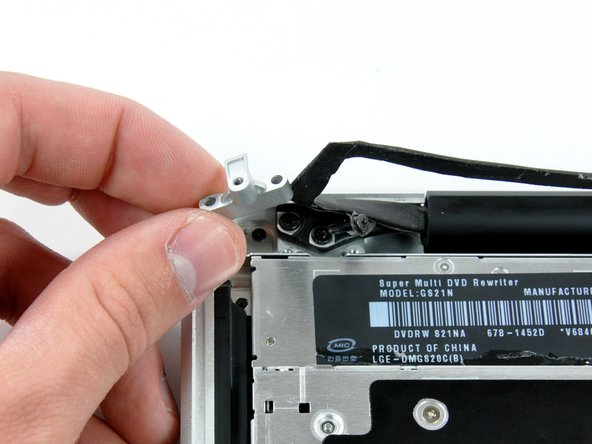
Disconnect the camera cable by pulling the male end straight away from its socket.
You have to be EXTREMELY careful when detaching and reattaching this cable!!! It carries your Bluetooth, iSight camera, and Wifi connections!! I was being very careful when reattaching it and ending up either messing up the connector on the logic board or the cable itself- both cases are equally as bad. The cable doesn't snap back in or have guides, and it is therefore difficult to know if it's in as far as it needs to be, etc. If you mess up the connector on the logic board (that's what it's connecting to), you have to replace the entire logic board, and if you mess up the cable itself (it has very small, delicate metal connectors), you have to replace your entire display!! Each costs around $500/ea! I did a ton of research before embarking on this procedure and really wish someone had made a note of this prior- learn from my mistake!
I had some difficulty getting the 'isight' cable back on. Pay close attention when you remove it as you will need to reattach the cable at an angle to get the small protrusion on the right side of the connector passed the little black plastic block that is glued onto the system board. It looks like this little block is there to keep the cable from slipping out... so it makes it tricky getting it back in.
Personally I would avoid disconnecting the cable from the socket as advised in this step, one should be able to proceed simply by carefully lifting the cable free from the adhesive holding it on to the optical drive.
Like others here, I followed Step 6 as per the guide and ended up with no Bluetooth or iSight camera, due to somehow damaging the connector and/or socket, despite taking the utmost care. It is possible to carefully slip the old drive out, and a new drive in, with the cable connector in situ (at least that was the case on my Late 2008 MacBook Pro).
You can remove the small smooth block that is blocking this plug pretty easy. Once you connect the plug then you can stick that block back in place, it's just glued down.
Looking at the cable socket towards the DVD drive - to the left of the cable socket there is a small rectangular, transparent plastic piece glued to the print board. Its function is to apply pressure to the left of the plug, so that it stays in the socket. Even if you can relatively easy unplug the plug from the socket, this piece of plastic makes it impossible to re-enter the plug into the socket. So, if you can do your thing without un-plugging this cable, you are more safe.
-
Also, IF you decide to take the plastic piece off and glue it back on, face your tool away from the resistors and towards the DVD-drive. I did not and sheared off 3 resistors from the motherboard. Result = Dead machine. Costwise I cannot defend having it repaired, so am shipping it off in parts, as everthing else works.
-
But the 2 GPUs DOES make it a nifty little machine - even past Apple and general progress killing off El Capitan.
BUT I found a guy, who soldered 3 resistors on for next to nothing, and now I have High Sierra running quite well on it with DosDude1's patches. Only thing is a bit choppy vid at 1080 HD watching youtube, when vid restarts after commercials, for some reason. And the speakers are crackling, but easy to fix with rubber cement, perfect.
ok, this step ruined my machine. should have lokked at the comment before removing the cable
-
-
-
-
Remove the following three Phillips screws securing the optical drive to the upper case:
-
One 3.5 mm Phillips screw.
-
Two 2.5 mm Phillips screws.
I can't remove one of the Two 2.5 mm Phillips screw, the one on the top of the picture.
It seems to be very tight and I am using a newertechnology PH00 from my Mac repair tool kit.
I am afraid to damage the head of the screw. What do you suggest to do?
Thanks
You most likely need a jewelers screwdriver to remove the two 2.5 mm screws. they are very tiny and very tight
ph 000 will do the trick
I ruined the head of the 3.5 mm Phillips screw. What kind of screw is this (M1, M1.2, ...?)?
I know this is a little late, but I found a part number from another guide. It says that all three of those screws are the same. Here is the part number for that screw: 922-8662, and here is a link to what I found on that screw: https://www.impactcomputers.com/922-8662...
Under the "specifications" tab, it says that they are M2.
The top screw was locked tight for me also and I eventually stripped the phillips screw head. The only thing I could do is drill it out. Since I replaced the optical drive with an SSD, I didn't need the screw after all.
-
-
-
Remove the optical drive cable by pulling it straight away from the optical drive.
-
-
-
Remove the two black Phillips #0 screws securing the small metal mounting bracket. Transfer this bracket to your new optical drive or hard drive enclosure.
-
-
-
Remove the plastic spacer from the optical bay hard drive enclosure by pressing in on one of the clips on either side and lifting it up and out of the enclosure.
All Macbooks use 9.5mm Optical Drive Caddy, also, If you’re wondering as well, the Optical Drive runs at SATA II speeds just like with the main hard drive area, so if you’re using a SSD, then it’s going to run at a slightly slower speed.
-
-
-
Make sure that the hard drive connectors are facing down before placing it into the enclosure.
-
Gently place the hard drive into the enclosure's hard drive slot.
-
While firmly holding the enclosure in place with one hand, use your other hand to press the hard drive into the enclosure connectors.
Okay it seems like some models of MacBook Pro have issues with a fast (6Gbit/s) SSD in the optical bay. Even though my Mac says it offers 6Gbit on both bays it simply didn't work in the optical bay. So I switched places between the two drives and everything seems to work. My Mac booted from the old HDD in optical bay automatically and then I cloned it afterwards and changed the startup disk to the new one. As said before, don't put a fast SSD in the optical bay!
This is an extremely late response to an old comment, but… whatev’s. My 2011 MacBook Pro had that issue: the main (HDD bay) SATA operated at 6Gbit, and while the optical bay said it was 6Gbit, the “Negotiated Link Speed” was like 1.5Gbits regardless of what you put in it (I can understand 1.5Gbits for an optical drive, but not for an SSD). Some of the early 2012 models did the same thing, from what I understand, but that was corrected pretty early on; both my 13” and 15” 2012’s run at 6Gb/s on both SATA busses.
AJH -
It’s not wise to swop the optidrive for an HD as there is no physical protection. The caddy is only intended for an SSD. -
-
-
Once the hard drive is snug, reinsert the plastic spacer while holding the hard drive against the bottom of the enclosure.
-
-
-
Use two Phillips #1 screws to secure the drive to its enclosure.
Where are these screws coming from? Were they part of the original optical drive?
The new enclosure should include these two Phillips screws.
Can someone show the step of removal process of hdd/SSD placed in the caddy? I am unable to revert this process. Do we have to apply back greater force to remove back the hard drive/SSD from the caddy?
These screws seems to be located in different places on different enclosures. I had serious trouble getting the SSD that the previous owner of this MacBook installed out of the enclosure until I realized the screws holding the SSD in place were on the side and not on the bottom. In case anyone else has the same issue!
nessie1001 - 回复
-
-
-
Attach the optical drive bracket to the new enclosure with two Phillips #0 screws.
-
Reconnect any cables you have removed from the original optical drive onto the optical bay enclosure.
Replaced the optical with hdd, as well as replaced the hard drive with an ssd. Now I get the circle with a line through it. But, when I hold the option key down, it gives me both hard drives, PLUS, the thumb drive I have in the USB port with a Mountain Lion installer. It even shows the recovery disks, but gives me the circle with the line when I choose one. Any help is appreciated.
Mate,
My mbp shipped with OS 10.8, and I had upgraded twice to 10.10
I've a 10.7 USB which upgraded my old MBP.
My plan today was to boot with my new ssd, my time machine back up and the Lion usb plugged in.
I would then click on the Lion usb, and tell it to put the OS and time machine back up on the ssd.
So I help down ALT and when it started it gave me the options of the usual Mac internal or the Lion USB.
I clicked Lion, but instead of taking me to the install options (Disk utility, restore from time machine etc etc) it gave me that grey circle with a diagonal line through it. The no entry sign - grey on grey - that I think you have.
Some googling said that it is because I was trying to usb a 10.7 install on a MBP that shipped 10.8
You can't go back, apparently.
So if any of the OSs are older than the mac you got, you will get this error. The grey in grey no entry.
I just cloned my HDD to my ssd (Carbon copy cloner free 30 day trial) using an external stat-usb3 wire and all is good.
Rory -
I have a 17" Macbook Pro6,1 unibody with an Intel Core i5, 2.53GHz. I was successful installing a 250GB SSD in the DVD bay, and I'm able to boot from it. I did this by first installing OS X 10.9.4 on the SSD mounted into an external HD case, testing the system to see if it would boot up into the SSD, then installing the SSD and carrier in the DVD drive bay. The system now boots up from the SSD with no problems. If you are having installation problems, I recommend trying this method.
roger hall - 回复
I just have finished installing second SSD to my MBP (unibody 15` 2010).
First one was changed like one year ago. Samsung 500GB SSD. It is in my HDD bay and I'm running system from it.
Today I put a new Samsung 1TB 850 Evo 1 SSD in to my optic bay.
I encounter problem with SSD not recognized by Finder.
But It was recognized by Disk Utility.
What I did was I erase new SSD by Disk Utility. Then the new partition was created and now It has been seen by Finder.
So If you see it in Disk Utility just erased it.
Some extra info in under this link--> https://discussions.apple.com/docs/DOC-4...
Wish you all luck :)
My installation went great thanks to the guide. I did notice a small thing that might make a good tip, and that is to inspect all the visible screws. I saw one that was slightly raised, and when I poked around with the spudger, I found 2 more that had worked themselves out a bit. Its probably something super rare but at the age of these things, it wouldn't hurt to check.
-
-
-
Align the cable's SATA connector with the drive's port and plug in securely.
-
Plug the USB connector into your laptop and your optical drive is ready for use.
There is a small metal button in the front of the drive and you can use that to eject the drive if you were wondering.
Maybe that explain the eject button mechanism maybe….
Die neue SSD wurde durch das Laufwerk ersetzt aber leider wird jetzt die alte HDD nicht mehr erkannt. Hatte schon ein anderer das Problem?
-


To reassemble your device, follow these instructions in reverse order.
To reassemble your device, follow these instructions in reverse order.
87等其他人完成本指南。


5条评论
Thank you for this very comprehensive guide. I have been able to use it to add a 2nd 1TB Hard Drive to my smaller 13-inch, Aluminum, Late 2008 Macbook in lieu of its original SuperDrive. However, I am unable to see this 2nd drive on my desktop. This is despite the fact that I have checked “Hard disks” under the General tab in Preferences. I only see my 1st 500 Gb SSD boot drive. What can I do to have the 2nd Hard Drive show on my desktop as well?
Les Lesaca - 回复
Ok, I formatted the new HD and it can now be seen on my desktop!
Les Lesaca - 回复
Hi, I’m planning to do the 2nd disk op, however my idea is to add either a 2Tb SSD or 4TB SSD, leaving the OS and the std office tools (write, table, presentation) on original HDD. SSD would contain data and video/photo editing tools.
Does anyone know if the late2008 accepts, runs the above 1Tb drives (SSDs or HDDs)?
I’ve heard so many no/yes/hmmm/ney replies, seems that no one knows. Not even Apple Support team.
I would be grateful if somebody is able to give a solid advice on this matter.
Vesa Koret - 回复
One of the CDRom small screw got damage and it wont be unscrew is there away for me to remove the CD Rom? Help?
Richard Tirtadji: you can try to fix a “good” screw with a strong glue on the top of the defective one. There are how-to’s at youtube.
The A1286 has no Access Door.!!
I actually can see no sign of the battery!...
aguib - 回复
I assume you have the newer model, with the built-in battery. It's still removable with tools, but these are the wrong instructions for that model.
lgc90 - 回复
when will there be a guide for the other unibody macbook pro. that does not have an access door?
irishking - 回复
Is there a manual to show, how disasembly the display, i mean, after step 5, to check the display between lcd and aluminiun back case?
Max
Max - 回复
On other guides you state the height of the HD that can be supported, e.g. MacBook Pro 15" Core 2 Duo型号A1211 硬盘更换 , I have read ( but have not confirmed ) that the uni-body MacBook Pro can be fitted with the 750GB and 1TB 12mm drive from Western Digital.
Can you confirm this?
Many thanks in advance.
ahothabeth - 回复
My display and aluminum casing has separated.
I don't know if it just snaps back together or does it need to be glued.
I dropped mine on the carpeted stairs and the display still works.
I'm hoping I can just snap it back together and that no plastic pieces or teeth of the snapping
portion have been broken........
SHerwood Ball - 回复
When you say "left fan" is this "left when looking at the logic board after turning the computer over and looking it up opening it up" or "left when sitting at the computer keyboard and typing on it"?
thvv - 回复
We always use left and right in reference to the computer when you're using it.
Andrew Optimus Goldheart -
Directions were great and the worn dc in board was replaced. The hardest part of the procedure is disconnecting the data display cable. A better description of step 21 is to slide the connector parallel to the circuit board towards the outside corner. Reconnecting correctly took several tries.
I used the tip of the spudger to nudge the corners a little at a time to seat the connector.
The ribbon connector for the keyboard has to be inserted all the way before seating the retaining cap. It took me three tries . First try power button did not work second try numbers keys did not work.
Thanks for the directions ...could not have done it with out them!!!
landryd - 回复
Hola. Poseo un MacBook Pro Late 2008 y debo cambiarle las cornetas. Me sirve unas cornetas de un MBP Late 2011?
jegonzalez80 - 回复
Please read the instructions about removing the bluetooth cable - you CAN work around it, and NOT take off the plug.
kenneth krabat - 回复