跳转到主内容

当前版本的文档还未经巡查,您可以查看最新的已查核版本

你所需要的

  1. 这个步骤还没有翻译 帮忙翻译一下

    : 步骤 1 中的图像 1,3 : 步骤 1 中的图像 2,3 : 步骤 1 中的图像 3,3
    • Unzip the jacket and fold back the bottom corner.

    • Identify the start of the seam that is holding the zipper in place.

  2. 这个步骤还没有翻译 帮忙翻译一下

    : 步骤 2 中的图像 1,3 : 步骤 2 中的图像 2,3 : 步骤 2 中的图像 3,3
    • Using a seam ripper, gently remove the stitches on the inside of the zipper.

    • Be careful not to accidentally puncture or tear the jacket.

  3. 这个步骤还没有翻译 帮忙翻译一下

    : 步骤 3 中的图像 1,2 : 步骤 3 中的图像 2,2
    • Bend the zipper teeth away from the zipper webbing to make it easier to reach the stitches that hold the zipper and webbing together.

    • Using the seam ripper, gently rip the seam between the zipper and zipper webbing.

  4. 这个步骤还没有翻译 帮忙翻译一下

    : 步骤 4 中的图像 1,2 : 步骤 4 中的图像 2,2
    • Continue ripping the seam holding the zipper to the webbing until you come to the top of the seam.

  5. 这个步骤还没有翻译 帮忙翻译一下

    : 步骤 5 中的图像 1,2 : 步骤 5 中的图像 2,2
    • When you come to the fold in the zipper webbing, insert the seam ripper between the two layers of webbing, and gently pull the stitches out.

  6. 这个步骤还没有翻译 帮忙翻译一下

    : 步骤 6 中的图像 1,1
    • The zipper should now be free from the jacket and can be discarded.

  7. 这个步骤还没有翻译 帮忙翻译一下

    : 步骤 7 中的图像 1,3 : 步骤 7 中的图像 2,3 : 步骤 7 中的图像 3,3
    • Identify where the zipper flap is still sewn into the jacket. Use the seam ripper to free the zipper flap from the jacket. The yellow rectangle in the photos above will help you identify the zipper flap.

    • Be careful not to damage the jacket with the seam ripper as you free the webbing.

  8. 这个步骤还没有翻译 帮忙翻译一下

    : 步骤 8 中的图像 1,3 : 步骤 8 中的图像 2,3 : 步骤 8 中的图像 3,3
    • Lay the jacket flat and measure from the base of the zipper to the collar, along the seam you just removed. In our case we measured 27 inches.

    • The jacket should be flat, so you get an accurate measurement.

  9. 这个步骤还没有翻译 帮忙翻译一下

    : 步骤 9 中的图像 1,3 : 步骤 9 中的图像 2,3 : 步骤 9 中的图像 3,3
    • Lay out your new zipper on a flat surface and use the measurement you recorded in the step above, starting from the zipper box, or the bottom of the zipper.

    • Mark the measurement with tailor's chalk.

    • Pull the zipper slider back behind the mark you just made.

  10. 这个步骤还没有翻译 帮忙翻译一下

    : 步骤 10 中的图像 1,2 : 步骤 10 中的图像 2,2
    • Measure one inch beyond where you just marked and make a second mark with tailor’s chalk.

  11. 这个步骤还没有翻译 帮忙翻译一下

    : 步骤 11 中的图像 1,2 : 步骤 11 中的图像 2,2
    • Cut the zipper between the teeth at the second mark you made.

  12. 这个步骤还没有翻译 帮忙翻译一下

    : 步骤 12 中的图像 1,3 : 步骤 12 中的图像 2,3 : 步骤 12 中的图像 3,3
    • Use end nipper pliers to remove the teeth of the zipper between the two marks.

    • Use needle-nose pliers to remove all the leftover bits of the teeth from the zipper.

  13. 这个步骤还没有翻译 帮忙翻译一下

    : 步骤 13 中的图像 1,3 : 步骤 13 中的图像 2,3 : 步骤 13 中的图像 3,3
    • Take a zipper stop and align it, posts down, just beyond the last remaining zipper tooth.

    • Crimp the zipper stop onto the zipper using pliers.

  14. 这个步骤还没有翻译 帮忙翻译一下

    : 步骤 14 中的图像 1,3 : 步骤 14 中的图像 2,3 : 步骤 14 中的图像 3,3
    • Fold the excess zipper tape away from the teeth at a slight angle.

    • Sew the toothless end of the zipper down, backstitching to hold it in place.

  15. 这个步骤还没有翻译 帮忙翻译一下

    : 步骤 15 中的图像 1,3 : 步骤 15 中的图像 2,3 : 步骤 15 中的图像 3,3
    • Align the toothless edge of the zipper with the inside serged edge of the zipper webbing.

    • The serged edge is the one with the zig-zag stitching.

    • Fold the top of the webbing down over the sewn zipper tape.

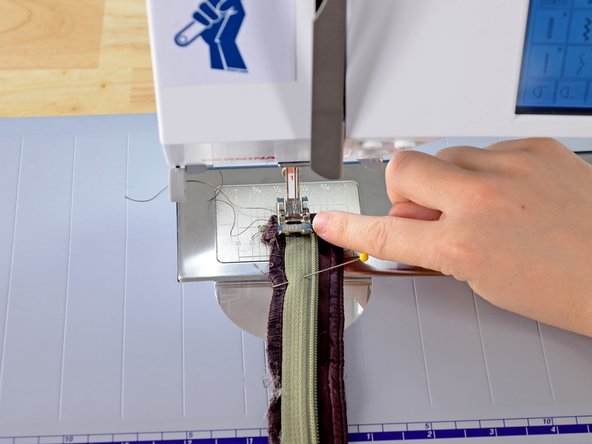
    • You can pin the zipper and webbing in place for more stability.

  16. 这个步骤还没有翻译 帮忙翻译一下

    : 步骤 16 中的图像 1,2 : 步骤 16 中的图像 2,2
    • Align the zipper and webbing in the sewing machine so that the zipper teeth are along the edge of the presser foot.

    • Sew a few stitches, removing pins before you come to them.

  17. 这个步骤还没有翻译 帮忙翻译一下

    : 步骤 17 中的图像 1,3 : 步骤 17 中的图像 2,3 : 步骤 17 中的图像 3,3
    • Sew along the edge of the zipper teeth, making sure that the zipper and webbing stay aligned.

  18. 这个步骤还没有翻译 帮忙翻译一下

    : 步骤 18 中的图像 1,2 : 步骤 18 中的图像 2,2
    • Reinsert the zipper and webbing into the jacket, aligning the edge of the jacket fabric with the zipper teeth.

  19. 这个步骤还没有翻译 帮忙翻译一下

    : 步骤 19 中的图像 1,2 : 步骤 19 中的图像 2,2
    • While holding the zipper in place, move the fabric underneath the zipper out of the way so you’re only sewing the zipper to one layer of fabric.

  20. 这个步骤还没有翻译 帮忙翻译一下

    : 步骤 20 中的图像 1,2 : 步骤 20 中的图像 2,2
    • Install the zipper foot into your sewing machine.

    • Align the jacket and zipper in the sewing machine.

    • Be sure that there is no fabric behind the zipper webbing before you sew.

  21. 这个步骤还没有翻译 帮忙翻译一下

    : 步骤 21 中的图像 1,2 : 步骤 21 中的图像 2,2
    • Check your alignment and begin sewing, guiding the fabric along the zipper teeth.

    • Go slowly, re-aligning the fabric as you go.

  22. 这个步骤还没有翻译 帮忙翻译一下

    : 步骤 22 中的图像 1,2 : 步骤 22 中的图像 2,2
    • Continue sewing and re-aligning the zipper as you proceed along the full length of the zipper.

  23. 这个步骤还没有翻译 帮忙翻译一下

    : 步骤 23 中的图像 1,1
    • When you reach the end of the zipper, backstitch to hold your stitches in place and remove the jacket from the sewing machine.

  24. 这个步骤还没有翻译 帮忙翻译一下

    : 步骤 24 中的图像 1,3 : 步骤 24 中的图像 2,3 : 步骤 24 中的图像 3,3
    • Align the inside jacket fabric along the backside of the webbing.

    • Try to align the stitch holes directly over the stitches you just sewed.

  25. 这个步骤还没有翻译 帮忙翻译一下

    : 步骤 25 中的图像 1,3 : 步骤 25 中的图像 2,3 : 步骤 25 中的图像 3,3
    • Align the jacket in the sewing machine, with the zipper webbing facing up.

    • Holding the inside fabric of the jack in place, sew directly over the original stitching.

    • Go slowly, re-aligning the fabric as you go.

    • Clip the threads, and admire your work!

    • Repeat this guide, ironing the webbing when you’re finished, to install the other side of the zipper.

终点

10等其他人完成本指南。

Brittany McCrigler

于03/05/12注册

89,011 声望

创作了131篇指南

团队

iFixit iFixit 的会员

Staff

135 名成员

创作了16,734篇指南

3条评论

Very well documented.

Mike Macey - 回复

Have not yet completed my zipper repair very good tutorial. Thanks

mildred Norton - 回复

Well done, thank you so much. I was worried about the down falling out after I rip the old zipper, but I see that isn't a problem!

Js W - 回复

添加评论

浏览统计数据:

过去 24 小时: 17

过去 7 天: 131

过去 30 天: 517

总计 74,089