跳转到主内容

Insignia NS-D160A14 A/V Board Replacement

你所需要的

  1. Insignia NS-D160A14 A/V Board Replacement, Outer Case: 步骤 1 中的图像 1,1
    • Unplug the power cord before proceeding to open the DVD player's enclosure.

    • Remove the two 7mm Phillips #2 screws from the back of the DVD player.

  2. Insignia NS-D160A14 A/V Board Replacement: 步骤 2 中的图像 1,1
    • Carefully lift the outer case up, starting from the back.

    • Removing the outer case may require some force, and you will need to get the case into an angled position compared to the rest of the DVD player before it can be completely separated.

  3. Insignia NS-D160A14 A/V Board Replacement, Front Panel: 步骤 3 中的图像 1,3 Insignia NS-D160A14 A/V Board Replacement, Front Panel: 步骤 3 中的图像 2,3 Insignia NS-D160A14 A/V Board Replacement, Front Panel: 步骤 3 中的图像 3,3
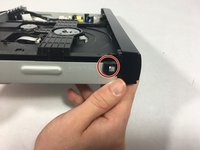
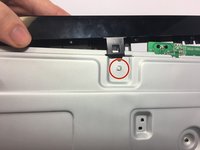
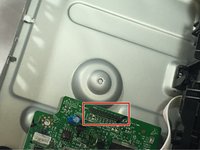
    • Unhook the 4 hooks on the main casing.

    • There is one hook on the top of the casing, one on the bottom, and one on each side.

    • These hooks are brittle and can easily break.

  4. Insignia NS-D160A14 A/V Board Replacement, Motherboard: 步骤 4 中的图像 1,1
    • Remove the central 7 mm screw holding the motherboard in place.

    • Be sure to ground yourself before manipulating the motherboard. A static shock could render one or more components on the motherboard useless.

  5. Insignia NS-D160A14 A/V Board Replacement: 步骤 5 中的图像 1,1
    • Disconnect the white power cord connector from the motherboard.

  6. Insignia NS-D160A14 A/V Board Replacement: 步骤 6 中的图像 1,2 Insignia NS-D160A14 A/V Board Replacement: 步骤 6 中的图像 2,2
    • Keeping the 8-pin connector as straight as possible, lift the motherboard out of case.

    • You may need to bend the side of the case slightly to give the motherboard room to be lifted out.

  7. Insignia NS-D160A14 A/V Board Replacement, A/V Board: 步骤 7 中的图像 1,2 Insignia NS-D160A14 A/V Board Replacement, A/V Board: 步骤 7 中的图像 2,2
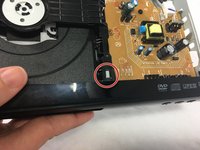
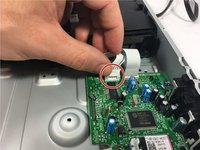
    • Remove the two white cables connected to the A/V board from the optical drive using your fingers.

    • Be careful when removing the cables on the A/V board. Don't apply too much pressure, or the wires could be damaged.

  8. Insignia NS-D160A14 A/V Board Replacement: 步骤 8 中的图像 1,2 Insignia NS-D160A14 A/V Board Replacement: 步骤 8 中的图像 2,2
    • Lift the A/V board upwards until you feel it come free from the indentations in the housing.

    • Gently push on the A/V jacks with your thumb from the outside as you lift the board out.

结论

To reassemble your device, follow these instructions in reverse order.

Cglocke

于07/21/16注册

176 声望

撰写一个指南

团队

0条评论

添加评论

浏览统计数据:

过去 24 小时: 0

过去 7 天: 0

过去 30 天: 0

总计 471