跳转到主内容

InMotion V8 (and variants) Electric Unicycle (EUC) Inner Tube Replacement

你所需要的

  1. InMotion V8 (and variants) Electric Unicycle (EUC) Inner Tube Replacement, Procure the Correct Tube: 步骤 1 中的图像 1,3 InMotion V8 (and variants) Electric Unicycle (EUC) Inner Tube Replacement, Procure the Correct Tube: 步骤 1 中的图像 2,3 InMotion V8 (and variants) Electric Unicycle (EUC) Inner Tube Replacement, Procure the Correct Tube: 步骤 1 中的图像 3,3
    • The correct tube size is 16" x 2.125"

    • The valve stem must be angled, not straight

    • There are several angles that angled valve stems could have for 16x2.125 tubes.

    • The correct stem is bent 90 degrees aligned with the plane of the inflated tube

    • A stem bent 90 degrees and rotated normal/orthogonal to the plane of the tube will catch in the wheelwell

    • I was able to "cram" this tube with the stem that is bent about 60 degrees and rotated about 30 degrees. I had to twist the stem before and during inflation so that the cap wouldn't click against my wheelwell. It held air for about 300 miles and now I'm changing it again.

  2. InMotion V8 (and variants) Electric Unicycle (EUC) Inner Tube Replacement, Remove the Pedals: 步骤 2 中的图像 1,3 InMotion V8 (and variants) Electric Unicycle (EUC) Inner Tube Replacement, Remove the Pedals: 步骤 2 中的图像 2,3 InMotion V8 (and variants) Electric Unicycle (EUC) Inner Tube Replacement, Remove the Pedals: 步骤 2 中的图像 3,3
    • To change the inner tube or tire, you will need to remove both pedals

    • Use a 4mm Allen/Hex wrench to loosen the screw in the pedal hanger pillar. You will need to remove it to apply Loctite prior to reassembly. Turn counterclockwise to loosen.

    • Use a 5mm Allen/Hex wrench to remove the two screws that capture the hinge pin. Turn counterclockwise to loosen.

    • One of the screws was difficult to turn. I slipped the handle of a "four-way screwdriver" over an Allen wrench for comfort and leverage.

    • Avoid causing tool scaring on the end of the hinge pin. The pedals are held folded by a Teflon surface compressed against the end of the hinge pin.

    • Insert a hex wrench at one end of the pedal to push the hinge pin out far enough that you can pull the pin out by hand.

    • (in the photo, you are noticing that I taped some baby-proofing to the underside of the pedal)

  3. InMotion V8 (and variants) Electric Unicycle (EUC) Inner Tube Replacement, Prepare to Remove the Lenses: 步骤 3 中的图像 1,2 InMotion V8 (and variants) Electric Unicycle (EUC) Inner Tube Replacement, Prepare to Remove the Lenses: 步骤 3 中的图像 2,2
    • Remove the two screws securing each lens, using a small Phillips screwdriver.

    • My screw was corroding, so use the correct size tool and avoid stripping the screw head.

    • Open the trolley handle so that the lens can turn

  4. InMotion V8 (and variants) Electric Unicycle (EUC) Inner Tube Replacement, Remove Lenses: 步骤 4 中的图像 1,2 InMotion V8 (and variants) Electric Unicycle (EUC) Inner Tube Replacement, Remove Lenses: 步骤 4 中的图像 2,2
    • Open the covers beneath each pedal so that the lens can turn

    • The lens is attached by "bayonet" hooks and should easily rotate a few mm counter-clockwise and lift off easily

    • If the lens is stuck, use finesse, don't pound on the lens to break it free. I found mechanical interference at the hinge pin and needed to slide the pin over

    • The lens should rotate and the bayonet should disconnect, by applying a heel-strike to the right-hand side of the upper pad.

  5. InMotion V8 (and variants) Electric Unicycle (EUC) Inner Tube Replacement, Inspection Point: 步骤 5 中的图像 1,1
    • Observe what level of environmental (dust and water) penetration your riding causes

    • DO NOT REMOVE those screws around the circumference holding the halves of the splash guard together. Maintaining the integrity of the seal maintains your "ingress protection" level, and bbulkow says you could break the switch or backup light.

  6. InMotion V8 (and variants) Electric Unicycle (EUC) Inner Tube Replacement, Detatch the Wheelwell from the Pedal Hangers: 步骤 6 中的图像 1,3 InMotion V8 (and variants) Electric Unicycle (EUC) Inner Tube Replacement, Detatch the Wheelwell from the Pedal Hangers: 步骤 6 中的图像 2,3 InMotion V8 (and variants) Electric Unicycle (EUC) Inner Tube Replacement, Detatch the Wheelwell from the Pedal Hangers: 步骤 6 中的图像 3,3
    • Remove bolts securing the wheelwell to the pedal hangers

    • Remove hinge pins beneath pedal hangers if still engaged

    • I needed to slide one of the hinge pins to disengage and remove it. Do not pry on the pin.

  7. InMotion V8 (and variants) Electric Unicycle (EUC) Inner Tube Replacement, Disconnect the Battery: 步骤 7 中的图像 1,2 InMotion V8 (and variants) Electric Unicycle (EUC) Inner Tube Replacement, Disconnect the Battery: 步骤 7 中的图像 2,2
    • The battery voltage is 84VDC, that's enough to shock you

    • Pull the battery connector from where it is tucked beneath the right handle anchor

    • Using both hands to pull on the halves of the connector, disconnect the battery connector.

    • Do not tug on the power wires, as strands can break or the wire ends can separate from the connector pins potentially resulting in a glitch while you are riding.

  8. InMotion V8 (and variants) Electric Unicycle (EUC) Inner Tube Replacement, Remove the Cover of the Controller Board: 步骤 8 中的图像 1,3 InMotion V8 (and variants) Electric Unicycle (EUC) Inner Tube Replacement, Remove the Cover of the Controller Board: 步骤 8 中的图像 2,3 InMotion V8 (and variants) Electric Unicycle (EUC) Inner Tube Replacement, Remove the Cover of the Controller Board: 步骤 8 中的图像 3,3
    • Using a small Phillips screwdriver, open the cover for the controller board

    • Unplug battery power from the controller board (the connector in line with the red and black pair of wires)

    • Inspect and be careful with wires, I found a pinched / damaged wire in my unit. An intermittent connection in the strands of a wire or in a connector could spill a rider!

  9. InMotion V8 (and variants) Electric Unicycle (EUC) Inner Tube Replacement, Disconnect the Motor from the Controller Board: 步骤 9 中的图像 1,2 InMotion V8 (and variants) Electric Unicycle (EUC) Inner Tube Replacement, Disconnect the Motor from the Controller Board: 步骤 9 中的图像 2,2
    • Observe and record (just take a photo...) which color of motor phase wire is connected to which terminal on the controller board. You will use this information during reassembly.

    • Disconnect the three motor phase wires (Yellow, Green, and Blue at the left of the photo) by pulling the connector (not the wire) straight up from the board

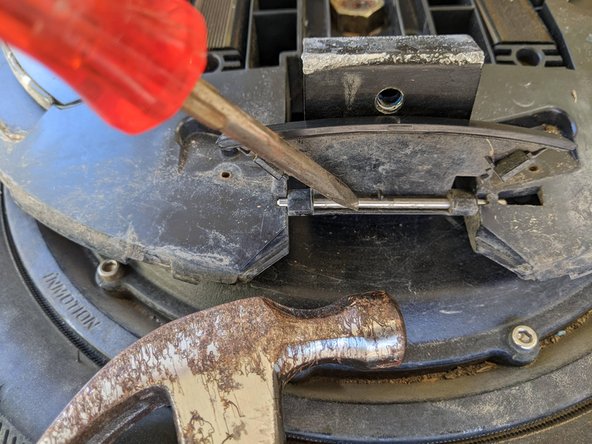
    • Disconnect the sensor connector. The connector is held on by an integrated clip, squeeze the lever to release.

    • Do not pull on electrical wires, they can separate from their connector

    • No other wires need be disconnected from the controller!

  10. InMotion V8 (and variants) Electric Unicycle (EUC) Inner Tube Replacement, Remove the Wheelwell from the Pedal Hangers: 步骤 10 中的图像 1,1
    • Grasping the handle and the tire and pull apart to separate the wheelwell from the motor. The two parts should separate easily.

  11. InMotion V8 (and variants) Electric Unicycle (EUC) Inner Tube Replacement, Remove the Valve Core: 步骤 11 中的图像 1,1
    • Deflate the inner tube by removing the valve core using a tool for Schrader valves. This could be a separate tool, or one that is integrated with the valve cap. The photo shows both tools.

  12. InMotion V8 (and variants) Electric Unicycle (EUC) Inner Tube Replacement, Remove the Tire: 步骤 12 中的图像 1,1
    • I was able to accomplish this easily without tools. I was able to work both beads over the wheel simultaneously.

    • Pull the tire to one side and deform the bead over the wheel. Rotate the tire and work the bead off of the wheel all around.

  13. InMotion V8 (and variants) Electric Unicycle (EUC) Inner Tube Replacement, Remove the Tube: 步骤 13 中的图像 1,1
    • Inspect the tube and the tire and clean the inside of the tire to be certain that any damaging foreign objects have been removed

    • The tire as well as the tube may be replaced during reassembly. You may choose to patch the tube.

  14. InMotion V8 (and variants) Electric Unicycle (EUC) Inner Tube Replacement, Reinstall the tube into the tire: 步骤 14 中的图像 1,1
    • Apply any tire insert, such as Tube Defender from flattiredefender, or Mr. Tuffy tire liner. I haven't experimented yet.

    • Insert the tube into the tire. If there is a direction-of-travel arrow on the side of the tire, it should point opposite the direction of the valve stem.

    • Some tread patterns are optimized for shedding water and mud in a direction of travel and are marked with an arrow on the sidewall.

    • The valve stem needs to point away from the direction of travel to protect it from snagging on any foreign objects.

    • Inspect that the tube is not twisted

  15. InMotion V8 (and variants) Electric Unicycle (EUC) Inner Tube Replacement, Reinstall the tire and tube onto the motor: 步骤 15 中的图像 1,2 InMotion V8 (and variants) Electric Unicycle (EUC) Inner Tube Replacement, Reinstall the tire and tube onto the motor: 步骤 15 中的图像 2,2
    • Insert the valve stem into the wheel with the stem pointed away from forward rotation.

    • Verify your valve stem is angled as shown in the photo. If the stem is on top, it should point to the right.

    • Work one of the beads entirely onto the wheel.

    • Inspect that the tube is not caught between the installed tire bead and the wheel rim.

    • Work the tube entirely into the wheel rim so that installing the second tire bead will not damage the tube

    • Work the second tire bead over the wheel rim.

    • Inspect that the tube is not twisted, and is not caught between the tire and rim, and the valve stem is centered in the hole of the wheel

  16. InMotion V8 (and variants) Electric Unicycle (EUC) Inner Tube Replacement, Reinsert the Motor Assembly into Wheelwell: 步骤 16 中的图像 1,1
    • Align and slide the motor assembly into the housing. This could be easiest with the motor upright and lowering the housing.

    • Reconnect the motor power and sensor wires to the controller board.

  17. InMotion V8 (and variants) Electric Unicycle (EUC) Inner Tube Replacement, Reinstall the Controller Board Cover: 步骤 17 中的图像 1,3 InMotion V8 (and variants) Electric Unicycle (EUC) Inner Tube Replacement, Reinstall the Controller Board Cover: 步骤 17 中的图像 2,3 InMotion V8 (and variants) Electric Unicycle (EUC) Inner Tube Replacement, Reinstall the Controller Board Cover: 步骤 17 中的图像 3,3
    • Several cautions here:

    • Do not connect the battery power yet

    • Observe the cover is assymmetric, the location of the upper screw tabs is to the sides, the location of the lower screw tabs is at a 45 degree angle. There is only one correct orientation for the cover.

    • Before covering the wire bundles, position the bundles over the side openings so that turning screws and drawing the cover together with the housing will not cut or damage any wire bundle.

    • Add small zip-ties to contain the left and right wire bundles at the bulkhead openings in the controller cover.

  18. InMotion V8 (and variants) Electric Unicycle (EUC) Inner Tube Replacement, Reattach the Housing to the Motor: 步骤 18 中的图像 1,2 InMotion V8 (and variants) Electric Unicycle (EUC) Inner Tube Replacement, Reattach the Housing to the Motor: 步骤 18 中的图像 2,2
    • Using a 4mm Allen wrench, reinstall the attachment screws.

    • The plastic housing is brittle. Do not crush the plastic housing by over-tightening. Use Loctite, and tighten gently.

  19. InMotion V8 (and variants) Electric Unicycle (EUC) Inner Tube Replacement, Inflate the Tire: 步骤 19 中的图像 1,1
    • Inflate the inner tube to 30psi.

    • Verify that the tire spins freely and that the valve stem does not click against the housing.

    • Optionally, remove the core and apply a dose of tire sealant.

  20. InMotion V8 (and variants) Electric Unicycle (EUC) Inner Tube Replacement, Reconnect the Battery: 步骤 20 中的图像 1,1
    • Reconnect the battery connector

    • Tuck the battery connector into the cavity beneath the right-hand anchor point of the carry handle.

    • Inspection point: This would be a great time to set the EUC upright on the floor and power it up to see that all of the control system is functioning correctly.

    • Inspect and adjust the route of the power wires so there will be no interference with the lens that is stressful to the wiring

  21. InMotion V8 (and variants) Electric Unicycle (EUC) Inner Tube Replacement, Reinstall the Trim Covers beneath the Pedal Anchors: 步骤 21 中的图像 1,1
    • Insert wisdom here.

  22. InMotion V8 (and variants) Electric Unicycle (EUC) Inner Tube Replacement, Reinstall the Lenses: 步骤 22 中的图像 1,1
    • Thread the lens over the open trolley handle, fully open the trim pieces beneath the pedals, settle into place, and engage the bayonet attachment by striking the left side of the top pad using the heel of your hand.

    • This should not be difficult if the alignment is correct

    • Reinstall the small flat-head screws to retain the lens

    • The trolley handle should operate freely.

    • Repeat for second lens.

    • Close the trim covers beneath the pedals.

  23. InMotion V8 (and variants) Electric Unicycle (EUC) Inner Tube Replacement, Reinstall the Pedals: 步骤 23 中的图像 1,2 InMotion V8 (and variants) Electric Unicycle (EUC) Inner Tube Replacement, Reinstall the Pedals: 步骤 23 中的图像 2,2
    • The pedal screws must be installed using Loctite so that they don't work loose and the pedals flop open

    • Sequence: The center 4mm set screw must be tightened after the 5mm hinge pin screws to avoid asymmetric forces moving the hinge pin.

    • Thread the pedal, spacer bead, pedal anchor, second spacer bead, and remainder of pedal onto the hinge pin

    • Wipe clean and reinstall the 5mm screws at the ends of the hinge pin, first applying a drop of Loctite.

    • Reinstall the 4mm screw at the center of the pedal anchor, first applying a drop of Loctite.

    • Verify the retention force on the pedal is to your taste, adjusting the 5mm screws slightly as needed. I don't want the pedal to fall open, but I do want to be able to open the pedal using my foot.

结论

To reassemble your device, follow these instructions in reverse order.

Student4Life

于05/27/17注册

2,613 声望

创作了7篇指南

0条评论

添加评论

浏览统计数据:

过去 24 小时: 1

过去 7 天: 12

过去 30 天: 38

总计 1,216