跳转到主内容

Huawei P8 Lite Display with Frame Replacement

你所需要的

  1. Huawei P8 Lite Display with Frame Replacement, Back Cover: 步骤 1 中的图像 1,2 Huawei P8 Lite Display with Frame Replacement, Back Cover: 步骤 1 中的图像 2,2
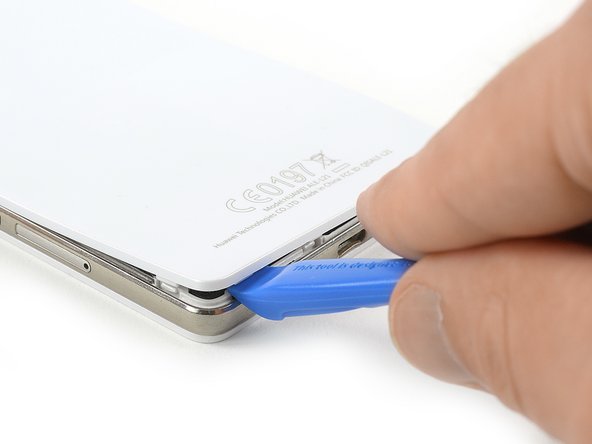
    • Use an Opening Tool and start to lever up the back cover of your Huawei P8 Lite at the bottom of your phone.

  2. Huawei P8 Lite Display with Frame Replacement: 步骤 2 中的图像 1,3 Huawei P8 Lite Display with Frame Replacement: 步骤 2 中的图像 2,3 Huawei P8 Lite Display with Frame Replacement: 步骤 2 中的图像 3,3
    • There are clips around the whole mid frame, holding down the back cover. Open all of them with the Opening Tool.

    • When all clips are open, remove the back cover from the rest of the phone.

    • If the back cover doesn't come freely, there are probably some additional clips that need to be disconnected.

  3. Huawei P8 Lite Display with Frame Replacement, Loudspeaker: 步骤 3 中的图像 1,1
    • Use a tweezer to remove the warranty sticker which sits on a screw in the bottom right of your phone.

  4. Huawei P8 Lite Display with Frame Replacement: 步骤 4 中的图像 1,1
    • Remove the 4 black Torx T5 screws which hold down the lower part of the loudspeaker.

    • Remove the three silver Phillips #00 screws which hold down the upper part of the loudspeaker.

  5. Huawei P8 Lite Display with Frame Replacement: 步骤 5 中的图像 1,1
    • Remove the loudspeaker carefully.

  6. Huawei P8 Lite Display with Frame Replacement, Motherboard: 步骤 6 中的图像 1,3 Huawei P8 Lite Display with Frame Replacement, Motherboard: 步骤 6 中的图像 2,3 Huawei P8 Lite Display with Frame Replacement, Motherboard: 步骤 6 中的图像 3,3
    • Remove the three Phillips #00 screws that hold the metal plate in place.

    • Remove the metal plate with a tweezer.

    • Unplug the battery flex connector with a spudger.

  7. Huawei P8 Lite Display with Frame Replacement: 步骤 7 中的图像 1,1
    • Remove the two Torx T5 screws.

    • If there is a tamper evident sticker over your screws remove them to properly seat your driver.

    • Remove the five Phillips #00 screws.

  8. Huawei P8 Lite Display with Frame Replacement: 步骤 8 中的图像 1,2 Huawei P8 Lite Display with Frame Replacement: 步骤 8 中的图像 2,2
    • Carefully pry off the plastic cover on the left side. The NFC antenna contacts might be slightly glued to the cover.

    • Then remove the top cover.

  9. Huawei P8 Lite Display with Frame Replacement: 步骤 9 中的图像 1,3 Huawei P8 Lite Display with Frame Replacement: 步骤 9 中的图像 2,3 Huawei P8 Lite Display with Frame Replacement: 步骤 9 中的图像 3,3
    • Remove the SIM card and SD card trays.

    • Disconnect the three plug connectors and one ZIF connector.

    • Unlock the ZIF connector by lifting the small black plastic lever.

  10. Huawei P8 Lite Display with Frame Replacement: 步骤 10 中的图像 1,3 Huawei P8 Lite Display with Frame Replacement: 步骤 10 中的图像 2,3 Huawei P8 Lite Display with Frame Replacement: 步骤 10 中的图像 3,3
    • Remove the volume and power button cable.

    • Take out the motherboard by lifting the bottom part first.

    • Pay attention to the cables, so they don't rip when staying stuck to the motherboard.

    • On the back of the motherboard there is a thermal pad (pink rubber-like gob) for heat dissipation. If this thermal pad broke or is too dried out you might want to replace it with a new one.

  11. Huawei P8 Lite Display with Frame Replacement, Vibrator: 步骤 11 中的图像 1,2 Huawei P8 Lite Display with Frame Replacement, Vibrator: 步骤 11 中的图像 2,2
    • Pry off the vibrator using a plastic opening tool.

  12. Huawei P8 Lite Display with Frame Replacement, Earpiece Speaker: 步骤 12 中的图像 1,2 Huawei P8 Lite Display with Frame Replacement, Earpiece Speaker: 步骤 12 中的图像 2,2
    • Lift out the earpiece speaker of its recess with a tweezer.

    • It is glued in place with a mild adhesive, so you might need a little prying.

  13. Huawei P8 Lite Display with Frame Replacement, Display with Frame: 步骤 13 中的图像 1,1
    • To avoid thermal runaway, including fire, do not bend or puncture the battery

    • Use the pull tab as seen here in the battery guide to remove one of the adhesives strips underneath the battery.

    • Use an opening pick or spudger to carefully pry the battery out the rest of the way.

    • Never reinstall a battery that has been bent or damaged during removal.

  14. Huawei P8 Lite Display with Frame Replacement: 步骤 14 中的图像 1,1
    • Inspect your new display assembly and be sure to transfer any missing parts from the old one.

结论

To reassemble your device, follow these instructions in reverse order.

22等其他人完成本指南。

Tobias Isakeit

于03/31/14注册

117,293 声望

创作了188篇指南

团队

Master Techs Master Techs 的会员

Community

322 名成员

创作了2,521篇指南

4条评论

Hat super geklappt, danke! Zwei wichtige Dinge - NFC Antenne ist schwer von Batterie zu lösen- müsste gleich bei Akku mit beschrieben sein und bei Schritt 7 oder 11, dass man noch eine Steckverbindung lösen muss (verklebt!) und übertragen muss. Hat geklappt, danke Euch - eure tools sind super dazu!

allehoffis - 回复

Danke allehoffis für dein Feedback. Freut mich, dass alle so weit geklappt hat. Ja, die NFC Antenne klebt da gut dran. Im separaten Akku-Guide ist darauf hingewiesen, dass sie schwer zu lösen ist. Vlt kommt hier auch noch eine Notiz dazu. In Schritt 6 wird die ZIF Verbindung getrennt. Ist es das, was du meinst mit “verklebt”?

Tobias Isakeit -

Hat alles super geklappt, danke für diese Anleitung

pt5878-631 - 回复

gracias!!!!!!

adrian - 回复

添加评论

浏览统计数据:

过去 24 小时: 1

过去 7 天: 3

过去 30 天: 17

总计 11,234