跳转到主内容

Huawei P8 Lite Battery Replacement

你所需要的

  1. Huawei P8 Lite Battery Replacement, Back Cover: 步骤 1 中的图像 1,2 Huawei P8 Lite Battery Replacement, Back Cover: 步骤 1 中的图像 2,2
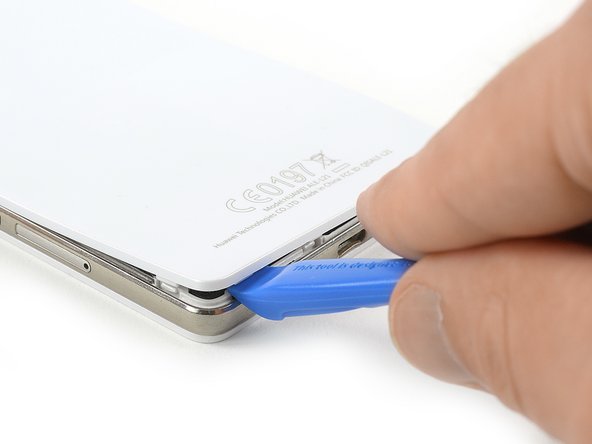
    • Use an Opening Tool and start to lever up the back cover of your Huawei P8 Lite at the bottom of your phone.

  2. Huawei P8 Lite Battery Replacement: 步骤 2 中的图像 1,3 Huawei P8 Lite Battery Replacement: 步骤 2 中的图像 2,3 Huawei P8 Lite Battery Replacement: 步骤 2 中的图像 3,3
    • There are clips around the whole mid frame, holding down the back cover. Open all of them with the Opening Tool.

    • When all clips are open, remove the back cover from the rest of the phone.

    • If the back cover doesn't come freely, there are probably some additional clips that need to be disconnected.

  3. Huawei P8 Lite Battery Replacement, Loudspeaker: 步骤 3 中的图像 1,1
    • Use a tweezer to remove the warranty sticker which sits on a screw in the bottom right of your phone.

  4. Huawei P8 Lite Battery Replacement: 步骤 4 中的图像 1,1
    • Remove the 4 black Torx T5 screws which hold down the lower part of the loudspeaker.

    • Remove the three silver Phillips #00 screws which hold down the upper part of the loudspeaker.

  5. Huawei P8 Lite Battery Replacement: 步骤 5 中的图像 1,1
    • Remove the loudspeaker carefully.

  6. Huawei P8 Lite Battery Replacement, Battery: 步骤 6 中的图像 1,3 Huawei P8 Lite Battery Replacement, Battery: 步骤 6 中的图像 2,3 Huawei P8 Lite Battery Replacement, Battery: 步骤 6 中的图像 3,3
    • Remove the three Phillips #00 screws that hold the metal plate in place.

    • Remove the metal plate with a tweezer.

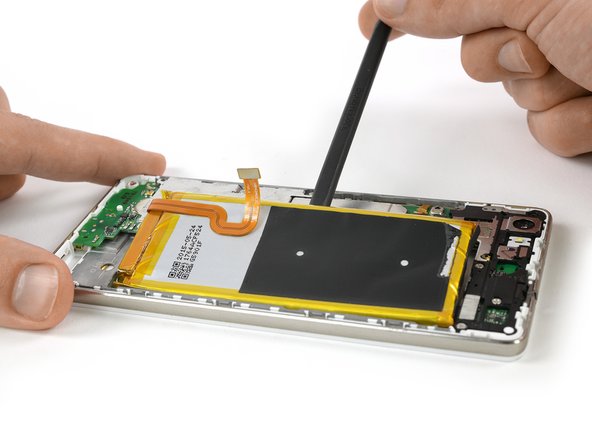
    • Unplug the battery flex connector with a spudger.

  7. Huawei P8 Lite Battery Replacement: 步骤 7 中的图像 1,2 Huawei P8 Lite Battery Replacement: 步骤 7 中的图像 2,2
    • To protect your motherboard during battery removal, you can reinstall the shield plate, allowing for safer prying.

    • Screw the three Phillips #00 screws back into the motherboard shield.

  8. Huawei P8 Lite Battery Replacement: 步骤 8 中的图像 1,2 Huawei P8 Lite Battery Replacement: 步骤 8 中的图像 2,2
    • Use a tweezer to loosen the adhesive strip and lift it up to give you an easy grip.

    • Gently pull out the adhesive strip. Don't pull it in a steep but in a flat angle and with caution. It can tear in two pieces easily.

    • If your phone is equipped with an NFC antenna continue with the next step to get it off. Skip the next step if it does not have an NFC antenna.

  9. Huawei P8 Lite Battery Replacement: 步骤 9 中的图像 1,3 Huawei P8 Lite Battery Replacement: 步骤 9 中的图像 2,3 Huawei P8 Lite Battery Replacement: 步骤 9 中的图像 3,3
    • Remove the Phillips #00 screw.

    • Use a tweezer to remove the plastic cover.

    • Carefully peel up the NFC tag and remove it.

    • When reassembling make sure to install the NFC antenna onto the new battery and connect it.

  10. Huawei P8 Lite Battery Replacement: 步骤 10 中的图像 1,3 Huawei P8 Lite Battery Replacement: 步骤 10 中的图像 2,3 Huawei P8 Lite Battery Replacement: 步骤 10 中的图像 3,3
    • There are three adhesive strips beneath the battery you'll need to undo. One under the top, the mid and the bottom of the battery.

    • Be very careful not to pry against the motherboard, you may damage surface mount components and lose functionality.

    • Use a Spudger to carefully start to pry out your battery.

  11. Huawei P8 Lite Battery Replacement: 步骤 11 中的图像 1,3 Huawei P8 Lite Battery Replacement: 步骤 11 中的图像 2,3 Huawei P8 Lite Battery Replacement: 步骤 11 中的图像 3,3
    • Undo the adhesive beneath the battery with the Spudger.

    • The easiest way to do so is by moving the Spudger in small movements like a lever.

  12. Huawei P8 Lite Battery Replacement: 步骤 12 中的图像 1,1
    在这个步骤中使用的工具:
    Tesa 61395 Tape
    $5.99
    购买
    • Remove the battery.

    • If you reinstalled the metal motherboard shield to protect the motherboard while prying, you will have to remove it to connect your new battery.

    • When reassembling your phone replace old adhesive with double-sided tape or pre-cut adhesive strips.

结论

To reassemble your device, follow these instructions in reverse order and apply new adhesive strips where necessary.

60等其他人完成本指南。

Dominik Schnabelrauch

于11/23/16注册

203,329 声望

创作了682篇指南

团队

iFixit iFixit 的会员

Staff

135 名成员

创作了16,817篇指南

10条评论

Thanks for your sweet effort

Hussien - 回复

Très bon tuto ! Merci beaucoup :-)

ps : j’ai galéré a décollé la batterie

Jérôme Blanchart - 回复

Hat wunderbar funktioniert! Nun läuft mein P8 Lite wieder!

2711chrissi - 回复

One thing to be careful of that I just did, and screwed up my nieces phone.

You see that black square hole in the aluminium chassis under the battery? Yeah be very very careful when sticking your prying tool under the battery. The LCD us right behind it. Try and stay very far away from those holes in the chassis when you do your prying.

Her screen now has Horizontal and vertical lines right across the centre of the screen.

Sigh.

Terrence Wilson - 回复

Super Anleitung, Danke kann ich weiter empfehlen!

del Grosso - 回复

添加评论

浏览统计数据:

过去 24 小时: 10

过去 7 天: 49

过去 30 天: 160

总计 83,336