跳转到主内容

当前版本的文档还未经巡查,您可以查看最新的已查核版本

你所需要的

  1. 这个步骤还没有翻译 帮忙翻译一下

    : 步骤 1 中的图像 1,2 : 步骤 1 中的图像 2,2
    • Make sure the toaster is unplugged before dissembling.

    • Turn the toaster over and remove the rubber bumper feet.

  2. 这个步骤还没有翻译 帮忙翻译一下

    : 步骤 2 中的图像 1,2 : 步骤 2 中的图像 2,2
    • Use a Phillips #2 screwdriver to remove four 12 mm screws at the base of the toaster shell.

  3. 这个步骤还没有翻译 帮忙翻译一下

    : 步骤 3 中的图像 1,3 : 步骤 3 中的图像 2,3 : 步骤 3 中的图像 3,3
    • With the dial facing you, push the toaster base up and away until the base is just over the lip of the shell. This will disconnect the browning dial from the rest of the toaster.

    • When reassembling the toaster, make sure that the back of the dial lines up with the slot, both in position and orientation (the dial and slot are not perfect circles - they have a notch).

    • The only object holding the shell onto the toaster now is the grey part of the lever.

  4. 这个步骤还没有翻译 帮忙翻译一下

    : 步骤 4 中的图像 1,1
    • Reach into the shell and grab the back white part of the lever.

    • Hold the grey lever with both your index finger and middle finger. Next, pull it.

    • Pulling too hard will break the mechanism that holds the grey handle onto the white lever.

    • Remove the shell.

  5. 这个步骤还没有翻译 帮忙翻译一下

    : 步骤 5 中的图像 1,3 : 步骤 5 中的图像 2,3 : 步骤 5 中的图像 3,3
    • To begin fixing the lever spring, remove the top metal plate of the toaster.

    • To do this, locate the four metal bending couples that keep it attached (two in front, two in back).

    • Bend down each of the bending couples that are currently at a ninety degree angle.

    • Lift the plate and remove.

  6. 这个步骤还没有翻译 帮忙翻译一下

    : 步骤 6 中的图像 1,3 : 步骤 6 中的图像 2,3 : 步骤 6 中的图像 3,3
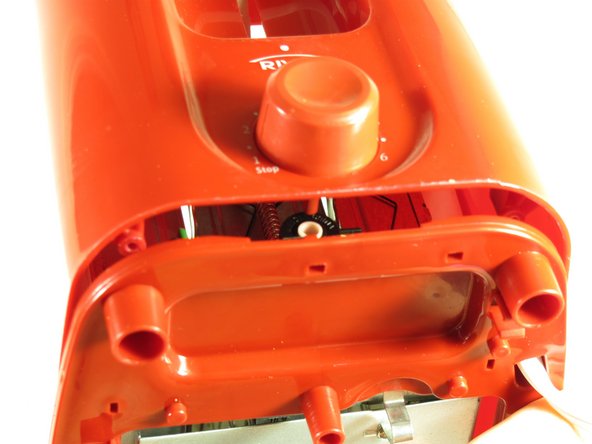
    • Locate the metal "U" bracket that is in the middle of the two toaster slots.

    • The bracket is secured by two protruding metal strips that are twisted and one metal strip on the lever side that is bent over the pole.

    • Using pliers or tweezers, untwist the two metal strips.

    • Use pliers or tweezers to unfold the metal sheet that keeps the pole in place.

    • Pull up on the bracket and remove.

  7. 这个步骤还没有翻译 帮忙翻译一下

    : 步骤 7 中的图像 1,2 : 步骤 7 中的图像 2,2
    • Remove the short top spring from the pole.

    • Find the bottom of the pole and push it up through the top of the white lever bracket.

    • Prepare for the spring to jump out as it will no longer be held in place.

  8. 这个步骤还没有翻译 帮忙翻译一下

    : 步骤 8 中的图像 1,1
    • Use soap and water to clean the spring and rod. If you can not complete the third bullet, just brush of the debris as the soap will remove the lubricant.

    • Ensure there are no crumbs restricting the compression of the spring or movement along the pole.

    • Now use a commercial lubricant, such as WD-40, to re-lubricate the pole and springs.

终点

Grant Haug

于09/26/12注册

148 声望

创作了4篇指南

团队

Cal Poly, Team 2-8, Propen Fall 2012 Cal Poly, Team 2-8, Propen Fall 2012 的会员

CPSU-PROPEN-F12S2G8

5 名成员

创作了6篇指南

0条评论

添加评论

浏览统计数据:

过去 24 小时: 2

过去 7 天: 7

过去 30 天: 22

总计 7,466