简介
构建自己的计算机最可怕的部分之一可能是处理昂贵的新处理器,尤其是其底部的大平面精致的引脚。 如果你不小心弯曲了一些 别担心,别担心!在大多数情况下,这些引脚可以向后弯曲,没有人会知道你的不幸事件。
使用本指南来拉直计算机处理器 (CPU) 上弯曲的针脚。
注意:弯曲引脚的严重程度因情况而异,但本指南中概述的一般过程旨在概括所有内容。 某些弯曲的情况是无法修复的,因此请使用你的最佳判断并谨慎行事。 如果你的处理器在收到时已损坏,请在尝试将引脚向后弯曲之前寻求 RMA,这可能会使你的保修失效。
注意:CPU 引脚极其脆弱,虽然具有延展性,但只能弯曲有限次数,否则很容易断裂。
如果引脚断开,请查阅 CPU 的 引脚分配图,看看是否 引脚恰好是虚拟引脚或其他不重要的引脚。 如果是这样,请认为自己很幸运,并像平常一样安装 CPU。
本指南使用 AMD Ryzen 7 2700X,但该过程适用于所有 pin 网格阵列 (PGA) CPU,包括所有 AMD AM2、AM2+、AM3、 AM3+ 和 AM4 插槽 CPU。 本指南不适用于 land grid array (LGA) CPU,例如现代 Intel CPU 和 AMD AM5 CPU,因为引脚位于主板内部 插槽而不是 CPU 本身。
你所需要的
-
-
通过握住 CPU 的边缘并向下观察直排引脚来检查是否有异常情况,以评估损坏情况和弯曲引脚的数量。
-
从两个方向检查每一行,以便你清楚地了解需要处理哪些区域。例如,从上到下以及从左到右观察引脚。
-
-
-
轻轻地将实用刀片滑入两排引脚之间。
-
如果弯曲的引脚挡住了刀片的路径,请使用刀片的尖角将它们轻轻弯曲直立,一次弯曲一个。
I like to use a pocket knife blade. It’s stiffer and you get better control (the razor blade is more flexible at the pointy end. Also the knife handle allows better control over force as you are rotating, rather than levering.
-
-
-
I actually have a device designed for single pin that is very similar to the mechanical pencil, My problem is that it has such a long lever arm that it’s easy to apply too much force, If using that, grab the pencil as close to the chip as comfortable for better control of force and distance.
-
-
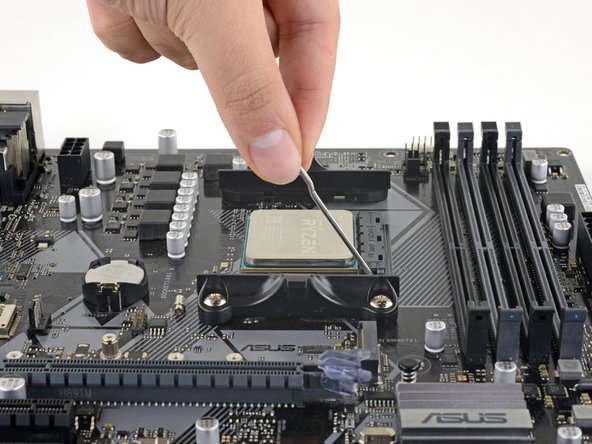
将带有金色三角形的 CPU 角与同样带有三角形的主板插槽角相匹配。
-
抓住 CPU 的边缘并将其与插槽对齐。
Ich weiß noch nicht ob die CPU funktioniert . Aber die Anleitung ist wirklich gut Habe das unter einer beleuchteten Lupe gemacht .Die Pins waren an den Ecken verbogen. ( Ebay Transport ? ) Fällt wie von selbst in den Sockel und kann verriegelt werden . Danke
-
-
-
在不接触 CPU 的情况下,在插槽上重复锁定/解锁过程四到五次。
-
就是这样!关闭插座的锁定臂并继续构建你的 PC。
-


24等其他人完成本指南。


14条评论
Thanks so much!
Ce tutoriel est aussi valable pour les sockets Intel à “matrice de pastilles” (Land Grid Array) sauf que dans le cas d’un socket LGA les pins à relever seront sur le socket plutôt que sur le processeur, mais le principe est le même, j’ai pu sauver une carte mère avec un socket LGA 1155 comme ça.
Exemple de socket LGA ou les pins sont bien visibles : https://upload.wikimedia.org/wikipedia/c...
Les pins sur les sockets sont très petits, mais avec une pincette de précision (visible dans ce tutoriel) comme celle d’iFixit c’est faisable.
It's a valuable guide for those who get into trouble with bent CPU pins.
I have encountered and dealt with such a problem several times. It's not an easy task.
This guide gives readers the knowledge and tool to fix the struggle problem. Especially, step-by-step instruction with clear photos will encourage readers to overcome the problem.
Thank U :) I’ll fix it.
using a razor blade is brilliant. worked perfectly
Worked 30 years ago on the first 386 I built and worked last week on a Ryzen 5600g that I dropped. All be best fixes for high-tech screw-ups involve low-tech ingenuity.
Thank you so much!
gerade zwei ryzen cpu vom neffen erfolgreich gerade gebogen, 1000 dank!
Riz Vienna - 回复
15 min to 2 hours 650 pins and 6 hours later
I'm too scared to do it myself.. are pins easily broken?
This helped so much thank god I was able to save my CPU