跳转到主内容

How To Fix A Leaky Faucet

你所需要的

  1. How To Fix A Leaky Faucet, Cartridge Faucet: 步骤 1 中的图像 1,2 How To Fix A Leaky Faucet, Cartridge Faucet: 步骤 1 中的图像 2,2
    • Shut off the hot and cold water valves underneath the sink by twisting them clockwise until they are tight.

    • The appearance of these valves will differ from sink to sink, but most operate the same.

    • To test that the water has been completely shut off, try turning on the faucet like you would normally. If no water comes out, you're in luck!
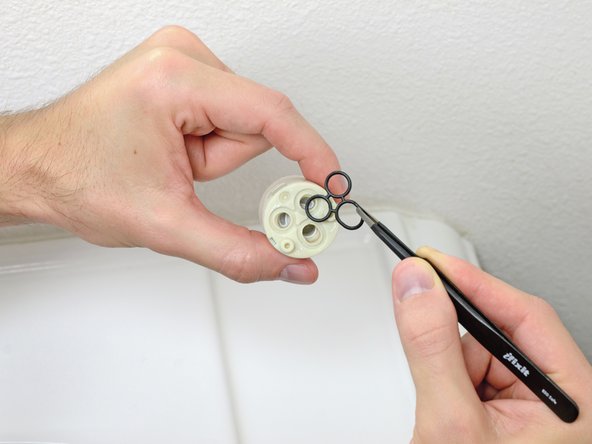
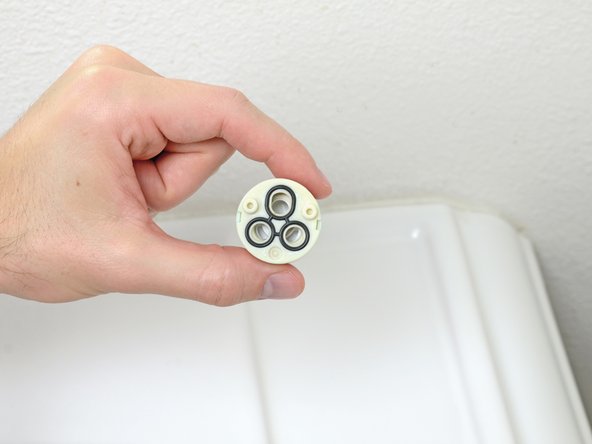
    • When reopening the valves after the repair, leave the faucet in its on position. This will prevent pressurized air from building up in the faucet cartridge.

  2. How To Fix A Leaky Faucet: 步骤 2 中的图像 1,3 How To Fix A Leaky Faucet: 步骤 2 中的图像 2,3 How To Fix A Leaky Faucet: 步骤 2 中的图像 3,3
    • Pull up on the the pop-up drain stopper to seal the sink drain.

    • Place a towel in the sink to catch any excess water or faucet hardware.

  3. How To Fix A Leaky Faucet: 步骤 3 中的图像 1,3 How To Fix A Leaky Faucet: 步骤 3 中的图像 2,3 How To Fix A Leaky Faucet: 步骤 3 中的图像 3,3
    • Use your fingers or a prying tool to remove the plug button from the top of the faucet handle.

  4. How To Fix A Leaky Faucet: 步骤 4 中的图像 1,1
    • Use a screwdriver to remove the single handle screw.

    • The number and head type/length of the screws may vary from faucet to faucet.

  5. How To Fix A Leaky Faucet: 步骤 5 中的图像 1,3 How To Fix A Leaky Faucet: 步骤 5 中的图像 2,3 How To Fix A Leaky Faucet: 步骤 5 中的图像 3,3
    • Gently pull the faucet handle up from the rest of the faucet.

  6. How To Fix A Leaky Faucet: 步骤 6 中的图像 1,2 How To Fix A Leaky Faucet: 步骤 6 中的图像 2,2
    • Remove the temperature limit stop from the top of the cartridge.

    • When removing the temperature limit stop and indexer, take note of their position. The limit stop and indexer determine the maximum temperature that water can reach when coming out of the faucet.

    • Even if you mark the position of the indexer and stop, you may still need to reset the temperature limit after addressing the leak. Follow the instructions for your specific faucet if they are available.

  7. How To Fix A Leaky Faucet: 步骤 7 中的图像 1,3 How To Fix A Leaky Faucet: 步骤 7 中的图像 2,3 How To Fix A Leaky Faucet: 步骤 7 中的图像 3,3
    • Unscrew the bonnet from the faucet.

  8. How To Fix A Leaky Faucet: 步骤 8 中的图像 1,2 How To Fix A Leaky Faucet: 步骤 8 中的图像 2,2
    • Remove the temperature limit indexer from the top of the cartridge.

  9. How To Fix A Leaky Faucet: 步骤 9 中的图像 1,2 How To Fix A Leaky Faucet: 步骤 9 中的图像 2,2
    • Use an adjustable wrench to loosen the bonnet nut.

  10. How To Fix A Leaky Faucet: 步骤 10 中的图像 1,2 How To Fix A Leaky Faucet: 步骤 10 中的图像 2,2
    • Remove the bonnet nut.

  11. How To Fix A Leaky Faucet: 步骤 11 中的图像 1,2 How To Fix A Leaky Faucet: 步骤 11 中的图像 2,2
    • Remove the cartridge.

  12. How To Fix A Leaky Faucet: 步骤 12 中的图像 1,3 How To Fix A Leaky Faucet: 步骤 12 中的图像 2,3 How To Fix A Leaky Faucet: 步骤 12 中的图像 3,3
    • Remove the cartridge o-rings.

    • If the leak has been coming only from the end of the faucet, replace the cartridge.

    • If the faucet has been leaking from the base or from the faucet handle, replace the o-rings.

    • When installing new o-rings, be sure to properly seat them into the grooves on the underside of the cartridge. A misaligned o-ring can easily cause a new leak.

  13. How To Fix A Leaky Faucet: 步骤 13 中的图像 1,2 How To Fix A Leaky Faucet: 步骤 13 中的图像 2,2
    • When reinserting the cartridge, be sure that the keys on the cartridge line up with the keys on the base of the faucet.

结论

To reassemble your device, follow these instructions in reverse order.

2等其他人完成本指南。

Geoff Wacker

于09/30/13注册

89,996 声望

创作了89篇指南

一条评论

I am looking for the brand of the faucet in this picture. We have one faucet and need aerator for it but no brand on it...?

Kittie Finch - 回复

添加评论

浏览统计数据:

过去 24 小时: 1

过去 7 天: 12

过去 30 天: 28

总计 1,568