跳转到主内容

Hover 1 Eclipse Battery Replacement

  1. Hover 1 Eclipse Battery Replacement, Battery: 步骤 1 中的图像 1,3 Hover 1 Eclipse Battery Replacement, Battery: 步骤 1 中的图像 2,3 Hover 1 Eclipse Battery Replacement, Battery: 步骤 1 中的图像 3,3
    • Using a Phillips #1 Screwdriver, remove the four 11mm screws that surround the edge of the plug side bottom shell piece.

    • Using a Phillips #1 Screwdriver, remove the four 13mm screws that surround the edge of the plug side bottom shell piece.

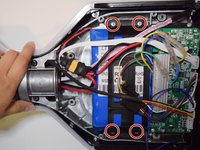
    • Remove the right side bottom shell piece.

  2. Hover 1 Eclipse Battery Replacement: 步骤 2 中的图像 1,2 Hover 1 Eclipse Battery Replacement: 步骤 2 中的图像 2,2
    • Locate the black and red wires connected by an yellow header, Xt60.

    • This wire connects the battery to the motherboard.

    • Carefully tug on the two sides of the yellow header to disconnect them.

  3. Hover 1 Eclipse Battery Replacement: 步骤 3 中的图像 1,3 Hover 1 Eclipse Battery Replacement: 步骤 3 中的图像 2,3 Hover 1 Eclipse Battery Replacement: 步骤 3 中的图像 3,3
    • Using a Phillips #1 Screwdriver, remove the four 11mm screws that secure the black plastic keeping the battery in place.

    • Carefully remove the black plastic from the hoverboard.

    • Be mindful of the wires surrounding the battery.

  4. Hover 1 Eclipse Battery Replacement: 步骤 4 中的图像 1,2 Hover 1 Eclipse Battery Replacement: 步骤 4 中的图像 2,2
    • Be careful with the wires surrounding the battery when executing this step.

    • The battery is attached to the metal with an adhesive.

    • Firmly grasp the battery and tug on it until it is free from the metal.

结论

To reassemble your device, follow these instructions in reverse order.

Mina Dedijer

于10/10/19注册

545 声望

创作了4篇指南

团队

Cal Poly, Team S12-G4, Regan Fall 2019 Cal Poly, Team S12-G4, Regan Fall 2019 的会员

CPSU-REGAN-F19S12G4

4 名成员

创作了5篇指南

0条评论

添加评论

浏览统计数据:

过去 24 小时: 0

过去 7 天: 3

过去 30 天: 19

总计 2,133