跳转到主内容

Hot Tools Professional 1110 Power Switch Replacement

你所需要的

  1. Hot Tools Professional 1110 Power Switch Replacement, Hot Tools Professional 1110 Disassembly: 步骤 1 中的图像 1,1
    • Ensure that you have a clean work station, and that you can easily keep track of small, loose parts.

    • In addition, MAKE SURE IT IS UNPLUGGED FOR ALL FOLLOWING STEPS!

  2. Hot Tools Professional 1110 Power Switch Replacement: 步骤 2 中的图像 1,2 Hot Tools Professional 1110 Power Switch Replacement: 步骤 2 中的图像 2,2
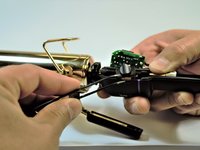
    • Firmly grasp the end of the Iron with the black plastic cap on the heating element end.

    • With your free hand, use tweezers to firmly grasp the small retaining ring sitting between the heating element and the handle body.

    • Once you have a firm grasp, pull up on the retaining ring, and it should come loose.

  3. Hot Tools Professional 1110 Power Switch Replacement: 步骤 3 中的图像 1,1
    • With the ring loose, turn the handle body over, and you will see three screw holes.

    • Take a PH1 screwdriver, and loosen up all three 6mm Phillips #1 screws in the handle body.

  4. Hot Tools Professional 1110 Power Switch Replacement: 步骤 4 中的图像 1,1
    • Once the screws have been removed, set them aside and with a pry tool, firmly pull the handle body apart in half lengthwise.

  5. Hot Tools Professional 1110 Power Switch Replacement: 步骤 5 中的图像 1,2 Hot Tools Professional 1110 Power Switch Replacement: 步骤 5 中的图像 2,2
    • For removing the clamping mechanism, firmly grasp the iron in your hand by the handle body, and locate the screw as shown in the picture.

    • Remove the screw shown (8mm Phillips #2 Pan Head) and when finished do the same for the opposite side.

  6. Hot Tools Professional 1110 Power Switch Replacement: 步骤 6 中的图像 1,1
    • Once both screws have been removed, continue to remove the top clamping half of the mechanism from the body of the Iron.

  7. Hot Tools Professional 1110 Power Switch Replacement: 步骤 7 中的图像 1,1
    • Rotate the handle, and remove the screw that holds on the spring mechanism for the clamp. This screw is a 8mm Phillips #2 Pan Head.

    • Once this step is fished your Hot Tools Professional 1110 will be fully disassembled and ready to have its components replaced.

  8. Hot Tools Professional 1110 Power Switch Replacement, Power Switch: 步骤 8 中的图像 1,2 Hot Tools Professional 1110 Power Switch Replacement, Power Switch: 步骤 8 中的图像 2,2
    • Remove the power switch button exposing the electrically connected power switch.

  9. Hot Tools Professional 1110 Power Switch Replacement: 步骤 9 中的图像 1,1
    • Remove power switch from the housing and desolder the three connected electrical wires. Take note of the orientation of each of the electrical wires to ensure that they are replaced correctly.

  10. Hot Tools Professional 1110 Power Switch Replacement: 步骤 10 中的图像 1,1
    • Ensuring that the three connecting electrical wires are in the correct orientation, solder the new power switch to the wires.

结论

To reassemble your device, follow these instructions in reverse order.

Dustin Ortega

于11/11/17注册

201 声望

创作了2篇指南

团队

IUPUI, Team S2-G2, Wilson Fall 2017 IUPUI, Team S2-G2, Wilson Fall 2017 的会员

IUPUI-WILSON-F17S2G2

4 名成员

创作了5篇指南

0条评论

添加评论

浏览统计数据:

过去 24 小时: 1

过去 7 天: 2

过去 30 天: 4

总计 189