跳转到主内容

Honda Rear Tine Tiller FRC800K1A P.T.O. Change Fork Replacement

你所需要的

  1. Honda Rear Tine Tiller FRC800K1A P.T.O. Change Fork Replacement, Disconnect the spark plug wire: 步骤 1 中的图像 1,2 Honda Rear Tine Tiller FRC800K1A P.T.O. Change Fork Replacement, Disconnect the spark plug wire: 步骤 1 中的图像 2,2
    • Before you begin the repair, disconnect the spark plug wire.

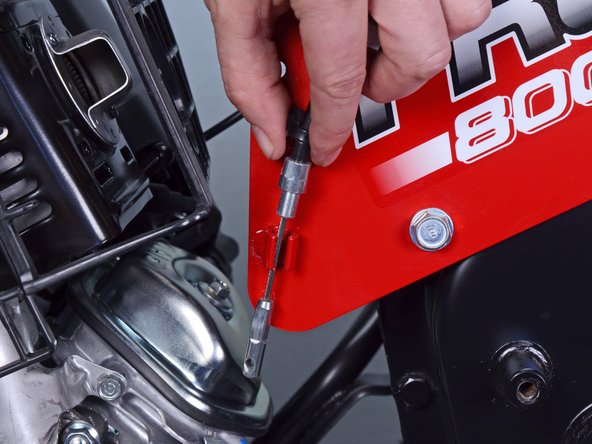
    • Firmly grip the base of the connector and pull it away from the spark plug to disconnect it.

  2. Honda Rear Tine Tiller FRC800K1A P.T.O. Change Fork Replacement, Turn off the fuel valve: 步骤 2 中的图像 1,1
    • Flip the fuel valve switch to the off position.

  3. Honda Rear Tine Tiller FRC800K1A P.T.O. Change Fork Replacement, Remove outer belt cover: 步骤 3 中的图像 1,1
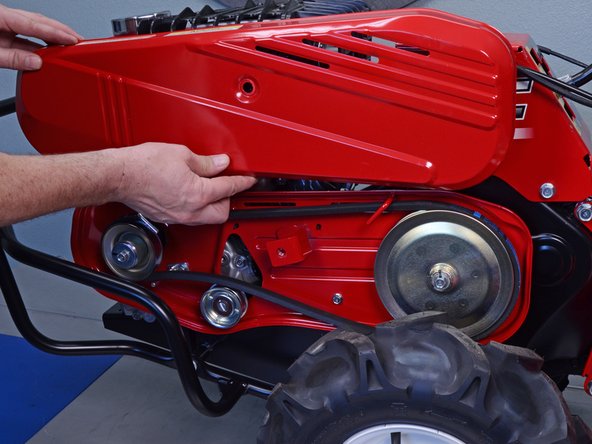
    • Use a 14 mm socket to remove the bolt securing the outer belt cover.

  4. Honda Rear Tine Tiller FRC800K1A P.T.O. Change Fork Replacement: 步骤 4 中的图像 1,3 Honda Rear Tine Tiller FRC800K1A P.T.O. Change Fork Replacement: 步骤 4 中的图像 2,3 Honda Rear Tine Tiller FRC800K1A P.T.O. Change Fork Replacement: 步骤 4 中的图像 3,3
    • Tilt the outer belt cover down and pull it off of the lip on the inner belt cover to remove it.

  5. Honda Rear Tine Tiller FRC800K1A P.T.O. Change Fork Replacement, Loosen the transmission pulley bolt: 步骤 5 中的图像 1,3 Honda Rear Tine Tiller FRC800K1A P.T.O. Change Fork Replacement, Loosen the transmission pulley bolt: 步骤 5 中的图像 2,3 Honda Rear Tine Tiller FRC800K1A P.T.O. Change Fork Replacement, Loosen the transmission pulley bolt: 步骤 5 中的图像 3,3
    • This step may require two people.

    • Pull the tine engagement lever to put belt tension on the transmission pulley.

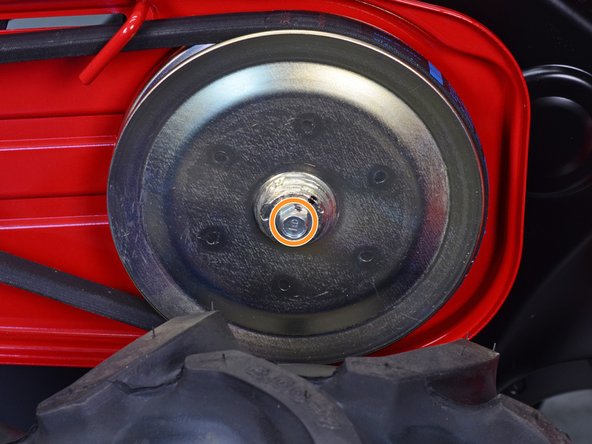
    • With the belt taut, use a 12 mm socket to loosen the transmission pulley bolt without fully removing it.

    • The pulley will rotate with the bolt and the bolt will not be able to be removed if belt tension is not applied.

  6. Honda Rear Tine Tiller FRC800K1A P.T.O. Change Fork Replacement, Remove the V-belt: 步骤 6 中的图像 1,3 Honda Rear Tine Tiller FRC800K1A P.T.O. Change Fork Replacement, Remove the V-belt: 步骤 6 中的图像 2,3 Honda Rear Tine Tiller FRC800K1A P.T.O. Change Fork Replacement, Remove the V-belt: 步骤 6 中的图像 3,3
    • Push the V-belt towards the transmission pulley to release tension.

    • Slip the V-belt off of the groove in the pulley.

  7. Honda Rear Tine Tiller FRC800K1A P.T.O. Change Fork Replacement: 步骤 7 中的图像 1,3 Honda Rear Tine Tiller FRC800K1A P.T.O. Change Fork Replacement: 步骤 7 中的图像 2,3 Honda Rear Tine Tiller FRC800K1A P.T.O. Change Fork Replacement: 步骤 7 中的图像 3,3
    • Pull the V-belt down and out of the way of the two-prong belt guide.

    • Push the V-belt around and off of the motor pulley to remove.

  8. Honda Rear Tine Tiller FRC800K1A P.T.O. Change Fork Replacement, Remove the belt guides: 步骤 8 中的图像 1,1
    • Use a 12 mm socket to remove the two bolts securing the belt guides to the inner belt cover.

    • Use a 10 mm socket to remove the bolt securing the inner belt cover to the frame.

  9. Honda Rear Tine Tiller FRC800K1A P.T.O. Change Fork Replacement, Lower the guard: 步骤 9 中的图像 1,2 Honda Rear Tine Tiller FRC800K1A P.T.O. Change Fork Replacement, Lower the guard: 步骤 9 中的图像 2,2
    • Use a 14 mm socket to loosen the two bolts securing the guard to the frame.

    • These bolts have corresponding 14 mm nuts on their opposite ends. You will need to keep the bolts steady with a wrench or socket for the nuts to become loose.

    • Remove both nuts, but do not remove the bolts yet.

  10. Honda Rear Tine Tiller FRC800K1A P.T.O. Change Fork Replacement: 步骤 10 中的图像 1,2 Honda Rear Tine Tiller FRC800K1A P.T.O. Change Fork Replacement: 步骤 10 中的图像 2,2
    • Remove the frontmost guard bolt.

  11. Honda Rear Tine Tiller FRC800K1A P.T.O. Change Fork Replacement: 步骤 11 中的图像 1,2 Honda Rear Tine Tiller FRC800K1A P.T.O. Change Fork Replacement: 步骤 11 中的图像 2,2
    • Grab the guard and lower it to the ground, pivoting it on the rear guard bolt.

  12. Honda Rear Tine Tiller FRC800K1A P.T.O. Change Fork Replacement, Remove the pulley bolts: 步骤 12 中的图像 1,1
    • Use a 12 mm socket to remove the motor and transmission pulley bolts.

    • Hold the pulleys steady to more easily remove the bolts.

  13. Honda Rear Tine Tiller FRC800K1A P.T.O. Change Fork Replacement, Remove the motor pulley: 步骤 13 中的图像 1,2 Honda Rear Tine Tiller FRC800K1A P.T.O. Change Fork Replacement, Remove the motor pulley: 步骤 13 中的图像 2,2
    • Remove the motor pulley.

    • Keep track of the key—which may fall out on its own—and keep it with the motor pulley.

  14. Honda Rear Tine Tiller FRC800K1A P.T.O. Change Fork Replacement, Remove the transmission pulley: 步骤 14 中的图像 1,3 Honda Rear Tine Tiller FRC800K1A P.T.O. Change Fork Replacement, Remove the transmission pulley: 步骤 14 中的图像 2,3 Honda Rear Tine Tiller FRC800K1A P.T.O. Change Fork Replacement, Remove the transmission pulley: 步骤 14 中的图像 3,3
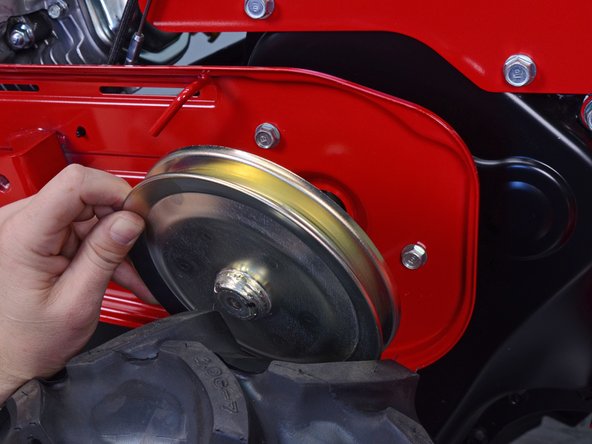
    • Pull the transmission pulley straight off of the splined shaft to remove.

  15. Honda Rear Tine Tiller FRC800K1A P.T.O. Change Fork Replacement, Remove the tensioner pulley: 步骤 15 中的图像 1,3 Honda Rear Tine Tiller FRC800K1A P.T.O. Change Fork Replacement, Remove the tensioner pulley: 步骤 15 中的图像 2,3 Honda Rear Tine Tiller FRC800K1A P.T.O. Change Fork Replacement, Remove the tensioner pulley: 步骤 15 中的图像 3,3
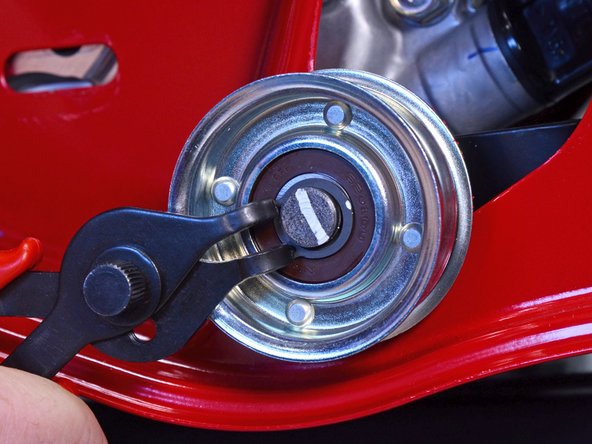
    • Use snap ring pliers to remove the snap ring securing the tensioner pulley to its shaft.

  16. Honda Rear Tine Tiller FRC800K1A P.T.O. Change Fork Replacement: 步骤 16 中的图像 1,2 Honda Rear Tine Tiller FRC800K1A P.T.O. Change Fork Replacement: 步骤 16 中的图像 2,2
    • Remove the tensioner pulley.

  17. Honda Rear Tine Tiller FRC800K1A P.T.O. Change Fork Replacement, Remove the wire clips: 步骤 17 中的图像 1,3 Honda Rear Tine Tiller FRC800K1A P.T.O. Change Fork Replacement, Remove the wire clips: 步骤 17 中的图像 2,3 Honda Rear Tine Tiller FRC800K1A P.T.O. Change Fork Replacement, Remove the wire clips: 步骤 17 中的图像 3,3
    • Use needle nose pliers to remove the three wire clips securing various cables to the back of the inner belt cover.

  18. Honda Rear Tine Tiller FRC800K1A P.T.O. Change Fork Replacement: 步骤 18 中的图像 1,1
    • Use a 12 mm socket to remove the two remaining inner belt cover bolts behind the transmission pulley.

  19. Honda Rear Tine Tiller FRC800K1A P.T.O. Change Fork Replacement, Remove the inner belt cover: 步骤 19 中的图像 1,3 Honda Rear Tine Tiller FRC800K1A P.T.O. Change Fork Replacement, Remove the inner belt cover: 步骤 19 中的图像 2,3 Honda Rear Tine Tiller FRC800K1A P.T.O. Change Fork Replacement, Remove the inner belt cover: 步骤 19 中的图像 3,3
    • Pull the inner belt cover clear of the motor and transmission shafts.

    • Remove the inner belt cover.

  20. Honda Rear Tine Tiller FRC800K1A P.T.O. Change Fork Replacement, Remove the side tine guards: 步骤 20 中的图像 1,2 Honda Rear Tine Tiller FRC800K1A P.T.O. Change Fork Replacement, Remove the side tine guards: 步骤 20 中的图像 2,2
    • Use a 12 mm socket and wrench to remove the six sets of side guard bolts and nuts, three on each side.

  21. Honda Rear Tine Tiller FRC800K1A P.T.O. Change Fork Replacement: 步骤 21 中的图像 1,2 Honda Rear Tine Tiller FRC800K1A P.T.O. Change Fork Replacement: 步骤 21 中的图像 2,2
    • Slide the side guard off of the curved main guard to remove.

    • Repeat the same process on the opposite side.

  22. Honda Rear Tine Tiller FRC800K1A P.T.O. Change Fork Replacement, Remove the rotary tine: 步骤 22 中的图像 1,1
    • Use a 14 mm socket to remove the two rotary tine retaining bolts.

    • Repeat the same process on the opposite rotary tine.

  23. Honda Rear Tine Tiller FRC800K1A P.T.O. Change Fork Replacement: 步骤 23 中的图像 1,3 Honda Rear Tine Tiller FRC800K1A P.T.O. Change Fork Replacement: 步骤 23 中的图像 2,3 Honda Rear Tine Tiller FRC800K1A P.T.O. Change Fork Replacement: 步骤 23 中的图像 3,3
    • Slide the rotary tine off its axle to remove it.

    • Repeat the same process on the opposite rotary tine.

  24. Honda Rear Tine Tiller FRC800K1A P.T.O. Change Fork Replacement, Remove the drag bar: 步骤 24 中的图像 1,3 Honda Rear Tine Tiller FRC800K1A P.T.O. Change Fork Replacement, Remove the drag bar: 步骤 24 中的图像 2,3 Honda Rear Tine Tiller FRC800K1A P.T.O. Change Fork Replacement, Remove the drag bar: 步骤 24 中的图像 3,3
    • Use a 14 mm socket to remove the bolt holding the drag bar in place.

    • Remove the drag bar.

  25. Honda Rear Tine Tiller FRC800K1A P.T.O. Change Fork Replacement, Remove the cable guide: 步骤 25 中的图像 1,1
    • Use a Phillips #1 screwdriver to remove the cable guide screw.

  26. Honda Rear Tine Tiller FRC800K1A P.T.O. Change Fork Replacement: 步骤 26 中的图像 1,3 Honda Rear Tine Tiller FRC800K1A P.T.O. Change Fork Replacement: 步骤 26 中的图像 2,3 Honda Rear Tine Tiller FRC800K1A P.T.O. Change Fork Replacement: 步骤 26 中的图像 3,3
    • Pull the cable guide's metal clip out of the shifter frame.

    • Unwind the cables from the cable guide.

    • Remove the cable guide.

  27. Honda Rear Tine Tiller FRC800K1A P.T.O. Change Fork Replacement, Remove the cable clips: 步骤 27 中的图像 1,1
  28. Honda Rear Tine Tiller FRC800K1A P.T.O. Change Fork Replacement, Remove the tensioner spring: 步骤 28 中的图像 1,2 Honda Rear Tine Tiller FRC800K1A P.T.O. Change Fork Replacement, Remove the tensioner spring: 步骤 28 中的图像 2,2
    • Lift up on the tensioner pulley arm to loosen the tension on the tensioner spring.

  29. Honda Rear Tine Tiller FRC800K1A P.T.O. Change Fork Replacement: 步骤 29 中的图像 1,2 Honda Rear Tine Tiller FRC800K1A P.T.O. Change Fork Replacement: 步骤 29 中的图像 2,2
    • Remove the top of the tensioner spring from the end of the clutch cable.

  30. Honda Rear Tine Tiller FRC800K1A P.T.O. Change Fork Replacement: 步骤 30 中的图像 1,2 Honda Rear Tine Tiller FRC800K1A P.T.O. Change Fork Replacement: 步骤 30 中的图像 2,2
    • Remove the bottom side of the tensioner spring from the tensioner arm.

    • Remove the tensioner spring.

  31. Honda Rear Tine Tiller FRC800K1A P.T.O. Change Fork Replacement, Remove the clutch cable: 步骤 31 中的图像 1,3 Honda Rear Tine Tiller FRC800K1A P.T.O. Change Fork Replacement, Remove the clutch cable: 步骤 31 中的图像 2,3 Honda Rear Tine Tiller FRC800K1A P.T.O. Change Fork Replacement, Remove the clutch cable: 步骤 31 中的图像 3,3
    • Pull up on the clutch cable to remove it from its slot.

  32. Honda Rear Tine Tiller FRC800K1A P.T.O. Change Fork Replacement: 步骤 32 中的图像 1,1
    • Use a Phillips #1 screwdriver to remove the cable guide screw.

    • Remove the cable from the cable guide.

  33. Honda Rear Tine Tiller FRC800K1A P.T.O. Change Fork Replacement: 步骤 33 中的图像 1,1
  34. Honda Rear Tine Tiller FRC800K1A P.T.O. Change Fork Replacement, Remove change lever extension: 步骤 34 中的图像 1,3 Honda Rear Tine Tiller FRC800K1A P.T.O. Change Fork Replacement, Remove change lever extension: 步骤 34 中的图像 2,3 Honda Rear Tine Tiller FRC800K1A P.T.O. Change Fork Replacement, Remove change lever extension: 步骤 34 中的图像 3,3
    • Use needle nose pliers to straighten the change lever pin.

    • Pull the pin straight out to remove.

  35. Honda Rear Tine Tiller FRC800K1A P.T.O. Change Fork Replacement: 步骤 35 中的图像 1,2 Honda Rear Tine Tiller FRC800K1A P.T.O. Change Fork Replacement: 步骤 35 中的图像 2,2
    • Slide the change lever extension off its base to remove.

  36. Honda Rear Tine Tiller FRC800K1A P.T.O. Change Fork Replacement, Remove the shift linkage mounting bracket: 步骤 36 中的图像 1,1
    • Remove the three shift linkage mounting bracket bolts and nuts:

    • Two 12 mm bolts and nuts

    • One 14 mm nut

    • This nut is holding the tensioner pulley arm assembly to the bracket. It may fall away once you remove this nut.

  37. Honda Rear Tine Tiller FRC800K1A P.T.O. Change Fork Replacement: 步骤 37 中的图像 1,2 Honda Rear Tine Tiller FRC800K1A P.T.O. Change Fork Replacement: 步骤 37 中的图像 2,2
    • Pull the shift linkage mounting bracket away from the frame.

    • If it hasn't already come off, the tensioner pulley arm assembly may fall away once you remove the mounting bracket.

  38. Honda Rear Tine Tiller FRC800K1A P.T.O. Change Fork Replacement: 步骤 38 中的图像 1,3 Honda Rear Tine Tiller FRC800K1A P.T.O. Change Fork Replacement: 步骤 38 中的图像 2,3 Honda Rear Tine Tiller FRC800K1A P.T.O. Change Fork Replacement: 步骤 38 中的图像 3,3
    • Pivot the shift lever out and away from the shift gate to remove it.

  39. Honda Rear Tine Tiller FRC800K1A P.T.O. Change Fork Replacement, Remove the shift gate: 步骤 39 中的图像 1,1
    • Use a 14 mm socket to remove the two shift gate through-bolts.

  40. Honda Rear Tine Tiller FRC800K1A P.T.O. Change Fork Replacement: 步骤 40 中的图像 1,2 Honda Rear Tine Tiller FRC800K1A P.T.O. Change Fork Replacement: 步骤 40 中的图像 2,2
    • Lift the shift gate off of the transmission to remove it.

  41. Honda Rear Tine Tiller FRC800K1A P.T.O. Change Fork Replacement, Remove the shifting arms: 步骤 41 中的图像 1,3 Honda Rear Tine Tiller FRC800K1A P.T.O. Change Fork Replacement, Remove the shifting arms: 步骤 41 中的图像 2,3 Honda Rear Tine Tiller FRC800K1A P.T.O. Change Fork Replacement, Remove the shifting arms: 步骤 41 中的图像 3,3
    • Use a 10 mm socket to remove the rotary change shifting arm bolt.

    • Remove the rotary change shifting arm.

  42. Honda Rear Tine Tiller FRC800K1A P.T.O. Change Fork Replacement: 步骤 42 中的图像 1,3 Honda Rear Tine Tiller FRC800K1A P.T.O. Change Fork Replacement: 步骤 42 中的图像 2,3 Honda Rear Tine Tiller FRC800K1A P.T.O. Change Fork Replacement: 步骤 42 中的图像 3,3
    • Use a 10 mm socket to remove the two remaining shifting arm bolts.

    • Remove the two remaining shifting arms.

  43. Honda Rear Tine Tiller FRC800K1A P.T.O. Change Fork Replacement, Remove the handle: 步骤 43 中的图像 1,1
    • Use a 14 mm socket to remove the front handle bolt.

    • Use a 14 mm socket to remove the shouldered handle angle selection bolt.

  44. Honda Rear Tine Tiller FRC800K1A P.T.O. Change Fork Replacement: 步骤 44 中的图像 1,3 Honda Rear Tine Tiller FRC800K1A P.T.O. Change Fork Replacement: 步骤 44 中的图像 2,3 Honda Rear Tine Tiller FRC800K1A P.T.O. Change Fork Replacement: 步骤 44 中的图像 3,3
    • Grab and rotate the handle off of the frame towards the motor.

    • Be careful not to snag, bend, or rip any cables as they are all still attached to the handle.

    • Set the handle near the motor.

  45. Honda Rear Tine Tiller FRC800K1A P.T.O. Change Fork Replacement, Remove the blade guard: 步骤 45 中的图像 1,1
    • Use a 17 mm socket to remove the three frontside blade guard bolts.

    • Use a 14 mm socket to remove the four backside blade guard bolts.

  46. Honda Rear Tine Tiller FRC800K1A P.T.O. Change Fork Replacement: 步骤 46 中的图像 1,3 Honda Rear Tine Tiller FRC800K1A P.T.O. Change Fork Replacement: 步骤 46 中的图像 2,3 Honda Rear Tine Tiller FRC800K1A P.T.O. Change Fork Replacement: 步骤 46 中的图像 3,3
    • Rotate the blade guard up and off of the transmission to remove it.

  47. Honda Rear Tine Tiller FRC800K1A P.T.O. Change Fork Replacement, Separate the transmission from the frame: 步骤 47 中的图像 1,1
    • The motor may fall away from the transmission during this step if it is not properly supported. Take care to ensure both the transmission and motor are supported.

    • Use a 14 mm socket to remove the two frame bolts.

  48. Honda Rear Tine Tiller FRC800K1A P.T.O. Change Fork Replacement: 步骤 48 中的图像 1,2 Honda Rear Tine Tiller FRC800K1A P.T.O. Change Fork Replacement: 步骤 48 中的图像 2,2
    • The transmission and motor are both very heavy. This may require two people.

    • Consider supporting the transmission with jack stands so you can easily remove the wheels in the coming steps.

    • While supporting both sides, roll the transmission away from the motor and frame.

  49. Honda Rear Tine Tiller FRC800K1A P.T.O. Change Fork Replacement, Remove the wheels: 步骤 49 中的图像 1,3 Honda Rear Tine Tiller FRC800K1A P.T.O. Change Fork Replacement, Remove the wheels: 步骤 49 中的图像 2,3 Honda Rear Tine Tiller FRC800K1A P.T.O. Change Fork Replacement, Remove the wheels: 步骤 49 中的图像 3,3
    • Remove the wheels.

    • Make sure the transmission is supported such that there isn't too much pressure on the now-exposed axles.

  50. Honda Rear Tine Tiller FRC800K1A P.T.O. Change Fork Replacement, Support the transmission: 步骤 50 中的图像 1,1
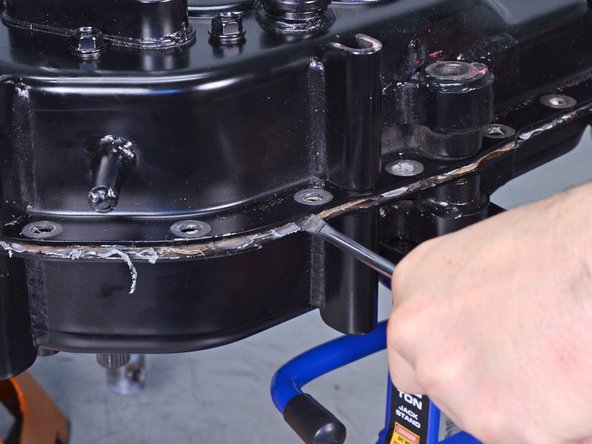
    • Support the transmission with jack stands so the seam between the two halves is level with the work surface.

    • Orient the transmission such that the right half of the case is facing up. This is the side containing the shift holder assembly.

  51. Honda Rear Tine Tiller FRC800K1A P.T.O. Change Fork Replacement, Separate the two halves of the case: 步骤 51 中的图像 1,1
    • Remove the thirty-two transmission case fasteners:

    • Thirty 12 mm bolts and nuts

    • Two 14 mm bolts and nuts

    • Reinstallation tip: Install five to eight 12 mm transmission case bolts equidistant around the circumference of the two halves of the case to tighten the two halves together. Once the two halves are mated, reinstall the rest of the 12 mm and the two 14 mm transmission case bolts in a criss-cross pattern.

    • Torque all transmission case bolts to 16 ft-lb (22 Nm). Re-torque all transmission case bolts after five hours. Wipe off any excess liquid gasket that squeezes out after you start tightening the two halves together.

  52. Honda Rear Tine Tiller FRC800K1A P.T.O. Change Fork Replacement: 步骤 52 中的图像 1,1
    • Use a 12 mm socket to remove the three bolts securing the shift holder to the right transmission case.

  53. Honda Rear Tine Tiller FRC800K1A P.T.O. Change Fork Replacement: 步骤 53 中的图像 1,1
    • Use a sharp blade to cut away any gasket material around the shift holder assembly.

    • Always cut away from yourself and others.

  54. Honda Rear Tine Tiller FRC800K1A P.T.O. Change Fork Replacement: 步骤 54 中的图像 1,2 Honda Rear Tine Tiller FRC800K1A P.T.O. Change Fork Replacement: 步骤 54 中的图像 2,2
    • Insert a large flathead screwdriver in between the two halves of the transmission case to pry them apart and break the gasket seal.

    • This may require a lot of force.

  55. Honda Rear Tine Tiller FRC800K1A P.T.O. Change Fork Replacement: 步骤 55 中的图像 1,3 Honda Rear Tine Tiller FRC800K1A P.T.O. Change Fork Replacement: 步骤 55 中的图像 2,3 Honda Rear Tine Tiller FRC800K1A P.T.O. Change Fork Replacement: 步骤 55 中的图像 3,3
    • Work the flathead screwdriver around the transmission to create a small gap along the entire perimeter of the case.

  56. Honda Rear Tine Tiller FRC800K1A P.T.O. Change Fork Replacement: 步骤 56 中的图像 1,3 Honda Rear Tine Tiller FRC800K1A P.T.O. Change Fork Replacement: 步骤 56 中的图像 2,3 Honda Rear Tine Tiller FRC800K1A P.T.O. Change Fork Replacement: 步骤 56 中的图像 3,3
    • After the top case is removed, the transmission gearing becomes exposed and has a tendency to move around. If gears, bearings, or washers fall out of their positioning, you will need to consult official Honda schematics to ensure proper reinstallation.

    • Use a mallet to lightly tap on the base of the shift holder assembly as you pry up the transmission case.

    • When removing the right half of the transmission case, make sure that the shift holder assembly is not coming up with the case as it is being pried up.

    • Reinstallation tip: If any of the bearings fall out of the right transmission case when installing it onto the left transmission case, install them onto their corresponding shaft on the left transmission case instead.


  57. Honda Rear Tine Tiller FRC800K1A P.T.O. Change Fork Replacement: 步骤 57 中的图像 1,1
    • Lightly tap on the tine shaft while prying up on the case to make removal easier.

    • Ensure the rotary chain stays seated in the bottom half of the transmission case.

  58. Honda Rear Tine Tiller FRC800K1A P.T.O. Change Fork Replacement: 步骤 58 中的图像 1,2 Honda Rear Tine Tiller FRC800K1A P.T.O. Change Fork Replacement: 步骤 58 中的图像 2,2
    • Slowly pull up to work the top case away from the bottom case.

    • Make sure no internal components come out with the top case. However, there are bearings installed in the top case that may stay with the bottom half of the case.

    • Completely remove the top half of the transmission case. You may have to "walk" the top half of the case off of the shafts it is slotted through.

    • Reinstallation tip: Scrape off old gasket before putting the transmission back together. Use a Scotch-Brite pad to remove any stubborn gasket from all mating surfaces, and do a final cleaning with isopropyl alcohol.

    • Be extra cautious to not let any old gasket fall into the transmission case oil basin, as debris could potentially harm future performance.

    • Reinstallation tip: When reapplying liquid gasket to the transmission case, run a 2-4 mm bead along all gasket mating surfaces on both the left and right transmission cases. Use HondaBond 4, ThreeBond 1216, or an equivalent liquid gasket. Reassemble both transmission halves within 10 minutes of applying the liquid gasket.

    • Reinstallation tip: If necessary, use a mallet to lightly tap the right transmission case until mostly flush with the left transmission case when putting the two halves back together.

  59. Honda Rear Tine Tiller FRC800K1A P.T.O. Change Fork Replacement, Remove the shift holder assembly: 步骤 59 中的图像 1,3 Honda Rear Tine Tiller FRC800K1A P.T.O. Change Fork Replacement, Remove the shift holder assembly: 步骤 59 中的图像 2,3 Honda Rear Tine Tiller FRC800K1A P.T.O. Change Fork Replacement, Remove the shift holder assembly: 步骤 59 中的图像 3,3
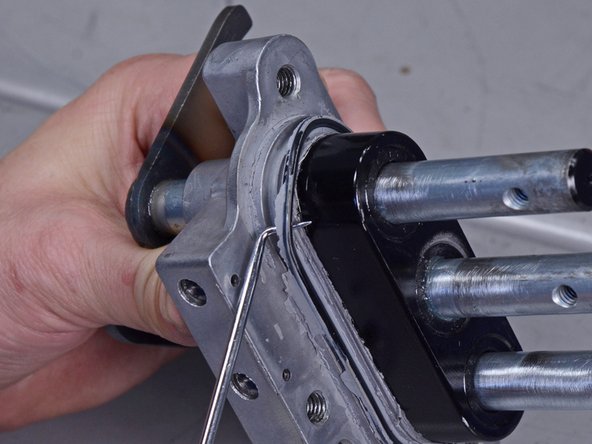
    • Slowly pull the shift holder assembly away from the transmission gearing to unseat the shift forks.

    • Lift the assembly out and away from the rest of the transmission to remove.

    • Some gears are supported by the shift forks, so they may shift during removal.

    • Reinstallation tip: Ensure the three shift forks line up with each of their corresponding gear shift slots.

  60. Honda Rear Tine Tiller FRC800K1A P.T.O. Change Fork Replacement, Secure the shift holder assembly: 步骤 60 中的图像 1,1
    • Support the shift holder assembly securely in a padded vise.

    • To avoid marring the shift holder components or housing, use a vise with plastic jaw covers or use a soft towel.

  61. Honda Rear Tine Tiller FRC800K1A P.T.O. Change Fork Replacement, Remove the shift holder spring: 步骤 61 中的图像 1,3 Honda Rear Tine Tiller FRC800K1A P.T.O. Change Fork Replacement, Remove the shift holder spring: 步骤 61 中的图像 2,3 Honda Rear Tine Tiller FRC800K1A P.T.O. Change Fork Replacement, Remove the shift holder spring: 步骤 61 中的图像 3,3
    • Use a 2.5 mm punch to partially remove the shift holder spring pin.

    • Leave the spring pin in the shift holder. It only needs to be pushed down enough so the spring can be removed.

  62. Honda Rear Tine Tiller FRC800K1A P.T.O. Change Fork Replacement: 步骤 62 中的图像 1,3 Honda Rear Tine Tiller FRC800K1A P.T.O. Change Fork Replacement: 步骤 62 中的图像 2,3 Honda Rear Tine Tiller FRC800K1A P.T.O. Change Fork Replacement: 步骤 62 中的图像 3,3
    • Use needle nose pliers to remove the spring from the shift holder housing.

    • There is a #10 ball bearing securing the P.T.O. change fork in place. It is located between the retention spring and the change fork.

    • Reinstallation Tip: Each change fork is separated by two #10 steel ball bearings. If any ball bearings fall out of the shift holder assembly, ensure there are two between the PTO change fork and the middle change fork and one between the PTO change fork and the spring in the shift shaft holder passage.

  63. Honda Rear Tine Tiller FRC800K1A P.T.O. Change Fork Replacement, Remove the P.T.O. change fork: 步骤 63 中的图像 1,3 Honda Rear Tine Tiller FRC800K1A P.T.O. Change Fork Replacement, Remove the P.T.O. change fork: 步骤 63 中的图像 2,3 Honda Rear Tine Tiller FRC800K1A P.T.O. Change Fork Replacement, Remove the P.T.O. change fork: 步骤 63 中的图像 3,3
    • With the retention spring removed and the ball bearing out of the way, pull the P.T.O. change fork directly out of the shift holder assembly to remove.

  64. Honda Rear Tine Tiller FRC800K1A P.T.O. Change Fork Replacement, Remove change fork oil seals: 步骤 64 中的图像 1,2 Honda Rear Tine Tiller FRC800K1A P.T.O. Change Fork Replacement, Remove change fork oil seals: 步骤 64 中的图像 2,2
    • Use a pick tool to remove the oil seal from the empty P.T.O. change fork passage.

    • Repeat for each removed change fork.

    • Use a pick tool to remove the large oval o-ring from the shaft holder assembly.

结论

To reassemble your device, follow these instructions in reverse order.

Refill the transmission with 5.3 quarts of SAE 10W-30 oil.

3等其他人完成本指南。

Carsten Frauenheim

于03/10/20注册

114,053 声望

创作了338篇指南

团队

iFixit iFixit 的会员

Staff

135 名成员

创作了17,198篇指南

0条评论

添加评论

浏览统计数据:

过去 24 小时: 0

过去 7 天: 4

过去 30 天: 24

总计 917