跳转到主内容

当前版本的文档还未经巡查,您可以查看最新的已查核版本

你所需要的

  1. 这个步骤还没有翻译 帮忙翻译一下

    : 步骤 1 中的图像 1,2 : 步骤 1 中的图像 2,2
    • To expose the battery, remove the outer case with your fingernail.

    • Remove the battery by pulling the black tab.

  2. 这个步骤还没有翻译 帮忙翻译一下

    : 步骤 2 中的图像 1,1
    在这个步骤中使用的工具:
    Spudger
    $3.99
    购买
    • Insert the flat end of the spudger into the two notches on the back of the camera cover and pry them up.

  3. 这个步骤还没有翻译 帮忙翻译一下

    : 步骤 3 中的图像 1,2 : 步骤 3 中的图像 2,2
    在这个步骤中使用的工具:
    Spudger
    $3.99
    购买
    • Work the spudger around the edges of the camera cover until it comes off.

  4. 这个步骤还没有翻译 帮忙翻译一下

    : 步骤 4 中的图像 1,2 : 步骤 4 中的图像 2,2
    在这个步骤中使用的工具:
    T5 Torx Screwdriver
    $5.49
    购买
    • Remove the four 6 mm screws with the T5 Torx screwdriver.

    • One of the screws is under the "void" sticker.

  5. 这个步骤还没有翻译 帮忙翻译一下

    : 步骤 5 中的图像 1,3 : 步骤 5 中的图像 2,3 : 步骤 5 中的图像 3,3
    • Insert the flat end of an iFixit opening tool between the side and inner covers to create a gap.

    • Work the tool around the edges until all the clips release.

  6. 这个步骤还没有翻译 帮忙翻译一下

    : 步骤 6 中的图像 1,2 : 步骤 6 中的图像 2,2
    • Once all the clips are open, remove the inner panel from the phone.

  7. 这个步骤还没有翻译 帮忙翻译一下

    : 步骤 7 中的图像 1,1
    在这个步骤中使用的工具:
    Spudger
    $3.99
    购买
    • Use the spudger to pry the camera off.

  8. 这个步骤还没有翻译 帮忙翻译一下

    : 步骤 8 中的图像 1,2 : 步骤 8 中的图像 2,2
    在这个步骤中使用的工具:
    Tweezers
    $4.99
    购买
    • Using tweezers, flip the connector latch away from the motherboard.

    • Detach the flexible connection from under the connector latch.

  9. 这个步骤还没有翻译 帮忙翻译一下

    : 步骤 9 中的图像 1,1
    • Slide the keyboard into the open position.

  10. 这个步骤还没有翻译 帮忙翻译一下

    : 步骤 10 中的图像 1,2 : 步骤 10 中的图像 2,2
    在这个步骤中使用的工具:
    Spudger
    $3.99
    购买
    • Lift the motherboard out of the case using the spudger.

    • Expose the underside of the motherboard using your hands.

  11. 这个步骤还没有翻译 帮忙翻译一下

    : 步骤 11 中的图像 1,2 : 步骤 11 中的图像 2,2
    • Remove the flexible connection from the motherboard.

    • Caution: Removing the connection too fast may cause damage to the connection and cables.

  12. 这个步骤还没有翻译 帮忙翻译一下

    : 步骤 12 中的图像 1,3 : 步骤 12 中的图像 2,3 : 步骤 12 中的图像 3,3
    在这个步骤中使用的工具:
    T5 Torx Screwdriver
    $5.49
    购买
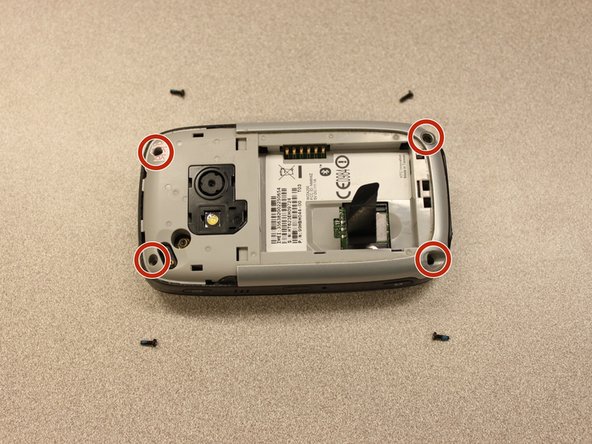
    • Remove the four 5mm screws with the T5 Torx screwdriver.

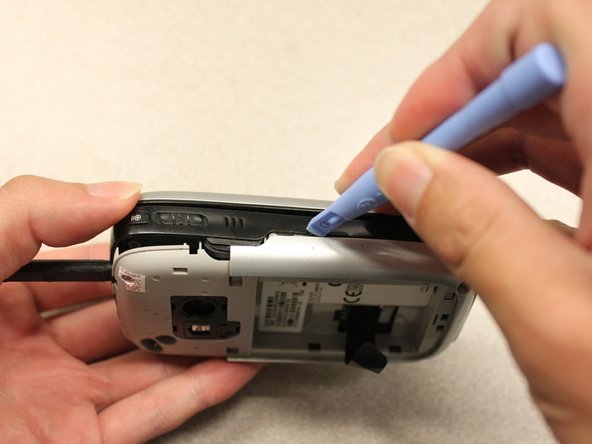
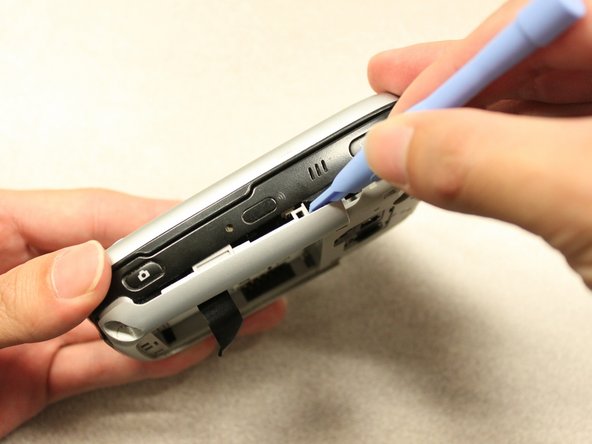
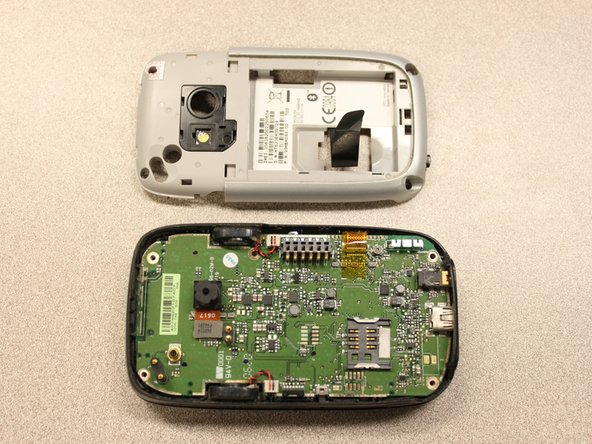
    • Remove the keyboard slider from the main body.

  13. 这个步骤还没有翻译 帮忙翻译一下

    : 步骤 13 中的图像 1,2 : 步骤 13 中的图像 2,2
    • Use the T5 Torx screwdriver to remove four 5mm screws that secure the back of the screen casing.

  14. 这个步骤还没有翻译 帮忙翻译一下

    : 步骤 14 中的图像 1,2 : 步骤 14 中的图像 2,2
    • Insert the plastic opening tool between the front panel and the rear panel and pry open to reach the screen.

  15. 这个步骤还没有翻译 帮忙翻译一下

    : 步骤 15 中的图像 1,2 : 步骤 15 中的图像 2,2
    • Once the rear panel is loose, lift it off of the front panel.

    • The flexible connection will pop loose.

  16. 这个步骤还没有翻译 帮忙翻译一下

    : 步骤 16 中的图像 1,1
    • Device rotated 90 degrees CCW.

    • Remove the yellow anti-static tape.

  17. 这个步骤还没有翻译 帮忙翻译一下

    : 步骤 17 中的图像 1,2 : 步骤 17 中的图像 2,2
    • Unscrew the two 3mm phillips #0 screws from the bottom of the device that secure the rigid flex board to the screen panel.

  18. 这个步骤还没有翻译 帮忙翻译一下

    : 步骤 18 中的图像 1,1
    • Device rotated 180 degrees CW.

    • Unscrew the two 3mm phillips #0 screws from the top of the device that secure the rigid flex board to the screen panel.

  19. 这个步骤还没有翻译 帮忙翻译一下

    : 步骤 19 中的图像 1,1
    • Device rotated 90 degrees CCW.

    • Unhinge the flexible connection and use the tweezers to disconnect.

  20. 这个步骤还没有翻译 帮忙翻译一下

    : 步骤 20 中的图像 1,1
    • Now that the rigid flex board is loose, remove it from the screen.

终点

Kyle Champ

于10/03/11注册

225 声望

创作了12篇指南

团队

Cal Poly, Team 20-27, Maness Fall 2011 Cal Poly, Team 20-27, Maness Fall 2011 的会员

CPSU-MANESS-F11S20G27

4 名成员

创作了24篇指南

0条评论

添加评论

浏览统计数据:

过去 24 小时: 0

过去 7 天: 0

过去 30 天: 1

总计 719