简介
HTC Vive 手柄扳机可能有问题,并且可能无法检测到长时间使用引起的点击。必须卸下主板才能使用扳机。本指南将向你展示如何更换扳机按钮。
你所需要的
-
-
使用尼龙撬棒将顶部和底部的碟子盖在边缘处分开。
-
用手向上拉,只取下顶部的碟盖。
My top saucer was REALLY stubborn. Don’t force it with your hand, use the spudger to separate it at the seam. Try not to poke your spudger in too deep, there are internals just inside the seam.
The second time around, I learned why it was so stubborn. The picture suggests that you should start at the base of the saucer and work your way around, but that’s backwards.
Start separating with your spudger at the distal side of the saucer and work your way toward the handle. Then for the last part, pull the piece up and away, like peeling a banana. See the second picture for the bottom half of the saucer, below. Do the same on the top.
-
-
-
使用 Phillips 00 螺丝刀从暴露的上部传感器面板上卸下三颗 12.8 毫米银色螺丝。
It’s Phillips 0, not 00.
You do not need to remove these screws to remove the bottom saucer. They provide stability to the two halves of the donut.
I had the same experience. Putting the screws back in made the bottom shell easier to remove.
I concur, you don’t need to remove these screws to take the bottom shell off.
I found mine had ph#000 screws size, not ph#00.
please do not remove the Phillips-head screws it is not necessary to remove them.
-
-
-
用手小心地拉开底部碟盘。
From what I can tell, there are two clicks on each side? one is quite easy, then the other one seems to require considerable force pushing down and on the side, I had to do it one side at a time and found two YouTube videos performing this step to use as reference. I have the vive pro wands and not the originals, so this may explain the difference. This felt very wrong to me.
-
-
-
翻转 Vive 手柄,使暴露的底托面板朝上。
-
使用 T5 Torx 螺丝刀卸下三颗黑色 5.2mm 螺丝。
Leave the middle screw where it is (the one being unscrewed in the picture). That screw holds the two halves of the photodiode assembly together, not the case.
five screws… two at bottom
I concur with trevosklar, don’t need to remove center screw to remove front panel (pad cover).
-
-
-
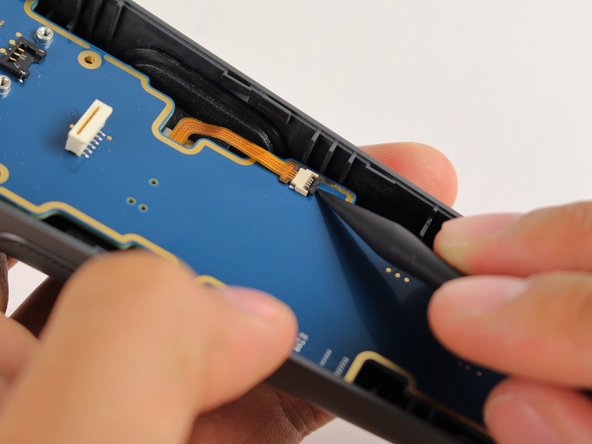
用两根手指将带状电缆向上拉离主板,轻轻断开上部带状电缆的连接。
You do not have to remove the ribbon cables from the plugs…you can carefully work the battery holder around them and remove it…being very gentle. And the black part of the handle will stay attached to the cables and be in the way. But removing the cables does make it easier to access the area for the battery, just not completely necessary.
-
-
-
-
使用尼龙撬棒将白色标签提起 90 度。
-
用两根手指向下拉带状电缆,轻轻断开底部带状电缆的连接。
Hallo what is the name of this conector because i Broker it
Yeah I did as instructed only to realize after that my gen 1 vive controller does not do that, and i desoldered the power button ribbon. That cable, does NOT detach on my model. destroyed.
-
-
-
用两根手指捏住银板并提起,将其取下。
There is no plate on mine, only tape covering it.
tamgoddess - 回复
Same with mine, also purchased 2018. It seems the silver plate part can be skipped for later models.
-
-
-
使用 T5 Torx 螺丝刀从电池框架底部卸下两颗 4.2mm 银色螺丝。
On my controller these were Philips 000 5.8mm screws, the same as in the previous step.
Second the above with a slight correction. Phillips 00.
tamgoddess - 回复
-
-
-
提起电池架以从 Vive 手柄中取出电池
Suddenly, here the electronics of the saucer are gone, but there’s no previous step mentioning its removal. This is kind of important because loosening the ribbon cables attaching it to the mainboard is a bit finicky.
-
-
-
使用 Phillips 00 螺丝刀从主板顶部卸下两颗黑色 5.8mm 螺丝。
These should be the silver screws not the black screws
Yeah, I think he switched the bottom battery screws with these in a previous disassembly. (see my comment at step 14) I’m opening mine for the first time since new purchase and the motherboard has 4 T5 screws.
-
-
-
用手将主板从 Vive 手柄中提起。
what is the benefit of the rectangular silver steel or ironic metal ,that iside the htc vive hand controller.?????
is it to solve some issus with the Mpu6500 sensor ??
or related to get rid of interferrences ??
the rectanguler metal piece is near to the mother board and the battery in the following image :-
https://d3nevzfk7ii3be.cloudfront.net/ig...
Thanks in advance!
I believe it’s just a weight to help balance the controller by shifting the center of gravity closer to the rear/bottom end. It doesn’t connect to anything, and the board has its own shield. So, just a slab of metal.
Awesome THANKS. … uh … where do I get another motherboard? DoH!
Anyone know of a good replacement button for the trackpad press button? (The one on the top side, tan or pinkish colored.)
-
-
-
使用 T5 Torx 螺丝刀从扳机内部卸下四颗黑色 5.2 毫米螺丝。
-
-
-
用手指按下扳机按钮,直到它从前面板中弹出。
Thank you! This saved me a lot of money. I could fix the slightly pushed in trigger myself.
-


请按逆序重组设备。
请按逆序重组设备。
6等其他人完成本指南。

团队

Cal Poly, Team S15-G5, Livingston Fall 2017 Cal Poly, Team S15-G5, Livingston Fall 2017 的会员
CPSU-LIVINGSTON-F17S15G5
4 名成员
创作了51篇指南
一条评论
It is possible to access and replace the trigger without having to disconnect any of the cables. I have done this with 3 controllers already.
Just ignore the steps saying to disconnect the cable, move parts to the side and be careful.
Jurij Gera - 回复
Where can I buy new t5 21 mm screws? Mine are getting stripped out!
jeremyvanwoerden - 回复
Where can you get replacement batteries?
Mike Justice - 回复
The middle bottom screw may have some form of warranty sticker on it if you have a Vive Pro wand (which is purple). Mine had this. Easy enough to remove and get on with it.
sodiboo - 回复