跳转到主内容

当前版本的文档还未经巡查,您可以查看最新的已查核版本

你所需要的

  1. , 加热iOpener: 步骤 1 中的图像 1,2 , 加热iOpener: 步骤 1 中的图像 2,2
    • 在操作前我们推荐你清空微波炉,在底部的任何讨厌的食物残渣最终都可能粘在iOpener上。

    • 将iOpener放在微波炉中央 。

    • 对于旋转式微波炉:确保盘子可以自由旋转。如果转盘卡住了,iOpener可能会过热并燃烧

  2. : 步骤 2 中的图像 1,1
    • 加热iOpener三十秒

    • 在整个维修过程中,如果iOpener 冷却了,在微波炉中每次重新加热额外的三十秒。

    • 注意在维修过程中不要过度加热iOpener,过热可能会导致iOpener爆炸。

    • 如果iOpener过热膨胀,千万不要触碰iOpener。

    • 如果iOpener中间部分依然烫的没法碰,请等待冷却后再使用,加热好的iOpener 应该可以保持热度十分钟

  3. : 步骤 3 中的图像 1,1
    • 把iOpener从微波炉中拿出来,捏着两边扁平边缘中的一个以避免碰到中心热的部分。

    • iOpener会非常烫,所以拿着它的时候千万要小心。必要的时候可以使用烤箱手套。

  4. , 加热iOpener的替代方案: 步骤 4 中的图像 1,2 , 加热iOpener的替代方案: 步骤 4 中的图像 2,2
    • 如果你没有微波炉,请按照此步骤在沸水中加热iOpener。

    • 在锅或平底锅里装满足够的水来完全淹没iOpener。

    • 把水加热到沸腾。关火。

    • 将iOpener放入热水中2-3分钟。确保iOpener完全浸入水中。

    • 用钳子从热水中提取加热的iOpener。

    • 用毛巾彻底擦干iOpener。

    • iOpener会很燙,所以拿取時請小心的從iOpener的邊邊拿

    • 你的iOpener已准备好使用!如果你需要重新加热iOpener,请将水加热到沸点,关火,并将iOpener放入水中2-3分钟。

  5. 这个步骤还没有翻译 帮忙翻译一下

    : 步骤 5 中的图像 1,1
    • Handling it by the tag, place the heated iOpener across the bottom casing.

    • Let the iOpener sit for at least a minute to soften the adhesive beneath the casing.

  6. 这个步骤还没有翻译 帮忙翻译一下

    : 步骤 6 中的图像 1,3 : 步骤 6 中的图像 2,3 : 步骤 6 中的图像 3,3
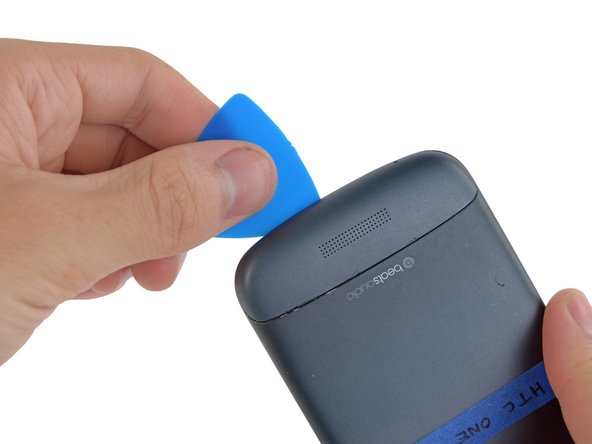
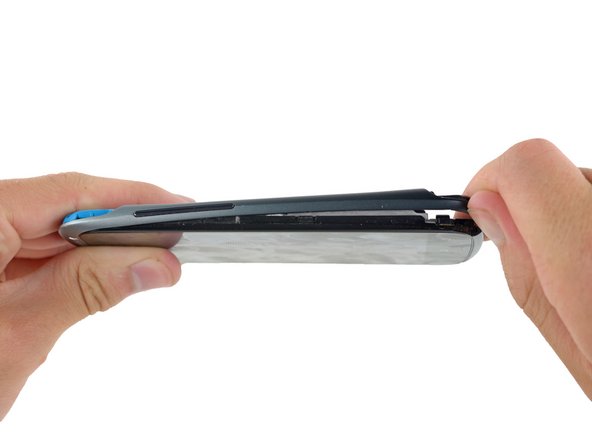
    • Gently place an opening pick in the corner of the gap between the bottom casing and rear case.

    • Slide the opening pick along the side of the casing, prying it away from the adhesive as you go.

  7. 这个步骤还没有翻译 帮忙翻译一下

    : 步骤 7 中的图像 1,1
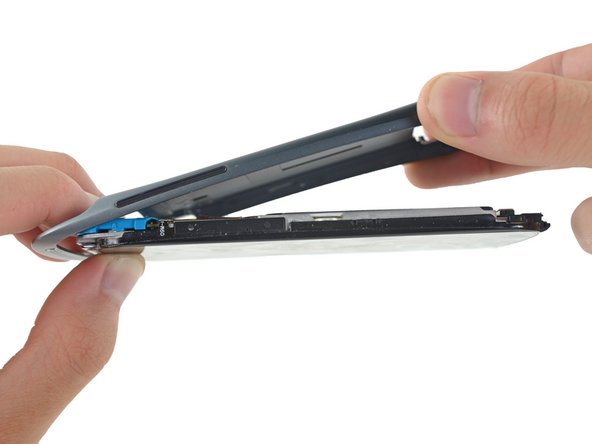
    • Use your fingers to pull the bottom casing off the rest of the phone.

  8. 这个步骤还没有翻译 帮忙翻译一下

    : 步骤 8 中的图像 1,2 : 步骤 8 中的图像 2,2
    • Starting at the groove near the headphone jack, use a plastic opening tool to lift the top casing.

  9. 这个步骤还没有翻译 帮忙翻译一下

    : 步骤 9 中的图像 1,1
    • Use your fingers to pull the top casing off of the rest of the phone.

  10. 这个步骤还没有翻译 帮忙翻译一下

    : 步骤 10 中的图像 1,1
    • Remove the following screws holding the rear case to the rest of the phone:

    • Two 3.15 mm Phillips #00 screws

    • One 4.15 Torx T5 screw

    • One 4 mm Torx T5 screw

  11. 这个步骤还没有翻译 帮忙翻译一下

    : 步骤 11 中的图像 1,3 : 步骤 11 中的图像 2,3 : 步骤 11 中的图像 3,3
    • Place your fingers on either side of the phone and gently push up on the rear case.

    • It is important to start from the bottom of the phone because the rear case wraps around the front of the phone at the top which makes it impossible to start prying from there.

  12. 这个步骤还没有翻译 帮忙翻译一下

    : 步骤 12 中的图像 1,1
    • Pull the rear case away from the rest of the phone with your hands.

  13. 这个步骤还没有翻译 帮忙翻译一下

    : 步骤 13 中的图像 1,2 : 步骤 13 中的图像 2,2
    • Using the pointed end of a spudger, lift the battery cable and release the connector.

  14. 这个步骤还没有翻译 帮忙翻译一下

    : 步骤 14 中的图像 1,2 : 步骤 14 中的图像 2,2
    • Switching to the flat end of the spudger, work your way underneath the battery and peel it away from the adhesive.

  15. 这个步骤还没有翻译 帮忙翻译一下

    : 步骤 15 中的图像 1,1
    • Remove the battery from the phone.

  16. 这个步骤还没有翻译 帮忙翻译一下

    : 步骤 16 中的图像 1,1
    • Remove the three 3.15mm Phillips #00 screws from the turquoise case.

  17. 这个步骤还没有翻译 帮忙翻译一下

    : 步骤 17 中的图像 1,2 : 步骤 17 中的图像 2,2
    • Using a plastic opening tool, lift the turquoise case from the end near the headphone jack.

  18. 这个步骤还没有翻译 帮忙翻译一下

    : 步骤 18 中的图像 1,1
    • Remove the turquoise cover from the phone.

  19. 这个步骤还没有翻译 帮忙翻译一下

    : 步骤 19 中的图像 1,2 : 步骤 19 中的图像 2,2
    • A camera filter is now free to move, so remove it using tweezers.

  20. 这个步骤还没有翻译 帮忙翻译一下

    : 步骤 20 中的图像 1,3 : 步骤 20 中的图像 2,3 : 步骤 20 中的图像 3,3
    • Use tweezers to lift the yellow polyimide tape that covers the ZIF connectors.

  21. 这个步骤还没有翻译 帮忙翻译一下

    : 步骤 21 中的图像 1,2 : 步骤 21 中的图像 2,2
    • Use the pointed end of a spudger to lift the white tab on the largest ZIF connector opposite the USB connector.

  22. 这个步骤还没有翻译 帮忙翻译一下

    : 步骤 22 中的图像 1,3 : 步骤 22 中的图像 2,3 : 步骤 22 中的图像 3,3
    • Use the pointed edge of a spudger to work the ZIF cable out of its connector.

    • To do this, you may have to slowly work both sides until the whole cable is released.

  23. 这个步骤还没有翻译 帮忙翻译一下

    : 步骤 23 中的图像 1,1
    • Repeat the procedure from steps 19 and 20 to remove the cables from the remaining ZIF connectors.

  24. 这个步骤还没有翻译 帮忙翻译一下

    : 步骤 24 中的图像 1,2 : 步骤 24 中的图像 2,2
    • Using the pointed end of the spudger, pop the antenna cable from its connector on the motherboard.

  25. 这个步骤还没有翻译 帮忙翻译一下

    : 步骤 25 中的图像 1,1
    • Remove the 3.15 mm Phillips #00 screw from the motherboard.

  26. 这个步骤还没有翻译 帮忙翻译一下

    : 步骤 26 中的图像 1,2 : 步骤 26 中的图像 2,2
    • Remove the motherboard from the rest of the phone.

  27. 这个步骤还没有翻译 帮忙翻译一下

    : 步骤 27 中的图像 1,1
    • Remove the plastic casing from the phone assembly.

    • If you are having difficulty removing the casing, use a plastic opening tool to gently pry it from the phone.

  28. 这个步骤还没有翻译 帮忙翻译一下

    : 步骤 28 中的图像 1,1
    • Remove the speaker.

终点

Adam Redmond

于05/16/17注册

535 声望

创作了5篇指南

团队

IUPUI, Team S4-G3, Harley Spring 2017 IUPUI, Team S4-G3, Harley Spring 2017 的会员

IUPUI-HARLEY-S17S4G3

3 名成员

创作了5篇指南

0条评论

添加评论

浏览统计数据:

过去 24 小时: 0

过去 7 天: 2

过去 30 天: 2

总计 345