跳转到主内容

HTC One Battery Replacement

你所需要的

视频概述

  1. HTC One Battery Replacement, Battery: 步骤 1 中的图像 1,1
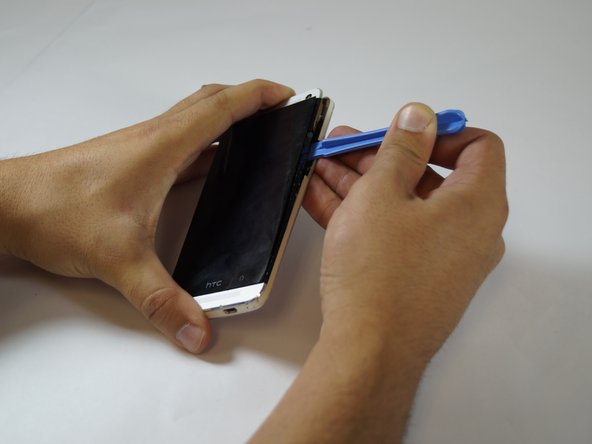
    • In this step you'll lift the screen. Be VERY gentle else you will break it. Insert the plastic opening tool in between the black plastic bezel and the glass screen edge along the sides and the top, gently loosening the adhesive. The screen will remain attached at the bottom edge, as if on a hinge.

    • You may need to use a hair dryer or hot air gun to loosen the adhesive holding the device together. Be careful not to heat the device too much however as you could cause damage!

  2. HTC One Battery Replacement: 步骤 2 中的图像 1,1
    • Wedge the plastic opening tool into the crack around the screen on the top, left and right sides.

  3. HTC One Battery Replacement: 步骤 3 中的图像 1,1
    • Once the screen has been loosened on the top, left and right edges, lift the screen.

    • The screen will stay on a hinge until the final step.

  4. HTC One Battery Replacement: 步骤 4 中的图像 1,1
    • The rear case is held on by glue and eight tabs on the screen bezel. On the volume side there is one above the rocker and three below; on the SIM side all are below the slot. Insert the plastic opening tool between the case edge and the screen bezel, aiming to prise the rear case edge outwards to loosen the glue and free the tabs, one at a time.

  5. HTC One Battery Replacement: 步骤 5 中的图像 1,1
    • Pry the back open once loose and lift. The back panel will come off with time.

  6. HTC One Battery Replacement: 步骤 6 中的图像 1,1
    • Remove all the #000 screws with a #000 Phillips screw driver.

    • Some screws are hidden by tape so remove the tape and check for screws.

  7. HTC One Battery Replacement: 步骤 7 中的图像 1,1
    在这个步骤中使用的工具:
    Tweezers
    $4.99
    购买
    • Lift the motherboard completely out of the phone with the tweezers. (may stay attached at the bottom by tape)

  8. HTC One Battery Replacement: 步骤 8 中的图像 1,1
    • Use the blue opening tool to pry up the battery from the frame.

    • The battery is glued to the frame so you will have to put force.

    • Do not break the battery upon removal.

结论

To reassemble your device, follow these instructions in reverse order.

48等其他人完成本指南。

AJ Skiles

于09/23/14注册

3,544 声望

撰写一个指南

团队

USF Tampa, Team 12-1, Blackwell Fall 2014 USF Tampa, Team 12-1, Blackwell Fall 2014 的会员

USFT-BLACKWELL-F14S12G1

4 名成员

创作了7篇指南

9条评论

Removing the screen first may make it easier to insert the plastic tool between the bezel and the case, however in my instance despite being as careful as I was able I still damaged the screen whilst doing this.

Furthermore, since both the bezel and the case edge are plastic I found that they were not strong enough to withstand damage whilst I loosened the glue that held them together. Whilst I was able to access and replace the battery, cosmetically speaking the phone is a ruin.

Hardest device disassembly I have _ever_ attempted.

Ian Silvester - 回复

Why do you need to remove the screen? Step 3 says the screen will stay hinged until the final step, but after step 3 there is no more mention of the screen.

Leo Taro - 回复

I got away without prying the LCD off (omitting step 2+3). I was lucky and the back coverpopped off rather easily. All in all it took me about an hour.

Christian Egger - 回复

If i change batterry finish.

Do I have to use glue to put the screen back on the body?
Viriya Nopparat - 回复

Where can I get a new battery

Felix - 回复

添加评论

浏览统计数据:

过去 24 小时: 5

过去 7 天: 27

过去 30 天: 124

总计 128,063