跳转到主内容

HP ZBook 15u G2 Heatsink Replacement

你所需要的

  1. HP ZBook 15u G2 Heatsink Replacement, Battery: 步骤 1 中的图像 1,1
    • Turn the HP Zbook over and flip the switch at the top so the red part is visible.

  2. HP ZBook 15u G2 Heatsink Replacement: 步骤 2 中的图像 1,1
    • Pull the back cover down to remove it.

  3. HP ZBook 15u G2 Heatsink Replacement: 步骤 3 中的图像 1,2 HP ZBook 15u G2 Heatsink Replacement: 步骤 3 中的图像 2,2
    • Flip the two switches on the top of the battery so the red is visible.

  4. HP ZBook 15u G2 Heatsink Replacement: 步骤 4 中的图像 1,1
    • Lift the plastic tab at the top of the battery up to lift the battery up and out of the device

  5. HP ZBook 15u G2 Heatsink Replacement, Heatsink: 步骤 5 中的图像 1,2 HP ZBook 15u G2 Heatsink Replacement, Heatsink: 步骤 5 中的图像 2,2
    在这个步骤中使用的工具:
    Tweezers
    $4.99
    购买
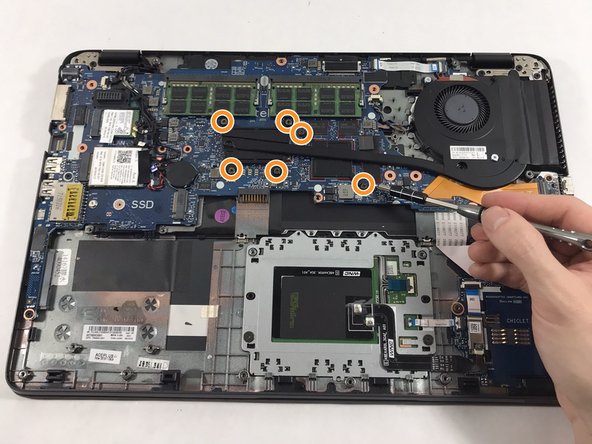
    • Use a torx 8 screwdriver to remove the 11 M2.5x5mm torx screws labeled M2.5x5.

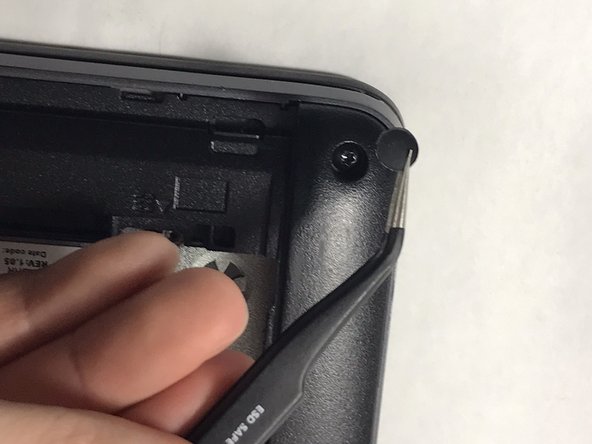
    • Use a pair of tweezers to remove the rubber feet at the edges and corners of the laptop to reveal the other 8 torx screws and remove them as well

  6. HP ZBook 15u G2 Heatsink Replacement: 步骤 6 中的图像 1,1
    • Use a Phillips #00 screwdriver to remove the five M2.0x2 mm screws beneath the battery.

  7. HP ZBook 15u G2 Heatsink Replacement: 步骤 7 中的图像 1,1
    • Remove the 4 mm Phillips screws under the SD card slot on the left of the laptop.

    • Lift the plastic edges around the bottom of the laptop to remove the bottom plastic cover.

  8. HP ZBook 15u G2 Heatsink Replacement: 步骤 8 中的图像 1,2 HP ZBook 15u G2 Heatsink Replacement: 步骤 8 中的图像 2,2
    • Loosen the 2 silver Phillips screws on the fan assembly.

    • Remove the 6 Phillips screws at the left side of the heatsink assembly.

  9. HP ZBook 15u G2 Heatsink Replacement: 步骤 9 中的图像 1,2 HP ZBook 15u G2 Heatsink Replacement: 步骤 9 中的图像 2,2
    • Using tweezers, gently unplug the wire the connects the fan to the motherboard.

  10. HP ZBook 15u G2 Heatsink Replacement: 步骤 10 中的图像 1,1
    • Grip the heatsink assembly by the fan and lift it up to remove it.

    • Use computer duster to blow away and remove any dust and particles in and around the heatsink and fan assembly.

结论

To reassemble your device, follow these instructions in reverse order.

另外一个人完成了本指南。

Kwasi Sarfo

于03/13/23注册

285 声望

创作了2篇指南

团队

UMass Dartmouth, Team 3-5, Petersen Spring 2023 UMass Dartmouth, Team 3-5, Petersen Spring 2023 的会员

UMASSD-PETERSEN-S23S3G5

4 名成员

创作了7篇指南

0条评论

添加评论

浏览统计数据:

过去 24 小时: 0

过去 7 天: 1

过去 30 天: 7

总计 114