跳转到主内容

HP Sprocket 2-in-1 Camera Lens Assembly Replacement

你所需要的

  1. HP Sprocket 2-in-1 Camera Lens Assembly Replacement, Outer Casing: 步骤 1 中的图像 1,2 HP Sprocket 2-in-1 Camera Lens Assembly Replacement, Outer Casing: 步骤 1 中的图像 2,2
    • Remove the back cover and any printer paper inside the device.

  2. HP Sprocket 2-in-1 Camera Lens Assembly Replacement: 步骤 2 中的图像 1,2 HP Sprocket 2-in-1 Camera Lens Assembly Replacement: 步骤 2 中的图像 2,2
    • Using the Jimmy, slowly pry open the outer edge of the remaining white plastic on the back.

    • Remove the plastic from the device once it lifts out freely.

  3. HP Sprocket 2-in-1 Camera Lens Assembly Replacement: 步骤 3 中的图像 1,3 HP Sprocket 2-in-1 Camera Lens Assembly Replacement: 步骤 3 中的图像 2,3 HP Sprocket 2-in-1 Camera Lens Assembly Replacement: 步骤 3 中的图像 3,3
    • Remove two 2.5mm JIS #00 located on the small circuit board in view.

    • Use the Jimmy to remove the board after the screws have been removed.

    • Be careful not to crease or damage the ribbon cable.

  4. HP Sprocket 2-in-1 Camera Lens Assembly Replacement: 步骤 4 中的图像 1,3 HP Sprocket 2-in-1 Camera Lens Assembly Replacement: 步骤 4 中的图像 2,3 HP Sprocket 2-in-1 Camera Lens Assembly Replacement: 步骤 4 中的图像 3,3
    • Remove two 2.5mm JIS #00 screws from the translucent plastic bracket.

    • One will be located beneath the ribbon cable.

    • Remove the translucent plastic bracket by hand.

  5. HP Sprocket 2-in-1 Camera Lens Assembly Replacement: 步骤 5 中的图像 1,2 HP Sprocket 2-in-1 Camera Lens Assembly Replacement: 步骤 5 中的图像 2,2
    • Remove four 2.5mm JIS #00 screws from the beige casing.

  6. HP Sprocket 2-in-1 Camera Lens Assembly Replacement: 步骤 6 中的图像 1,3 HP Sprocket 2-in-1 Camera Lens Assembly Replacement: 步骤 6 中的图像 2,3 HP Sprocket 2-in-1 Camera Lens Assembly Replacement: 步骤 6 中的图像 3,3
    • Use the iFixit opening tool to slowly work between the white and beige casing around the device.

    • Flip the device over and seperate the white casing from the rest of the device.

    • Be careful not to break the plastic while removing the case.

    • Gently remove the white casing as there is a ribbon cable connecting the two pieces.

  7. HP Sprocket 2-in-1 Camera Lens Assembly Replacement: 步骤 7 中的图像 1,1
    • Carefully remove the ribbon cable that connects the flash to the outer casing.

  8. HP Sprocket 2-in-1 Camera Lens Assembly Replacement, Camera Lens Assembly: 步骤 8 中的图像 1,2 HP Sprocket 2-in-1 Camera Lens Assembly Replacement, Camera Lens Assembly: 步骤 8 中的图像 2,2
    • Use the Japanese Industrial Standard J00 screwdriver to remove five 2.5mm screws.

    • One of the screws is below bronze tape. Move the tape slightly to get to the screw.

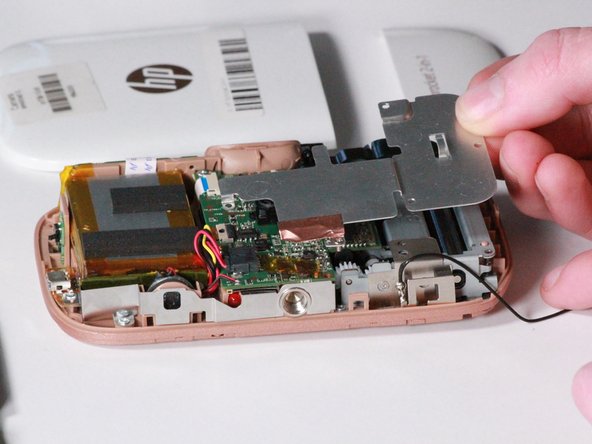
    • Remove the metal plate from the casing.

  9. HP Sprocket 2-in-1 Camera Lens Assembly Replacement: 步骤 9 中的图像 1,1
    • Use an iFixit opening tool to pry the camera free from the device.

结论

To reassemble your device, follow these instructions in reverse order.

0条评论

添加评论

浏览统计数据:

过去 24 小时: 0

过去 7 天: 2

过去 30 天: 5

总计 258