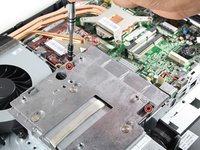
跳转到主内容

HP ProOne 600 G1 Fan Replacement

你所需要的

  1. HP ProOne 600 G1 Fan Replacement, Back Removal: 步骤 1 中的图像 1,2 HP ProOne 600 G1 Fan Replacement, Back Removal: 步骤 1 中的图像 2,2
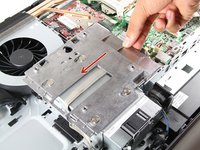
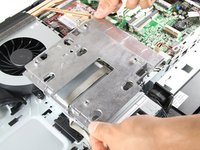
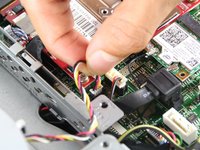
    • Push the unlock tabs on the back of the monitor in and towards each other while sliding the back cover up.

  2. HP ProOne 600 G1 Fan Replacement: 步骤 2 中的图像 1,2 HP ProOne 600 G1 Fan Replacement: 步骤 2 中的图像 2,2
    • Loosen the two 1/2" screws , with the T15 Torx Screwdriver, on each side of the stand. Remove stand.

  3. HP ProOne 600 G1 Fan Replacement: 步骤 3 中的图像 1,1
    • Take out the single 3/8" screw, with the T15 Torx Screwdriver, from the middle of the backplate.

  4. HP ProOne 600 G1 Fan Replacement: 步骤 4 中的图像 1,1
    • Remove the backplate by pulling it back towards you.

    • Small plastic tabs hold in the backplate, pull these up to remove it.

  5. HP ProOne 600 G1 Fan Replacement, Fan: 步骤 5 中的图像 1,3 HP ProOne 600 G1 Fan Replacement, Fan: 步骤 5 中的图像 2,3 HP ProOne 600 G1 Fan Replacement, Fan: 步骤 5 中的图像 3,3
    • Remove both 3/8" screws using the T15 Torx Screwdriver from the metal plate, and slide the plate to the left.

  6. HP ProOne 600 G1 Fan Replacement: 步骤 6 中的图像 1,3 HP ProOne 600 G1 Fan Replacement: 步骤 6 中的图像 2,3 HP ProOne 600 G1 Fan Replacement: 步骤 6 中的图像 3,3
    • Unscrew three surrounding 1/4" screws, with the T15 Torx Screwdriver. Pull out the fan and attached wires.

结论

To reassemble your device, follow these instructions in reverse order.

Victor Chacon

于10/01/15注册

113 声望

撰写一个指南

团队

Cal Poly, Team 1-20, Maness Fall 2015 Cal Poly, Team 1-20, Maness Fall 2015 的会员

CPSU-MANESS-F15S1G20

4 名成员

创作了12篇指南

0条评论

添加评论

浏览统计数据:

过去 24 小时: 0

过去 7 天: 9

过去 30 天: 20

总计 1,861