跳转到主内容

当前版本的文档还未经巡查,您可以查看最新的已查核版本

你所需要的

  1. 这个步骤还没有翻译 帮忙翻译一下

    : 步骤 1 中的图像 1,2 : 步骤 1 中的图像 2,2
    • Before disassembling your printer, be sure that the printer has been unplugged to avoid any risk of injury.

    • Rotate the printer 90 degrees counter clockwise so that the side panel next to control panel is facing you.

    • Remove the two T10 12mm Torx screws from the left side panel.

  2. 这个步骤还没有翻译 帮忙翻译一下

    : 步骤 2 中的图像 1,2 : 步骤 2 中的图像 2,2
    • Firmly pull the the back of the side panel until it separates from the body of the printer.

    • Rotate the side panel upwards while pulling it towards yourself to remove the panel.

  3. 这个步骤还没有翻译 帮忙翻译一下

    : 步骤 3 中的图像 1,2 : 步骤 3 中的图像 2,2
    • Rotate the printer 90 degrees clockwise.

    • Grasp the paper tray and rotate it down.

    • Insert your fingers into the slot in the printer door and pull to rotate the gate down.

  4. 这个步骤还没有翻译 帮忙翻译一下

    : 步骤 4 中的图像 1,2 : 步骤 4 中的图像 2,2
    • Rotate the printer 90 degrees clockwise.

    • Remove the two T10 12 mm Torx screws.

    • Grasp both sides of the side panel and pull it forward to remove the panel.

  5. 这个步骤还没有翻译 帮忙翻译一下

    : 步骤 5 中的图像 1,2 : 步骤 5 中的图像 2,2
    • Rotate the printer 90 degrees counter clockwise.

    • Lift the scanner lid to expose the scanner glass.

  6. 这个步骤还没有翻译 帮忙翻译一下

    : 步骤 6 中的图像 1,1
    • Remove the two T10 12 mm Torx screws.

    • Do not attempt to lift the top panel off the printer yet because it is still connected to the printer body by a cable.

  7. 这个步骤还没有翻译 帮忙翻译一下

    : 步骤 7 中的图像 1,2 : 步骤 7 中的图像 2,2
    • Rotate the printer 90 degrees counter clockwise.

    • Inside the printer is a small white tab. Press it inward with a spudger until a pop is heard.

    • Remove the front panel by grasping its front and pulling away from the printer.

  8. 这个步骤还没有翻译 帮忙翻译一下

    : 步骤 8 中的图像 1,2 : 步骤 8 中的图像 2,2
    • Rotate the printer 90 degrees clockwise.

    • Remove the cable connecting the top panel of the printer to the power button assembly.

  9. 这个步骤还没有翻译 帮忙翻译一下

    : 步骤 9 中的图像 1,1
    • Carefully lift the top panel of the printer away from the printer body.

  10. 这个步骤还没有翻译 帮忙翻译一下

    : 步骤 10 中的图像 1,2 : 步骤 10 中的图像 2,2
    • Set aside the top panel of the printer.

    • Remove the two T10 12 mm Torx screws from the top front of the printer

  11. 这个步骤还没有翻译 帮忙翻译一下

    : 步骤 11 中的图像 1,2 : 步骤 11 中的图像 2,2
    • Rotate the Printer 90 degrees counter clockwise.

    • Remove the scanner cable from the main circuit board.

    • Grasp the bottom of the cable and pull straight up. Do not wiggle it from side to side or twist it as this can damage the connection.

  12. 这个步骤还没有翻译 帮忙翻译一下

    : 步骤 12 中的图像 1,1
    • Rotate the printer 90 degrees clockwise.

    • Using both hands, lift the scanner tray from the body of the printer.

  13. 这个步骤还没有翻译 帮忙翻译一下

    : 步骤 13 中的图像 1,2 : 步骤 13 中的图像 2,2
    • Remove the power button circuit board from the support frame by pinching the left side, and pulling forward and to the left simultaneously.

    • Push up on the tab holding the secondary control circuit board with the spudger and pull it forward to remove it.

    • Be careful not to pull too hard on the cable connecting the power button control circuit board and the secondary control circuit board to the main circuit board

  14. 这个步骤还没有翻译 帮忙翻译一下

    : 步骤 14 中的图像 1,2 : 步骤 14 中的图像 2,2
    • Remove the two T10 12 mm Torx screws.

    • Lift the support frame off of the printer body with both hands.

  15. 这个步骤还没有翻译 帮忙翻译一下

    : 步骤 15 中的图像 1,1
    • Remove the printer door and paper tray by putting them in the closed position and not laying flat then rotating them upwards lift the left side up.

  16. 这个步骤还没有翻译 帮忙翻译一下

    : 步骤 16 中的图像 1,2 : 步骤 16 中的图像 2,2
    • Remove both of the ink cartridges by grabbing the front of the ink cartridge and pulling down.

    • Make sure that the printer carriage is pushed all the way to the right.

  17. 这个步骤还没有翻译 帮忙翻译一下

    : 步骤 17 中的图像 1,2 : 步骤 17 中的图像 2,2
    • Remove the T10 6 mm Torx screw on the left side of the track assembly.

    • Remove the T10 12 mm Torx screw on the left side of the track assembly.

  18. 这个步骤还没有翻译 帮忙翻译一下

    : 步骤 18 中的图像 1,2 : 步骤 18 中的图像 2,2
    • Gently push the ink cartridge carriage to the left side of the printer.

  19. 这个步骤还没有翻译 帮忙翻译一下

    : 步骤 19 中的图像 1,1
    • Remove the two T10 12 mm Torx screws.

    • Remove the two T10 6 mm Torx screws.

  20. 这个步骤还没有翻译 帮忙翻译一下

    : 步骤 20 中的图像 1,2 : 步骤 20 中的图像 2,2
    • Rotate the printer 90 degrees counter clockwise.

    • Remove the cable connecting the ink cartridge carriage to the main circuit board.

    • Pull straight up to free the cable from the main circuit board. Do not twist or wiggle the cable as doing so can damage it.

    • You may need to lift the carriage up with one hand in order to reach the cable with the free hand as shown.

  21. 这个步骤还没有翻译 帮忙翻译一下

    : 步骤 21 中的图像 1,1
    • Carefully remove the connector holding the drive motor wires to the main circuit board.

  22. 这个步骤还没有翻译 帮忙翻译一下

    : 步骤 22 中的图像 1,2 : 步骤 22 中的图像 2,2
    • Slide the ink cartridge carriage all the way to the right side of the printer.

    • Using both hands, carefully lift the ink cartridge track off of the main body of the printer.

  23. 这个步骤还没有翻译 帮忙翻译一下

    : 步骤 23 中的图像 1,2 : 步骤 23 中的图像 2,2
    • Set aside the printer body.

    • Remove the two motor retainment T10 4 mm Torx screws, per images 1-2.

  24. 这个步骤还没有翻译 帮忙翻译一下

    : 步骤 24 中的图像 1,2 : 步骤 24 中的图像 2,2
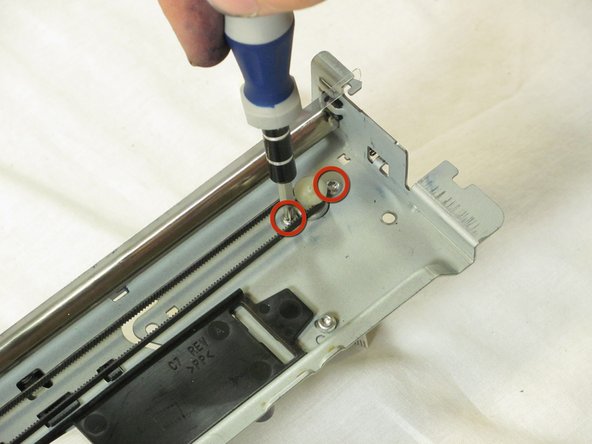
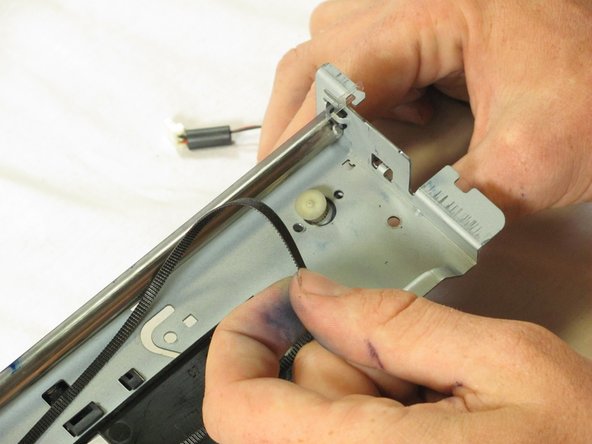
    • Grasp the bottom of the drive motor (Hidden behind the housing in images 1-2) and rock it away from the center of the cabal loop to release the tension in the cable.

    • Using your fingers, unhook the cable from drive motor.

  25. 这个步骤还没有翻译 帮忙翻译一下

    : 步骤 25 中的图像 1,1
    • Remove the printer drive motor by gently pulling it downward.

终点

另外一个人完成了本指南。

Jim

于10/06/11注册

1,590 声望

创作了10篇指南

团队

Cal Poly, Team 20-30, Maness Fall 2011 Cal Poly, Team 20-30, Maness Fall 2011 的会员

CPSU-MANESS-F11S20G30

4 名成员

创作了25篇指南

一条评论

Wo geht das Flachbandkabel F1 hin?

Karl-Heinz Beyer - 回复

添加评论

浏览统计数据:

过去 24 小时: 2

过去 7 天: 10

过去 30 天: 21

总计 4,837