跳转到主内容

HP Pavillion dm1-3010nr Cooling Fan Replacement

你所需要的

  1. HP Pavillion dm1-3010nr Cooling Fan Replacement, Battery: 步骤 1 中的图像 1,1
    • Flip the device over, so that the bottom cover is exposed.

    • Slide the black locking mechanism into its unlock position.

  2. HP Pavillion dm1-3010nr Cooling Fan Replacement: 步骤 2 中的图像 1,1
    • After unlocking the mechanism, slide the battery out of its compartment.

  3. HP Pavillion dm1-3010nr Cooling Fan Replacement, Cooling Fan: 步骤 3 中的图像 1,1
    • With the battery removed, the bottom cover can be opened with your hand.

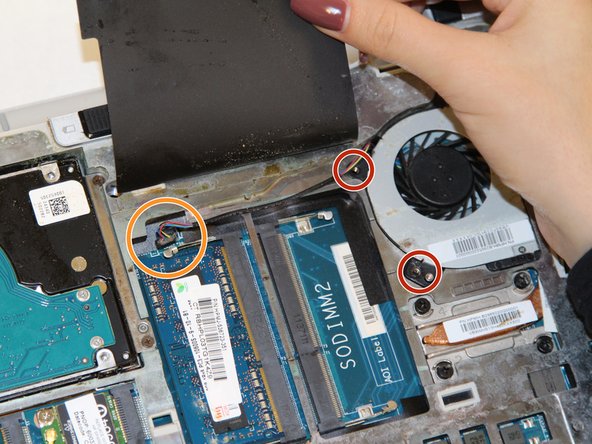
  4. HP Pavillion dm1-3010nr Cooling Fan Replacement: 步骤 4 中的图像 1,2 HP Pavillion dm1-3010nr Cooling Fan Replacement: 步骤 4 中的图像 2,2
    • Use a screwdriver from your iFixit Toolkit to remove the two 5mm Phillips #0 screws shown in each picture.

    • Use tweezers to carefully remove the fan's power cable from the motherboard. The cable can be seen in the second picture.

  5. HP Pavillion dm1-3010nr Cooling Fan Replacement: 步骤 5 中的图像 1,1
    • After removing the screws and unplugging the wire, remove the fan.

结论

To reassemble your device, follow these instructions in reverse order.

Amitpal Gill

于10/22/18注册

375 声望

创作了3篇指南

团队

UC Davis, Team S7-G1, Lore Fall 2018 UC Davis, Team S7-G1, Lore Fall 2018 的会员

UCD-LORE-F18S7G1

3 名成员

创作了4篇指南

0条评论

添加评论

浏览统计数据:

过去 24 小时: 0

过去 7 天: 1

过去 30 天: 4

总计 576