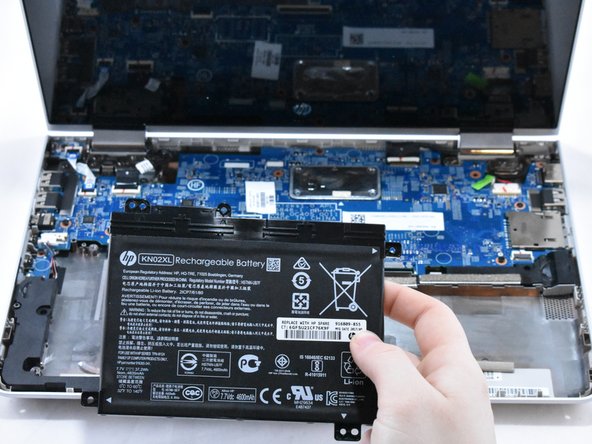
跳转到主内容

HP Pavilion x360 11m-ad013dx Motherboard Replacement

你所需要的

  1. HP Pavilion x360 11m-ad013dx Motherboard Replacement, Keyboard: 步骤 1 中的图像 1,1
    • Lay the HP Pavilion top-down with the front edge facing towards you.

  2. HP Pavilion x360 11m-ad013dx Motherboard Replacement: 步骤 2 中的图像 1,1
    • Remove the three 4.8mm Phillips #0 screws from the front side.

  3. HP Pavilion x360 11m-ad013dx Motherboard Replacement: 步骤 3 中的图像 1,2 HP Pavilion x360 11m-ad013dx Motherboard Replacement: 步骤 3 中的图像 2,2
    • Using a plastic spudger, remove the grey silicon strip closest to the back-side.

  4. HP Pavilion x360 11m-ad013dx Motherboard Replacement: 步骤 4 中的图像 1,1
    • Remove the three 5.7mm Phillips #1 screws.

  5. HP Pavilion x360 11m-ad013dx Motherboard Replacement: 步骤 5 中的图像 1,2 HP Pavilion x360 11m-ad013dx Motherboard Replacement: 步骤 5 中的图像 2,2
    • Open the HP Pavilion so that the screen is showing. Then tilt it down so that the screen is on its back, facing up.

    • Using a spudger, pry off the black keyboard panel.

    • This step requires force to unclasp the latches keeping the keyboard in place.

  6. HP Pavilion x360 11m-ad013dx Motherboard Replacement: 步骤 6 中的图像 1,2 HP Pavilion x360 11m-ad013dx Motherboard Replacement: 步骤 6 中的图像 2,2
    • Using your fingernail, disconnect the zero insertion force (ZIF) keyboard connector cable by flipping up the small locking flap.

    • You may disconnect the other end of the cable, for ease of access to other parts. Keep in mind that the end labeled MB connects to the motherboard.

  7. HP Pavilion x360 11m-ad013dx Motherboard Replacement: 步骤 7 中的图像 1,2 HP Pavilion x360 11m-ad013dx Motherboard Replacement: 步骤 7 中的图像 2,2
    • Using your fingernail, disconnect the zero insertion force (ZIF) connector for the touch pad cable by flipping up the small locking flap.

  8. HP Pavilion x360 11m-ad013dx Motherboard Replacement: 步骤 8 中的图像 1,1
    • Remove the keyboard.

  9. HP Pavilion x360 11m-ad013dx Motherboard Replacement, Battery: 步骤 9 中的图像 1,1
    • Remove the five 4.6mm Phillips #1 screws located around the battery.

  10. HP Pavilion x360 11m-ad013dx Motherboard Replacement: 步骤 10 中的图像 1,2 HP Pavilion x360 11m-ad013dx Motherboard Replacement: 步骤 10 中的图像 2,2
    • Using a spudger for assistance, lift up the right edge of the battery.

    • Remove the battery.

  11. HP Pavilion x360 11m-ad013dx Motherboard Replacement, Speaker: 步骤 11 中的图像 1,2 HP Pavilion x360 11m-ad013dx Motherboard Replacement, Speaker: 步骤 11 中的图像 2,2
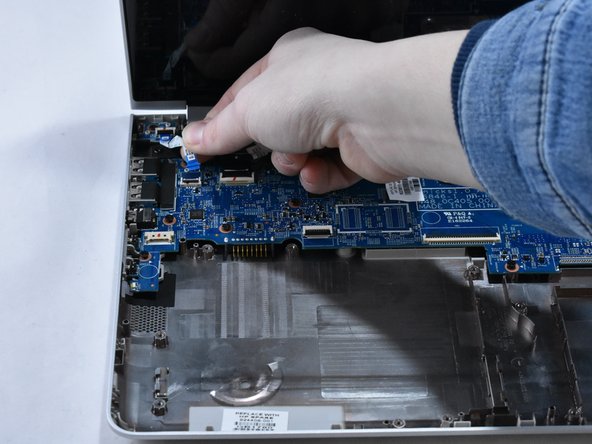
    • Using your fingernail, disconnect the ZIF (zero insertion force) hard drive cable by flipping up the small locking flap.

  12. HP Pavilion x360 11m-ad013dx Motherboard Replacement: 步骤 12 中的图像 1,2 HP Pavilion x360 11m-ad013dx Motherboard Replacement: 步骤 12 中的图像 2,2
    • With your fingernails, disconnect the speaker cable from the motherboard by pulling back on the connector.

    • Do not directly pull on the wires, as this can damage the connector.

  13. HP Pavilion x360 11m-ad013dx Motherboard Replacement: 步骤 13 中的图像 1,2 HP Pavilion x360 11m-ad013dx Motherboard Replacement: 步骤 13 中的图像 2,2
    • Lift the speaker cable from its retention chamber.

  14. HP Pavilion x360 11m-ad013dx Motherboard Replacement: 步骤 14 中的图像 1,1
    • Remove the four 6.2mm Phillips #1 screws around the speakers.

  15. HP Pavilion x360 11m-ad013dx Motherboard Replacement: 步骤 15 中的图像 1,1
    • Remove the speakers.

  16. HP Pavilion x360 11m-ad013dx Motherboard Replacement, Motherboard: 步骤 16 中的图像 1,2 HP Pavilion x360 11m-ad013dx Motherboard Replacement, Motherboard: 步骤 16 中的图像 2,2
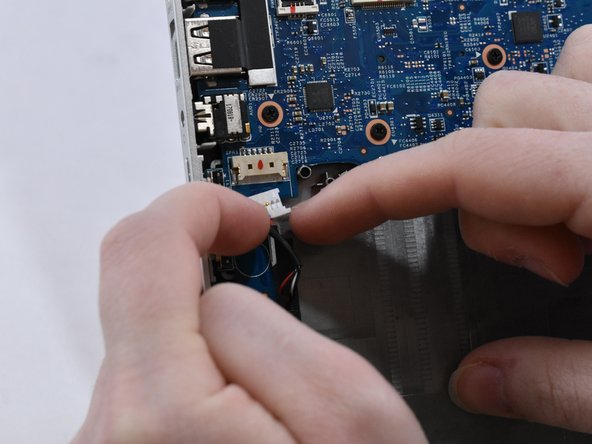
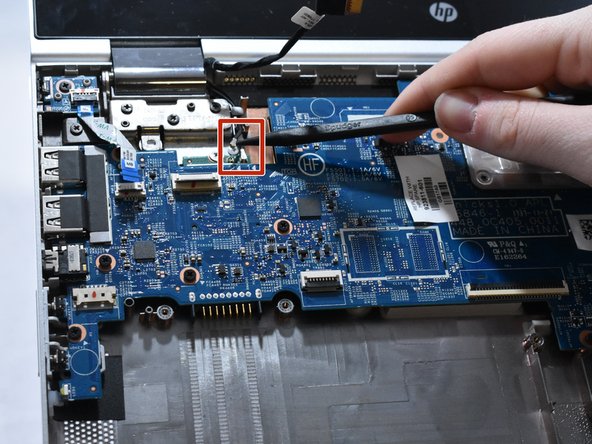
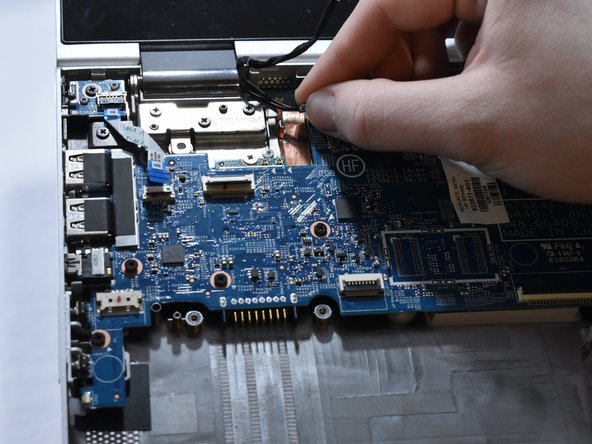
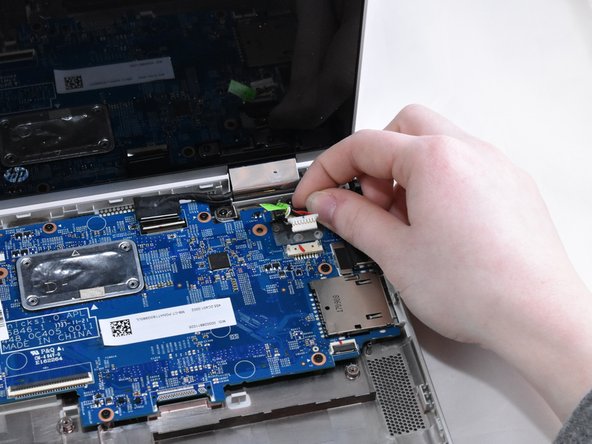
    • Using your fingernail, disconnect the ZIF (zero insertion force) power button connector cable from the motherboard.

  17. HP Pavilion x360 11m-ad013dx Motherboard Replacement: 步骤 17 中的图像 1,2 HP Pavilion x360 11m-ad013dx Motherboard Replacement: 步骤 17 中的图像 2,2
    • Using your fingernail, disconnect the ZIF display panel connector cable from the motherboard.

  18. HP Pavilion x360 11m-ad013dx Motherboard Replacement: 步骤 18 中的图像 1,3 HP Pavilion x360 11m-ad013dx Motherboard Replacement: 步骤 18 中的图像 2,3 HP Pavilion x360 11m-ad013dx Motherboard Replacement: 步骤 18 中的图像 3,3
    • Disconnect the two WLAN antenna cables by sliding under the cable with a spudger, then lifting straight up.

    • The black labeled cable inserts into the "A" connection. The white labeled cable inserts into the "B" connection.

  19. HP Pavilion x360 11m-ad013dx Motherboard Replacement: 步骤 19 中的图像 1,3 HP Pavilion x360 11m-ad013dx Motherboard Replacement: 步骤 19 中的图像 2,3 HP Pavilion x360 11m-ad013dx Motherboard Replacement: 步骤 19 中的图像 3,3
    • Using your fingernail, disconnect the ZIF display touch screen connector cable from the motherboard.

  20. HP Pavilion x360 11m-ad013dx Motherboard Replacement: 步骤 20 中的图像 1,2 HP Pavilion x360 11m-ad013dx Motherboard Replacement: 步骤 20 中的图像 2,2
    • Using your fingernails, disconnect the power connector cable by pulling straight out.

    • Do not directly pull the wires, as this can damage the connector. Instead, pull on the white, plastic part of the connector.

  21. HP Pavilion x360 11m-ad013dx Motherboard Replacement: 步骤 21 中的图像 1,1
    • Remove the eleven 4.6 mm Phillips #1 screws from around the motherboard.

  22. HP Pavilion x360 11m-ad013dx Motherboard Replacement: 步骤 22 中的图像 1,1
    • Remove the one 2.2 mm Phillips #1 broad head screw in the WLAN module.

  23. HP Pavilion x360 11m-ad013dx Motherboard Replacement: 步骤 23 中的图像 1,1
    • Lift the motherboard up on the right side. Then, gently pull the motherboard straight out to the right.

结论

To reassemble your device, follow these instructions in reverse order.

2等其他人完成本指南。

0条评论

添加评论

浏览统计数据:

过去 24 小时: 0

过去 7 天: 4

过去 30 天: 8

总计 1,102