跳转到主内容
加入维修社区 - 创建账户

HP Pavilion g7-2275dx RAM Replacement

你所需要的

    1. HP Pavilion g7-2275dx RAM Replacement, Battery: 步骤 1 中的图像 1,1
      • Working on your device while it is turned on may result in electric shock. Make sure to shut down and unplug your device before you begin.

      • Flip your device over so the bottom panel is facing up.

      添加评论

    2. HP Pavilion g7-2275dx RAM Replacement: 步骤 2 中的图像 1,1
      • The battery is held in by a latch in the front and tabs in the back.

      • Slide the lock switch left, towards the center of the computer.

      • Lift up the battery, rotating it up and away from you, then pull it out.

      • To put the battery back in, line it up with the battery bay and the holes for the tabs. Then let the battery rotate towards you and press down until the latch engages and you hear a click.

      询问修复机器人

      添加评论

    1. HP Pavilion g7-2275dx RAM Replacement, Disassembling HP Pavilion g7-2275dx Back Panel: 步骤 3 中的图像 1,1
      • Unscrew one Phillips #1 screw from the back panel.

      • The screw is on a spring and attached to the panel. It will pop up, but will not separate from the back panel.

      询问修复机器人

      添加评论

    2. HP Pavilion g7-2275dx RAM Replacement: 步骤 4 中的图像 1,2 HP Pavilion g7-2275dx RAM Replacement: 步骤 4 中的图像 2,2
      • Slide the back panel down and pull it up.

      询问修复机器人

      添加评论

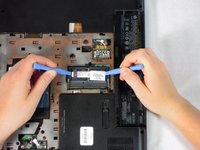
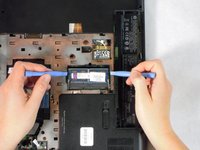
    1. HP Pavilion g7-2275dx RAM Replacement, RAM: 步骤 5 中的图像 1,2 HP Pavilion g7-2275dx RAM Replacement, RAM: 步骤 5 中的图像 2,2
      • Use your fingers, plastic opening tools, or pliers to pull the silver brackets away from the RAM.

      • The RAM should pop up to a 35 degree angle.

      询问修复机器人

      添加评论

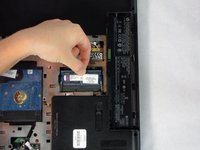
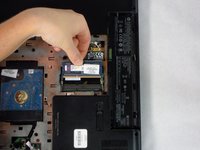
    2. HP Pavilion g7-2275dx RAM Replacement: 步骤 6 中的图像 1,2 HP Pavilion g7-2275dx RAM Replacement: 步骤 6 中的图像 2,2
      • Gently pull the RAM straight out in the direction it currently is orientated.

      • When inserting new RAM, place the RAM in the black housing at a 35 degree angle (it will fit loosely), then push down until it clicks into the silver brackets.

      • This computer supports two sticks of RAM. To add a second stick, repeat the above step with the upper black housing. (Ensure that you have the correct size and type of RAM before trying to add it).

      添加评论

结论

To reassemble your device, follow these instructions in reverse order.

取消:我没有完成这个指南。

2等其他人完成本指南。

John Sutton

于04/24/14注册

1,588 声望

创作了8篇指南

团队

Cal Poly, Team 11-51, Amido Spring 2014 Cal Poly, Team 11-51, Amido Spring 2014 的会员

CPSU-AMIDO-S14S11G51

4 名成员

创作了108篇指南

0指南评论

添加评论

浏览统计数据:

过去 24 小时: 3

过去 7 天: 10

过去 30 天: 40

总计 1,983