简介
Laptop cooking your lap? This guide will walk you through replacing your fan.
For help applying thermal paste, you can reference the iFixit Thermal Paste Application guide.
你所需要的
-
-
Unscrew one Phillips #1 screw from the back panel.
-
-
-
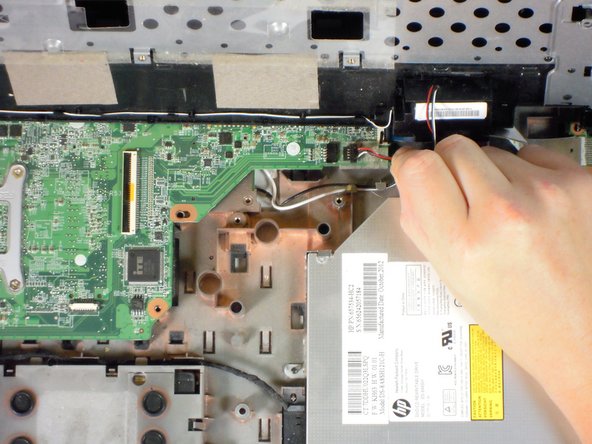
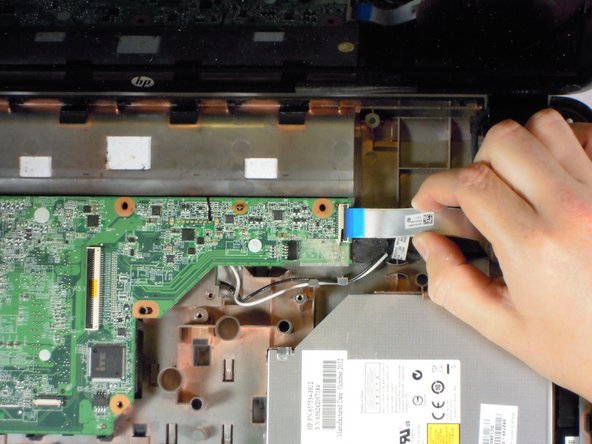
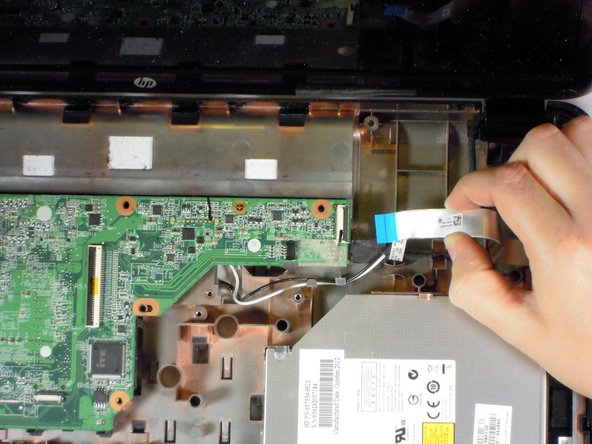
Using the black tab on the connect and/or a prying tool, lift up to disconnect the black hard drive cable from the green circuit board.
-
Pull the black cable up and out of the back panel. This will make taking the hard drive out much easier.
-
-
-
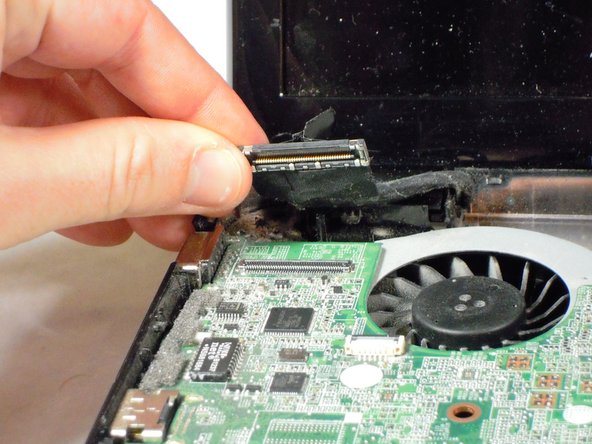
Use a Phillips #1 screw driver to unscrew the black 4 mm Phillips #1 screw on the wireless card.
-
-
-
Use a plastic opening tool to lift the wireless card out of its slot.
-
-
-
-
Unscrew the 7 mm Phillips #1 screw next to the keyboard icon.
-
-
-
Carefully pry up one of the top corners of the keyboard with a prying tool. Slide the tool along the top of the keyboard to release it from the housing. Pull the top of the keyboard towards you an inch or two.
-
Pull the keyboard up and away from you, as it is held in by clips in the front. It is not yet disconnected.
-
-
-
Using a Phillips #1 screw driver unscrew the four screws on the heat sink.
-
Lift the bracket up from the motherboard.
-
-
-
Since the fan is held on with adhesives, you will likely need a prying tool and a small amount of force to lift the fan up and off of the motherboard.
Where can l purchase a fan
This is ridiculous !! why is there not a separate opening/doorway/removable panel so that you can get straight to the Fan ? ? because with this design you literally have to take the whole dam laptop apart…31 steps just to clean or replace a fan ?? who was the moron that came up with this retarded design ??
I use to think the people at HP were pretty smart…Not anymore…never buying anything from HP again
I’ve disassembled mine twice with no problems. Try yoga to relieve all that frustration.
Kip Bunn -
Excellent teardown. I don't need to replace the fan (yet!), but needed to get the laptop apart to find out why when I opened it yesterday, suddenly it's like the case was being pried open.
Any idea on whether or not just the back piece of the case can be replaced?? Appears the plastic where the bracket screws into cracked apart, so there's nothing to hold the bracket in place while it pivots open & that was pushing the case apart. Going to Macgyver something for now… and heck, might as well clean it all while it's open, lol!
-


To reassemble your device, follow these instructions in reverse order.
To reassemble your device, follow these instructions in reverse order.
45等其他人完成本指南。

团队

Cal Poly, Team 11-51, Amido Spring 2014 Cal Poly, Team 11-51, Amido Spring 2014 的会员
CPSU-AMIDO-S14S11G51
4 名成员
创作了21篇指南
16条评论
I had to stop at stap 14 because i couldnt open my laptop, lifting the screen took the plastic piece around the keyboard loose. I tried to return my staps ( to still have a computer) but that plastic piece wont fit back. And i,still cant open my screen.
This worked well for accessing and cleaning the fan. Thanks.
I just wanted to say THANK YOU for posting this instructional page. I know this took a lot of time on your part plus you done this for free to boot. It is because of people like you that make the lives of others PC life much MUCH easier!
Thank you so much! It helped me a lot although I had a different g7 model.
Thanks!!! I was able to fix my laptop.
Thank you John! Your instructions were clear and the numbering helped me a lot in separating the various components and screws.
One point - in step 20- I disconnected a cable from a connector, roughly under where the esc key or the ~ key are. It is not mentioned in the description here. It may be that my model is different - G7-2022US.
Thank you so much for this tutorial! The repair shop quoted me $150 and 2 weeks to fix this, and I was able to fix this in about an hour for under $20. :) I JUST replaced the fan (heat sink was fine) so to remove it, I also had to use a teeny-tiny screwdriver (even smaller than an eyeglass repair kit size) to remove the existing screws that held the fan in place.. Other than that everything else was perfect. I have ZERO experience in repairing laptop innards, first time here, so this was exactly what I needed. It works perfectly now! While i was in there I went ahead and added 4GB RAM, so it's faster now also. THANK YOU!
sigkapgirl - 回复
Hey.. which (for replacing the fan) screwdrivers were you talking about? Phillips #1 Screwdriver doesn't work? Did you need something else?
Very Very nice layed out instruction guide. My laptop fan stopped working after spraying it with compressed air so i had to take it apart but had no idea where to start and after following the simple instruction guide i managed to find a very large piece of lint the size of a nickel lodged inside one of the internal parts of the fan which caused it to stop working. Without this guide i would not have been able to do that,
Thank you again for the very easy completely layed out instructions, very simple to follow.
What a bad design. This process makes me want to google the price of a new laptop….lol
Thanks
I followed exactly step by step being super gentle and after putting it all back together my laptop will not turn on now. I'm so upset right now.
I had to lube the fan bearing because otherwise it would throw an error when posting and make a horrible, and the guide was just perfect, thanks!
Perfect instructions, well done
There is no realistic risk of electric shock on a laptop. However, is it still advisable to disconnect power plug and battery before opening as there is a real risk of accidental damage by short-circuit.
antoniotavares - 回复