跳转到主内容

HP Pavilion dv7-1285dx Hard Drive Replacement

你所需要的

  1. HP Pavilion dv7-1285dx Hard Drive Replacement, Battery: 步骤 1 中的图像 1,1
    • Ensure the device is powered down and unplugged.

    • Turn the device upside down with the battery compartment facing you.

    • Slide the black slider to the right and lift the battery out of its compartment.

  2. HP Pavilion dv7-1285dx Hard Drive Replacement, Back Plate: 步骤 2 中的图像 1,1
    • Locate and remove the six Phillips PM2.5×7.0 screws around the perimeter of the back plate.

    • These screws do not completely detach from the device when unscrewed.

  3. HP Pavilion dv7-1285dx Hard Drive Replacement: 步骤 3 中的图像 1,2 HP Pavilion dv7-1285dx Hard Drive Replacement: 步骤 3 中的图像 2,2
    • Use the plastic opening tool to lift up the back plate and set it aside.

  4. HP Pavilion dv7-1285dx Hard Drive Replacement, Hard Drive: 步骤 4 中的图像 1,2 HP Pavilion dv7-1285dx Hard Drive Replacement, Hard Drive: 步骤 4 中的图像 2,2
    • Rotate the device 180 degrees.

    • Locate the 2 black Phillips PM2.5×7.0 screws on the right side of the hard drive case and unscrew them.

  5. HP Pavilion dv7-1285dx Hard Drive Replacement: 步骤 5 中的图像 1,3 HP Pavilion dv7-1285dx Hard Drive Replacement: 步骤 5 中的图像 2,3 HP Pavilion dv7-1285dx Hard Drive Replacement: 步骤 5 中的图像 3,3
    • Use the clear pull tab located on the left side of the hard drive case to unplug the hard drive by carefully pulling it to the left. Some force may be required.

    • After removing the hard drive, orient it such that the label face is up.

  6. HP Pavilion dv7-1285dx Hard Drive Replacement: 步骤 6 中的图像 1,2 HP Pavilion dv7-1285dx Hard Drive Replacement: 步骤 6 中的图像 2,2
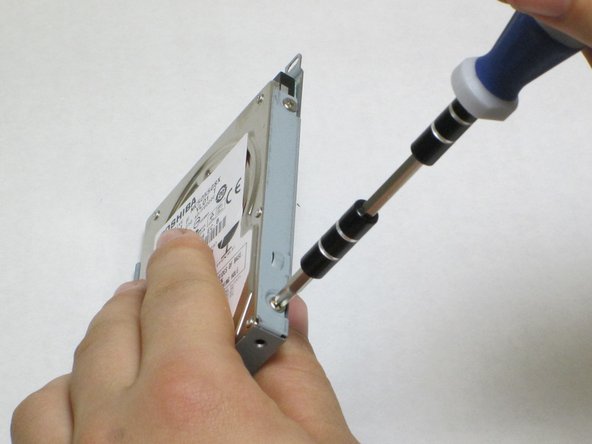
    • Remove the 4 Phillips head screws located on the sides of the hard drive (two per side).

  7. HP Pavilion dv7-1285dx Hard Drive Replacement: 步骤 7 中的图像 1,3 HP Pavilion dv7-1285dx Hard Drive Replacement: 步骤 7 中的图像 2,3 HP Pavilion dv7-1285dx Hard Drive Replacement: 步骤 7 中的图像 3,3
    • Hold the case as shown and use your thumbs to gently slide the hard drive out of its case.

    • Transfer the screws to the new hard drive case.

结论

To reassemble your device, follow these instructions in reverse order.

3等其他人完成本指南。

Jesse Quisido

于04/14/14注册

489 声望

创作了3篇指南

团队

Cal Poly, Team 12-34, Maness Spring 2014 Cal Poly, Team 12-34, Maness Spring 2014 的会员

CPSU-MANESS-S14S12G34

4 名成员

创作了7篇指南

0条评论

添加评论

浏览统计数据:

过去 24 小时: 0

过去 7 天: 1

过去 30 天: 5

总计 3,589