简介
By using the following tools and the following the steps below, you can simply remove your hard drive from your HP Pavilion Sleekbook and replace it with a new one.
你所需要的
-
-
Open the laptop and locate the keyboard. Identify the borders of the keyboard.
-
Taking plastic opening tools in hand, carefully and gently pry open the outer perimeter of the keyboard.
-
-
-
Once part of the keyboard has popped up, continue to lift the keyboard until it is removed.
Need to detach the two ribbon cables.
Mat Kramer - 回复
how do you reattach the ribbon cables?
bhdxxx1984 - 回复
I only had to remove 1 cable for the keyboard, the wide one. It is removed, and reattached, by flipping up the brown part of the socket. It was a little stiff on mine; I used 2 fingernails on either end of the socket to raise the flap up.
-
-
-
-
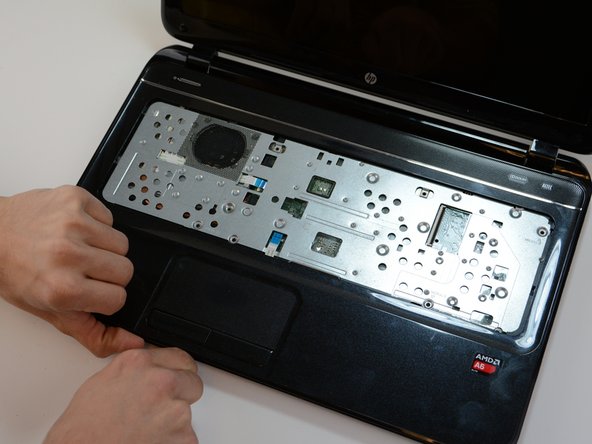
Pop out the black frame found underneath the keyboard using the plastic opening tools.
-
Once the frame is popped out continue to lift the frame gently.
You have to remove several screws on the bottom and a few screws underneath the keyboard before this step, there is no mention of any of this in your steps.
I concur, failure to mention this critical information made me chip chucks of plastic away. I thought I was doing something wrong
Rich Sigle - 回复
There are 5 screws to remove from the palm rest before this step (no need to remove the one on the bottom right side). Also, there are 2 ribbon cables that need to be released (flip up the brown part of the socket to release it).
maccentric - 回复
-
-
-
Locate and remove the silver hard drive cover in the bottom right corner.
Remove 4 screws, then…
maccentric - 回复
This is wrong information. In the Sleekbook, the keyboard in NOT separate from the plastic bezel. The entire surface, keyboard, speaker screen and surround are one piece. There are two punch pins on the reverse that have to be gently punched to release the keyboard, however, there is still one more step to get the assembly to release. I cannot find that trigger. All screws have been removed and the assembly lifted from the circumference snaps, still the assembly retains a grasp on something in the center. I need the solution to that.A yotube video shows how to replace the fan but it too assumes the keyboard is separate. Same exact model. Need a video showing how to the final release. Thank you for reading my comment. Would appreciate a howto from someone. Thanks, refurbman
-
-
-
Detach and remove the hard drive from the black plug located to the right of the hard drive.
-


To reassemble your device, follow these instructions in reverse order.
To reassemble your device, follow these instructions in reverse order.
12等其他人完成本指南。
团队

USF Tampa, Team 3-3, Hickman Winter 2015 USF Tampa, Team 3-3, Hickman Winter 2015 的会员
USFT-HICKMAN-W15S3G3
4 名成员
创作了5篇指南
6条评论
Fatto per il modello 15-b131el!!
This technician has left out several crucial steps for this repair several screws on the bottom and several underneath the keyboard before the laptop casing will come apart, common sense for a tech but a how-to should not leave these details out.
These instructions ruined my friends laptops. PLEASE do not post directions like this if you don’t know what you ‘re doing as folks like me will mistakenly assume that you do & attempt this and then damage cables. VERY, VERY careful folks! Cost me $200 for a replacement laptop.
If you do not remove the screws you will crack the keyboard and cover.
WIll it support any SSD drive to upgrade from basic HDD?
Wrong, you can't just remove the keyboard, you have to remove the 2 bolts labeled keyboard on the bottom or you are going to have a bad time.
dloeper2391 - 回复
Yes, as dloeper noted, the two screws on the bottom with the keyboard icons must be removed prior to this step. Might as well remove all the screws from the bottom, they all need to be removed (10 total, all the same size).
maccentric - 回复