跳转到主内容

HP Pavilion G60-235DX Fan Replacement

你所需要的

  1. HP Pavilion G60-235DX Fan Replacement, Keyboard: 步骤 1 中的图像 1,2 HP Pavilion G60-235DX Fan Replacement, Keyboard: 步骤 1 中的图像 2,2
    • Please turn the power of your device off. If not, it may cause a damage to the computer's hard drive and the person.

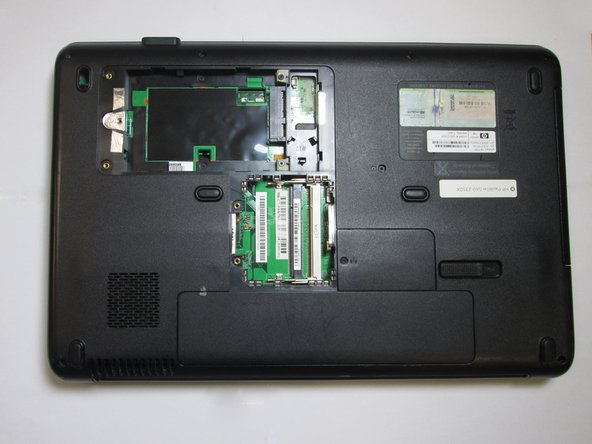
    • Slide the lock to remove the battery

    • After removing the battery, you can find 8 screws where battery were placed. Unscrew those 8 screws.

  2. HP Pavilion G60-235DX Fan Replacement: 步骤 2 中的图像 1,3 HP Pavilion G60-235DX Fan Replacement: 步骤 2 中的图像 2,3 HP Pavilion G60-235DX Fan Replacement: 步骤 2 中的图像 3,3
    • Do not force if the frame is not coming out. It may break the clip of the frame.

    • After the screws from battery house are removed, open the laptop to remove the keyboard frame.

    • Approach the frame on the side by using the prying tool. Carefully remove the clip. Watch out not to break the clip.

    • Then use the prying tool to carefully remove the frame from the top. Be careful not to break the clip.

    • Then, press the button located top of the touch pad to completely remove the frame from the bottom of the frame.

  3. HP Pavilion G60-235DX Fan Replacement: 步骤 3 中的图像 1,1
    • When the frame is removed, keyboard will be free to be removed. There is cable ribbon to be removed. Gently pull out the ribbon from where it is plugged.

    • The keyboard is now detached from the computer.

  4. HP Pavilion G60-235DX Fan Replacement, Screen: 步骤 4 中的图像 1,3 HP Pavilion G60-235DX Fan Replacement, Screen: 步骤 4 中的图像 2,3 HP Pavilion G60-235DX Fan Replacement, Screen: 步骤 4 中的图像 3,3
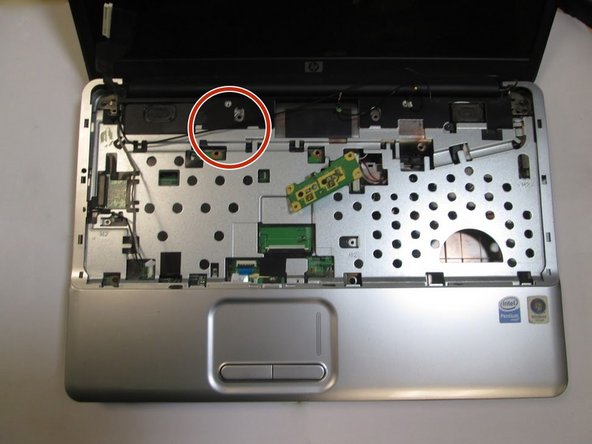
    • Unplug two wires by gently pulling it out.

    • Then remove two wires from the clip that was holding the wire in place.

  5. HP Pavilion G60-235DX Fan Replacement: 步骤 5 中的图像 1,1
    • Remove the covered cable ribbon that is located at the left side of the computer.

  6. HP Pavilion G60-235DX Fan Replacement: 步骤 6 中的图像 1,1
    • Gently pull the smaller wire from its clip. Please do not pull the wire by holding the wire itself. Use the plastic cover to pull.

  7. HP Pavilion G60-235DX Fan Replacement: 步骤 7 中的图像 1,1
    • There are 3 screws holding the screen from laptop each side. Unscrew every screw for each side.

    • Then gently pull out the screen from its place. Be sure not to force it out.

  8. HP Pavilion G60-235DX Fan Replacement: 步骤 8 中的图像 1,2 HP Pavilion G60-235DX Fan Replacement: 步骤 8 中的图像 2,2
    • Use the spudger to remove the rubber sticker located at the bottom of each side of the screen.

    • Unscrew the the screws from each side.

  9. HP Pavilion G60-235DX Fan Replacement: 步骤 9 中的图像 1,1
    • Firmly pry the front screen cover off. Slide the prying tool around the front screen. Please be careful not to destroy the clip. It will destroy the entire screen.

  10. HP Pavilion G60-235DX Fan Replacement: 步骤 10 中的图像 1,1
    • Be careful when moving the screen, you may damage the monitor and webcam cable.

    • Remove the screen from its house.

    • Gently disconnect the webcam cable from the monitor which locate at the back of the laptop.

  11. HP Pavilion G60-235DX Fan Replacement: 步骤 11 中的图像 1,1
    • Remove four screws from the side.

  12. HP Pavilion G60-235DX Fan Replacement, Ram: 步骤 12 中的图像 1,1
    • Lay the computer so that the backside is facing you and locate the screw in the picture.

  13. HP Pavilion G60-235DX Fan Replacement: 步骤 13 中的图像 1,1
    • Remove the screws.

  14. HP Pavilion G60-235DX Fan Replacement: 步骤 14 中的图像 1,1
    • Remove the cover that was held in by the screws that you just removed.

  15. HP Pavilion G60-235DX Fan Replacement: 步骤 15 中的图像 1,1
    • Push this slide over in order to remove the battery. This is safe when working with your computers memory.

  16. HP Pavilion G60-235DX Fan Replacement: 步骤 16 中的图像 1,1
    • Remove each one of the rams so that the computer looks like this. You can do so be squeezing tabs on each side of the ram.

  17. HP Pavilion G60-235DX Fan Replacement, Fan: 步骤 17 中的图像 1,2 HP Pavilion G60-235DX Fan Replacement, Fan: 步骤 17 中的图像 2,2
    • Remove the plate on the upper left side of the back plate, shown here.

    • You will need to use a screwdriver to remove the 5 mm screws holding this plate down.

  18. HP Pavilion G60-235DX Fan Replacement: 步骤 18 中的图像 1,1
    • Using a screwdriver, remove the 3 mm screws holding together the plate found in the directly right of the central plate.

  19. HP Pavilion G60-235DX Fan Replacement: 步骤 19 中的图像 1,1
    • Remove the battery by sliding the lock switch and pulling up and outwards.

    • The battery is located directly beneath the two most recent plates that have been removed.

  20. HP Pavilion G60-235DX Fan Replacement: 步骤 20 中的图像 1,2 HP Pavilion G60-235DX Fan Replacement: 步骤 20 中的图像 2,2
    • Use a spudger to remove the remaining keyboard plate on the front of the laptop body.

  21. HP Pavilion G60-235DX Fan Replacement: 步骤 21 中的图像 1,3 HP Pavilion G60-235DX Fan Replacement: 步骤 21 中的图像 2,3 HP Pavilion G60-235DX Fan Replacement: 步骤 21 中的图像 3,3
    • Remove the wire that is connecting the fan to the left side of the motherboard.

    • You are now able to swap the faulty fan for a replacement.

结论

To reassemble your device, follow these instructions in reverse order.

2等其他人完成本指南。

Michael Ayers

于01/24/17注册

137 声望

撰写一个指南

团队

Cal Poly, Team 10-5, Banghart Winter 2017 Cal Poly, Team 10-5, Banghart Winter 2017 的会员

CPSU-BANGHART-W17S10G5

3 名成员

创作了5篇指南

0条评论

添加评论

浏览统计数据:

过去 24 小时: 0

过去 7 天: 0

过去 30 天: 3

总计 1,946