跳转到主内容

HP Pavilion DM3-3010US Screen Replacement

你所需要的

  1. HP Pavilion DM3-3010US Screen Replacement, Sound Card: 步骤 1 中的图像 1,1
    • Place the laptop upside down on a stable surface and locate the battery ejection switch.

  2. HP Pavilion DM3-3010US Screen Replacement: 步骤 2 中的图像 1,1
    • Eject the battery by sliding the switch sideways.

  3. HP Pavilion DM3-3010US Screen Replacement: 步骤 3 中的图像 1,1
    • Pull the battery outwards.

  4. HP Pavilion DM3-3010US Screen Replacement: 步骤 4 中的图像 1,1
    • Remove the 2 plastic panels covering the internals of the laptop.

    • The rectangular panel can be removed by sliding the latch.

    • The square panel is removable once the battery is removed.

  5. HP Pavilion DM3-3010US Screen Replacement: 步骤 5 中的图像 1,1
    • Removing the square panel reveals the location of the hard drive.

  6. HP Pavilion DM3-3010US Screen Replacement: 步骤 6 中的图像 1,1
    • Locate the two screws located on the side of the hard drive mounting hardware.

    • This is accessible from the back of the laptop, where the battery was located.

  7. HP Pavilion DM3-3010US Screen Replacement: 步骤 7 中的图像 1,1
    • Locate the 4 additional screws on the top of the mounting hardware for the hard drive.

    • Remove and set aside these screws.

  8. HP Pavilion DM3-3010US Screen Replacement: 步骤 8 中的图像 1,1
    • Pay attention to the SATA cable connecting the hard drive to the motherboard. It can be damaged if handled roughly.

    • Pull the SATA cable out of its receptacle and set the hard drive aside.

  9. HP Pavilion DM3-3010US Screen Replacement: 步骤 9 中的图像 1,1
    • The picture shows the HP Pavilion DM3-3000 Series Audio USB Card Reader Board w/Cable.

    • With the hard drive removed, open the laptop and set it down in the position for normal use.

    • Locate the seam between the top panel of the laptop and the frame.

    • The seam is on the left side of the laptop when the screen is facing you.

    • Pull the top cover, including keyboard, up from the left side of the laptop.

  10. HP Pavilion DM3-3010US Screen Replacement: 步骤 10 中的图像 1,1
    • Dismount the audio driver by removing the 4 highlighted screws.

    • The audio driver is located on the right side of the laptop while the screen is facing you.

  11. HP Pavilion DM3-3010US Screen Replacement: 步骤 11 中的图像 1,1
    • The audio driver and surrounding components are susceptible to damage if handled incorrectly.

    • Carefully pull the audio driver upwards, away from the motherboard.

    • The laptop is now ready to receive the replacement audio driver.

  12. HP Pavilion DM3-3010US Screen Replacement, Screen: 步骤 12 中的图像 1,3 HP Pavilion DM3-3010US Screen Replacement, Screen: 步骤 12 中的图像 2,3 HP Pavilion DM3-3010US Screen Replacement, Screen: 步骤 12 中的图像 3,3
    • Release the hinges by removing the three Phillips PM2.5x7.0 screws and hinge covers that secure it to the base.

    • Before doing this, be sure all cables (WLAN, WWAN cables) are properly disconnected from the base enclosure. If not properly disconnected, lifting the display enclosure can damage the cords and other components.

  13. HP Pavilion DM3-3010US Screen Replacement: 步骤 13 中的图像 1,3 HP Pavilion DM3-3010US Screen Replacement: 步骤 13 中的图像 2,3 HP Pavilion DM3-3010US Screen Replacement: 步骤 13 中的图像 3,3
    • Remove the two rubber screw covers and the two Phillips PM2.0×4.0 screws at the bottom of the enclosure. This will give you access to the internal components.

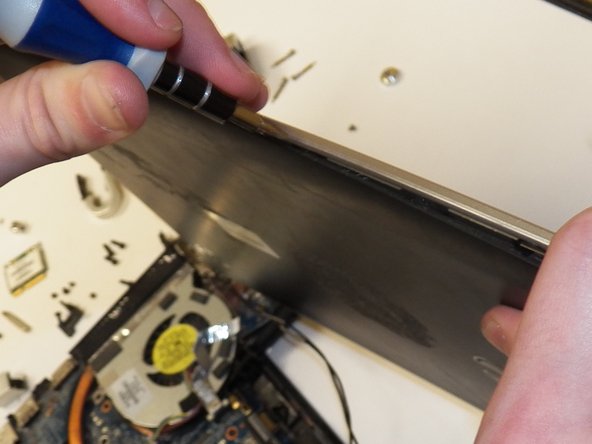
    • To detach the display bezel, flex the inside edges on the top, bottom, left, and right sides until it is fully detached. Then, lift it away from the rest of the screen enclosure.

  14. HP Pavilion DM3-3010US Screen Replacement: 步骤 14 中的图像 1,3 HP Pavilion DM3-3010US Screen Replacement: 步骤 14 中的图像 2,3 HP Pavilion DM3-3010US Screen Replacement: 步骤 14 中的图像 3,3
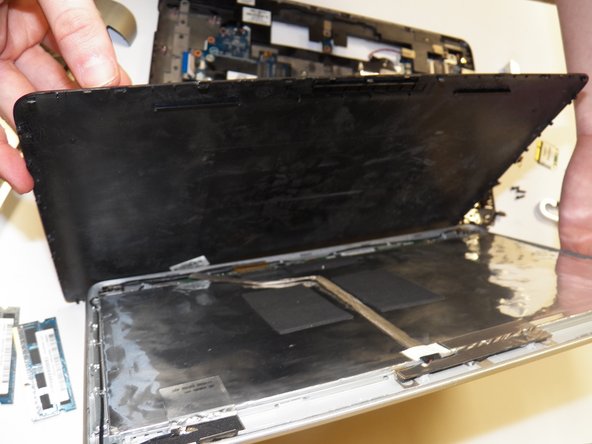
    • Next, remove the four Phillips 2.0×3.0 screws at each corner that secure the display panel to the enclosure. Then, you can remove the hinges on each side.

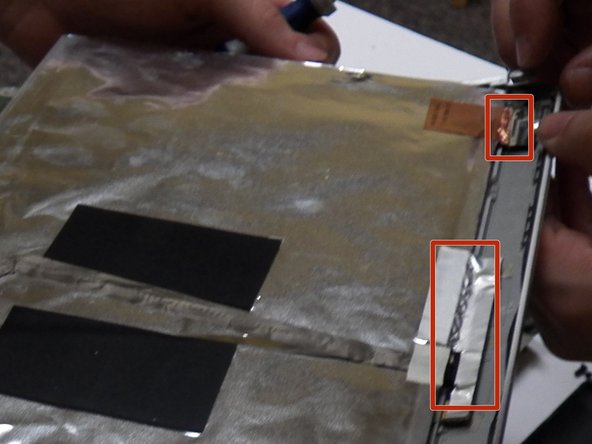
    • Remove the display panel cable by releasing the adhesive strip. Then, you can safely disconnect the display panel cable from its port.

    • You can also view this maintenance and service guide provided by HP here: http://h10032.www1.hp.com/ctg/Manual/c02...

结论

To reassemble your device, follow these instructions in reverse order.

另外一个人完成了本指南。

一条评论

this screen replacement guide is amazing

michael mannen - 回复

添加评论

浏览统计数据:

过去 24 小时: 0

过去 7 天: 0

过去 30 天: 1

总计 1,021