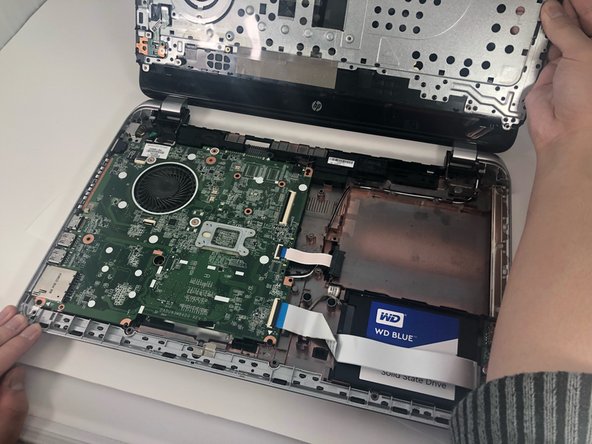
跳转到主内容

HP Pavilion 15-n232nr Hard Drive Replacement

你所需要的

  1. HP Pavilion 15-n232nr Hard Drive Replacement, Battery: 步骤 1 中的图像 1,2 HP Pavilion 15-n232nr Hard Drive Replacement, Battery: 步骤 1 中的图像 2,2
    • Flip the laptop over.

  2. HP Pavilion 15-n232nr Hard Drive Replacement: 步骤 2 中的图像 1,3 HP Pavilion 15-n232nr Hard Drive Replacement: 步骤 2 中的图像 2,3 HP Pavilion 15-n232nr Hard Drive Replacement: 步骤 2 中的图像 3,3
    • Slide the battery locks towards the center of the laptop. The battery will detach automatically.

    • Remove the battery by sliding it away from the laptop housing.

  3. HP Pavilion 15-n232nr Hard Drive Replacement, Keyboard: 步骤 3 中的图像 1,2 HP Pavilion 15-n232nr Hard Drive Replacement, Keyboard: 步骤 3 中的图像 2,2
    • Unscrew the 6 mm Phillips #1 screw securing the keyboard.

  4. HP Pavilion 15-n232nr Hard Drive Replacement: 步骤 4 中的图像 1,2 HP Pavilion 15-n232nr Hard Drive Replacement: 步骤 4 中的图像 2,2
    • Flip the laptop to the front side and open it up.

  5. HP Pavilion 15-n232nr Hard Drive Replacement: 步骤 5 中的图像 1,2 HP Pavilion 15-n232nr Hard Drive Replacement: 步骤 5 中的图像 2,2
    • Use the metal spudger to release the keyboard from the front panel.

  6. HP Pavilion 15-n232nr Hard Drive Replacement: 步骤 6 中的图像 1,3 HP Pavilion 15-n232nr Hard Drive Replacement: 步骤 6 中的图像 2,3 HP Pavilion 15-n232nr Hard Drive Replacement: 步骤 6 中的图像 3,3
    • Flip the keyboard out and locate the connector.

    • Use the spudger to unhinge the the fastener and remove the connector.

    • Keyboard should be completely detached after this step.

  7. HP Pavilion 15-n232nr Hard Drive Replacement, Optical Drive: 步骤 7 中的图像 1,2 HP Pavilion 15-n232nr Hard Drive Replacement, Optical Drive: 步骤 7 中的图像 2,2
    • Remove the 6 mm Phillips #1 screw securing the optical drive.

  8. HP Pavilion 15-n232nr Hard Drive Replacement: 步骤 8 中的图像 1,2 HP Pavilion 15-n232nr Hard Drive Replacement: 步骤 8 中的图像 2,2
    • Use the iFixit opening tool to slide the optical drive away from the laptop housing.

  9. HP Pavilion 15-n232nr Hard Drive Replacement, Hard Drive: 步骤 9 中的图像 1,2 HP Pavilion 15-n232nr Hard Drive Replacement, Hard Drive: 步骤 9 中的图像 2,2
    • The battery and optical drive should be removed at this point in the process.

    • Remove the ten 6 mm Phillips #1 screws.

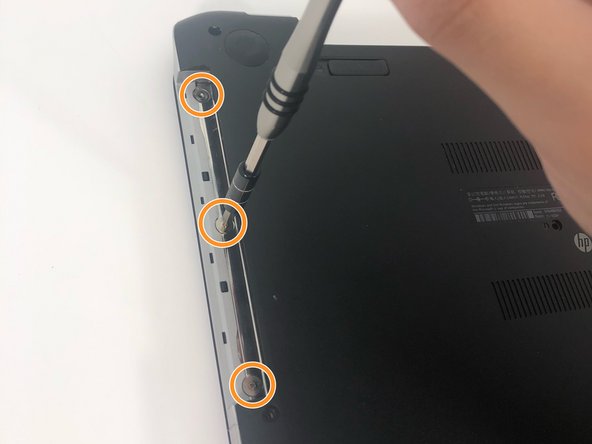
    • Remove the three 1 mm Phillips #000 screws.

    There are also 3 screws that need to be removed under the Wireless/RAM back panel.

    Michael Gravell - 回复

  10. HP Pavilion 15-n232nr Hard Drive Replacement: 步骤 10 中的图像 1,2 HP Pavilion 15-n232nr Hard Drive Replacement: 步骤 10 中的图像 2,2
    • Remove the five 2.5mm Phillips #1 screws.

    • Use the spudger to unhinge the cable connectors. Use tweezers to complete removal.

  11. HP Pavilion 15-n232nr Hard Drive Replacement: 步骤 11 中的图像 1,3 HP Pavilion 15-n232nr Hard Drive Replacement: 步骤 11 中的图像 2,3 HP Pavilion 15-n232nr Hard Drive Replacement: 步骤 11 中的图像 3,3
    • Carefully use the iFixit opening tool to release the front panel.

  12. HP Pavilion 15-n232nr Hard Drive Replacement: 步骤 12 中的图像 1,3 HP Pavilion 15-n232nr Hard Drive Replacement: 步骤 12 中的图像 2,3 HP Pavilion 15-n232nr Hard Drive Replacement: 步骤 12 中的图像 3,3
    • Use the spudger to unhinge the daughterboard connector.

    • Remove daughterboard connector.

  13. HP Pavilion 15-n232nr Hard Drive Replacement: 步骤 13 中的图像 1,1
    • Remove the 2.5 mm Phillips #1 screw and remove the daughterboard

  14. HP Pavilion 15-n232nr Hard Drive Replacement: 步骤 14 中的图像 1,3 HP Pavilion 15-n232nr Hard Drive Replacement: 步骤 14 中的图像 2,3 HP Pavilion 15-n232nr Hard Drive Replacement: 步骤 14 中的图像 3,3
    • Use the iFixit opening tool to remove the hard drive connector.

    • Remove the hard drive by lifting the right side and pulling it out.

结论

To reassemble your device, follow these instructions in reverse order.

6等其他人完成本指南。

2条评论

How to test it's processor

Kashmir Singh - 回复

Great guide, thank you!!

alt255d - 回复

添加评论

浏览统计数据:

过去 24 小时: 0

过去 7 天: 1

过去 30 天: 7

总计 1,370