跳转到主内容

HP Pavilion 13-s128nr Battery Replacement

你所需要的

  1. HP Pavilion 13-s128nr Battery Replacement, Back Panel: 步骤 1 中的图像 1,2 HP Pavilion 13-s128nr Battery Replacement, Back Panel: 步骤 1 中的图像 2,2
    • Use the iFixit opening tool to take off the rubber caps.

    • Remove the screws using the Phillips #0 screwdriver.

  2. HP Pavilion 13-s128nr Battery Replacement: 步骤 2 中的图像 1,1
    • Use the Jimmy to pry around the seam of the laptop.

    • Remove the back panel of the laptop.

    • Don't completely remove the back panel as there are ribbon cables that can be easily damaged if removed quickly.

  3. HP Pavilion 13-s128nr Battery Replacement: 步骤 3 中的图像 1,2 HP Pavilion 13-s128nr Battery Replacement: 步骤 3 中的图像 2,2
    • Using the iFixit opening tool to lift the tabs holding in the cables connecting the keyboard to the motherboard.

    • Pull the cable from the motherboard.

  4. HP Pavilion 13-s128nr Battery Replacement, Battery: 步骤 4 中的图像 1,2 HP Pavilion 13-s128nr Battery Replacement, Battery: 步骤 4 中的图像 2,2
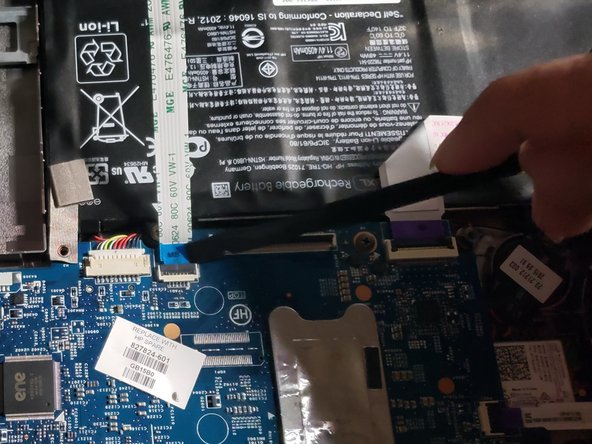
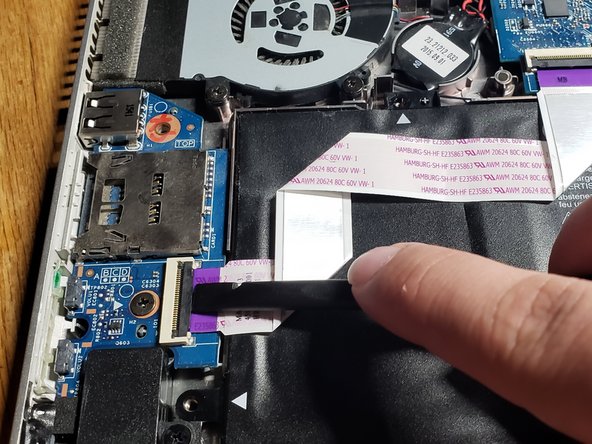
    • Lift upwards on the black tabs the purple strip is connected to.

    • Gently pull the purple strip out of its place.

  5. HP Pavilion 13-s128nr Battery Replacement: 步骤 5 中的图像 1,1
    • Using the Phillips #0 screwdriver, remove the five screws holding the battery in place.

  6. HP Pavilion 13-s128nr Battery Replacement: 步骤 6 中的图像 1,1
    • Pull the white cable connected to the motherboard out using the iFixit opening tool.

  7. HP Pavilion 13-s128nr Battery Replacement: 步骤 7 中的图像 1,1
    • Remove the battery.

    • There are little snap tabs on the right side of the battery. Be sure not to break them by pulling the battery out towards the left side.

结论

To reassemble your device, follow these instructions in reverse order.

另外一个人完成了本指南。

0条评论

添加评论

浏览统计数据:

过去 24 小时: 1

过去 7 天: 4

过去 30 天: 13

总计 1,114