跳转到主内容

HP LaserJet P1102w Motherboard Replacement

你所需要的

  1. HP LaserJet P1102w Motherboard Replacement, Left Side Panel: 步骤 1 中的图像 1,3 HP LaserJet P1102w Motherboard Replacement, Left Side Panel: 步骤 1 中的图像 2,3 HP LaserJet P1102w Motherboard Replacement, Left Side Panel: 步骤 1 中的图像 3,3
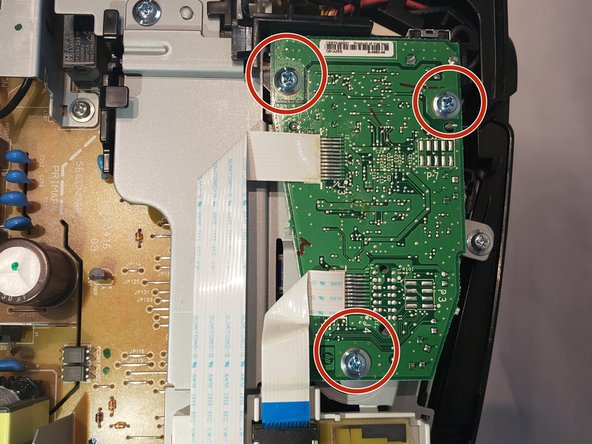
    • Flip printer on it's back. Using the plastic spudger, pry off front panel. There will be two main points to focus as shown.

    • Pry carefully to not break any plastic.

  2. HP LaserJet P1102w Motherboard Replacement: 步骤 2 中的图像 1,2 HP LaserJet P1102w Motherboard Replacement: 步骤 2 中的图像 2,2
    • Now that the pry points are free lift up the front panel.

  3. HP LaserJet P1102w Motherboard Replacement: 步骤 3 中的图像 1,2 HP LaserJet P1102w Motherboard Replacement: 步骤 3 中的图像 2,2
    • Unscrew the #1 Phillips screw 6mm on the back of the printer.

  4. HP LaserJet P1102w Motherboard Replacement: 步骤 4 中的图像 1,3 HP LaserJet P1102w Motherboard Replacement: 步骤 4 中的图像 2,3 HP LaserJet P1102w Motherboard Replacement: 步骤 4 中的图像 3,3
    • Using the plastic spudger, remove the button housing from the top left of printer.

    • Pry carefully to not break any plastic.

  5. HP LaserJet P1102w Motherboard Replacement: 步骤 5 中的图像 1,2 HP LaserJet P1102w Motherboard Replacement: 步骤 5 中的图像 2,2
    • Once the housing is removed, remove the three buttons.

  6. HP LaserJet P1102w Motherboard Replacement: 步骤 6 中的图像 1,3 HP LaserJet P1102w Motherboard Replacement: 步骤 6 中的图像 2,3 HP LaserJet P1102w Motherboard Replacement: 步骤 6 中的图像 3,3
    • Use the plastic spudger to remove the side panel. There are three main prying points as shown.

    • Pry carefully to not break any plastic.

  7. HP LaserJet P1102w Motherboard Replacement: 步骤 7 中的图像 1,2 HP LaserJet P1102w Motherboard Replacement: 步骤 7 中的图像 2,2
    • With all pry points free, remove the side panel.

  8. HP LaserJet P1102w Motherboard Replacement, Motherboard: 步骤 8 中的图像 1,3 HP LaserJet P1102w Motherboard Replacement, Motherboard: 步骤 8 中的图像 2,3 HP LaserJet P1102w Motherboard Replacement, Motherboard: 步骤 8 中的图像 3,3
    • Remove three #1 Phillips 6mm screws with the #1 Phillips screwdriver.

  9. HP LaserJet P1102w Motherboard Replacement: 步骤 9 中的图像 1,3 HP LaserJet P1102w Motherboard Replacement: 步骤 9 中的图像 2,3 HP LaserJet P1102w Motherboard Replacement: 步骤 9 中的图像 3,3
    • Using a pair of blunt nose tweezers, disconnect both ribbon wires.

    • With both ribbon wires removed we can lift the motherboard out of its housing.

    • There is a little black notch holding the motherboard down by the thumb in the final picture.

    • Be careful pulling, as ribbon wires are very fragile.

结论

To reassemble your device, follow these instructions in reverse order.

4等其他人完成本指南。

Jerome Etten

于10/04/18注册

709 声望

创作了4篇指南

团队

UW Stout, Team S6-G4, Ogden Fall 2018 UW Stout, Team S6-G4, Ogden Fall 2018 的会员

UWSTOUT-OGDEN-F18S6G4

4 名成员

创作了10篇指南

0条评论

添加评论

浏览统计数据:

过去 24 小时: 5

过去 7 天: 16

过去 30 天: 38

总计 1,842