跳转到主内容

HP Envy 14 Screen Replacement

你所需要的

  1. HP Envy 14 Screen Replacement, Screen: 步骤 1 中的图像 1,2 HP Envy 14 Screen Replacement, Screen: 步骤 1 中的图像 2,2
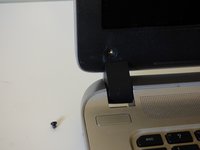
    • With your laptop turned off and facing down, locate the battery.

    • Slide and hold the black tabs while removing the battery. One of the black tabs may lock in place once slided over.
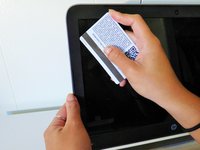
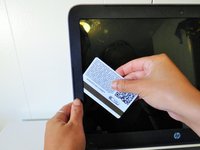
  2. HP Envy 14 Screen Replacement: 步骤 2 中的图像 1,3 HP Envy 14 Screen Replacement: 步骤 2 中的图像 2,3 HP Envy 14 Screen Replacement: 步骤 2 中的图像 3,3
    • Flip your laptop back over and open it up.

    • The black circles are stickers.

    • Peel off the 2 black stickers directly above the two hinges to reveal the screws.

  3. HP Envy 14 Screen Replacement: 步骤 3 中的图像 1,2 HP Envy 14 Screen Replacement: 步骤 3 中的图像 2,2
    • Use the 4mm Phillips Srewdriver to remove the 2 screws you just uncovered.

    • Make sure to put the 2 screws in a safe place so that you don't lose them! A small bowl or container would work perfectly.

  4. HP Envy 14 Screen Replacement: 步骤 4 中的图像 1,2 HP Envy 14 Screen Replacement: 步骤 4 中的图像 2,2
    在这个步骤中使用的工具:
    Plastic Cards
    $2.99
    购买
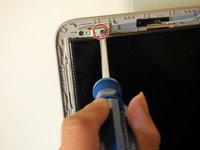
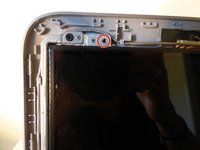
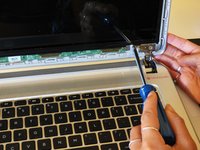
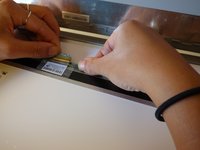
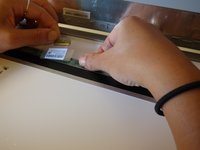
    • Use the plastic card or your fingernail to separate the black plastic border from the screen case.

    • You will hear a snapping sound but don't worry, you are not breaking the plastic, the border will snap right back into place!

  5. HP Envy 14 Screen Replacement: 步骤 5 中的图像 1,3 HP Envy 14 Screen Replacement: 步骤 5 中的图像 2,3 HP Envy 14 Screen Replacement: 步骤 5 中的图像 3,3
    • Separate the border entirely by unsnapping the plastic snaps all the way around the screen until you can remove the border.

  6. HP Envy 14 Screen Replacement: 步骤 6 中的图像 1,3 HP Envy 14 Screen Replacement: 步骤 6 中的图像 2,3 HP Envy 14 Screen Replacement: 步骤 6 中的图像 3,3
    • Use the 3mm Phillips Screwdriver to remove the 4 black screws found on the metal tabs above and below the corners of the screen.

    • Don't get confused with the other black screws on the top corners. The ones you want to remove are located closer to the middle of the screen.

    • Lean the laptop cover back and unscrew the bottom 2 screws first so that the screen doesn't fall over as you are removing the screws.

    • Put these 4 screws in a separate container so they do not get mixed up with the 2 screws you already removed.

  7. HP Envy 14 Screen Replacement: 步骤 7 中的图像 1,1
    • Now that the screen is not screwed in, place it face down on the keyboard.

  8. HP Envy 14 Screen Replacement: 步骤 8 中的图像 1,3 HP Envy 14 Screen Replacement: 步骤 8 中的图像 2,3 HP Envy 14 Screen Replacement: 步骤 8 中的图像 3,3
    • Gently peel off the bar code sticker that is connected to the video cable connector.

  9. HP Envy 14 Screen Replacement: 步骤 9 中的图像 1,2 HP Envy 14 Screen Replacement: 步骤 9 中的图像 2,2
    • Remove the video cable from the connector by gently pulling the gray tab out.

结论

To reassemble your device, follow these instructions in reverse order.

3等其他人完成本指南。

Noelle Ly

于09/29/15注册

192 声望

撰写一个指南

团队

Cal Poly, Team 10-5, Green Fall 2015 Cal Poly, Team 10-5, Green Fall 2015 的会员

CPSU-GREEN-F15S10G5

3 名成员

创作了4篇指南

2条评论

GIbt ein neues Modell (Spectre)... da wirds mit dem Display dank Verklebung echt sch....

willbjoern - 回复

Hi, do you think this would work with HP Envy 15 TouchSmart? For blank screen problem, if it is not the display, it may be the ribbon. Which one is the ribbon in your instructions above? Thanks!

Agung Adhiasto - 回复

添加评论

浏览统计数据:

过去 24 小时: 0

过去 7 天: 4

过去 30 天: 24

总计 5,201