跳转到主内容

HP Elite X2 1013 G3 Solid State Drive Replacement

你所需要的

  1. HP Elite X2 1013 G3 Solid State Drive Replacement, Screen: 步骤 1 中的图像 1,1
    • Flip the device over so the base is facing the ceiling.

    • Lift up the tablet stand.

    • Remove the four 2 mm screws from the tablet using a T5 Torx screwdriver.

  2. HP Elite X2 1013 G3 Solid State Drive Replacement: 步骤 2 中的图像 1,2 HP Elite X2 1013 G3 Solid State Drive Replacement: 步骤 2 中的图像 2,2
    • Flip the tablet over with the screen facing upwards.

    • Place the suction handle in the center of the screen and slowly lift off the screen until it is at a 30 degree angle, starting by gently prying up the bottom.

    • Do not pull the screen beyond a 30 degree angle. Additional internal components must be disconnected first.

  3. HP Elite X2 1013 G3 Solid State Drive Replacement: 步骤 3 中的图像 1,2 HP Elite X2 1013 G3 Solid State Drive Replacement: 步骤 3 中的图像 2,2
    • With the screen lifted at a 30 degree angle, gently disconnect the yellow ribbon cable at the end connected to the screen.

    • Gently disconnect the orange ribbon cable at the end connected to the bottom plate.

  4. HP Elite X2 1013 G3 Solid State Drive Replacement: 步骤 4 中的图像 1,2 HP Elite X2 1013 G3 Solid State Drive Replacement: 步骤 4 中的图像 2,2
    • Remove the screen from the tablet.

  5. HP Elite X2 1013 G3 Solid State Drive Replacement, Battery: 步骤 5 中的图像 1,1
    • Use the Phillips #00 screwdriver to remove the six 2 mm screws.

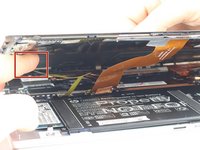
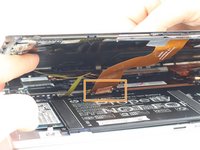
    • Gently disconnect the two connectors.

  6. HP Elite X2 1013 G3 Solid State Drive Replacement: 步骤 6 中的图像 1,1
    • Lift the battery out of the housing.

  7. HP Elite X2 1013 G3 Solid State Drive Replacement, Solid State Drive: 步骤 7 中的图像 1,1
    • Make sure the device is powered off and the battery is removed before continuing!

    • Using the Phillips #00 Screwdriver, remove the single indicated screw.

  8. HP Elite X2 1013 G3 Solid State Drive Replacement: 步骤 8 中的图像 1,1
    • Gently tilt the drive upward, then firmly pull it out from the motherboard.

    • Pay attention to the orientation of the SSD. Trying to put your replacement SSD in the wrong way could damage the part or the connector.

结论

To reassemble your device, follow these instructions in reverse order.

另外一个人完成了本指南。

Kory Haydon

于04/18/19注册

259 声望

创作了2篇指南

团队

Cal Poly, Team S9-G12, Maness Spring 2019 Cal Poly, Team S9-G12, Maness Spring 2019 的会员

CPSU-MANESS-S19S9G12

4 名成员

创作了5篇指南

0条评论

添加评论

浏览统计数据:

过去 24 小时: 1

过去 7 天: 17

过去 30 天: 63

总计 2,685