跳转到主内容

HP Chromebox J5N50UT Hard Drive Replacement

你所需要的

  1. HP Chromebox J5N50UT Hard Drive Replacement, Bottom Cover: 步骤 1 中的图像 1,1
    • Before removing the bottom cover, ensure that your computer is powered down and ensure that all external devices are disconnected. If you are unsure whether the computer is off or in hibernation mode, turn the computer on, then shut it down through the operating system.

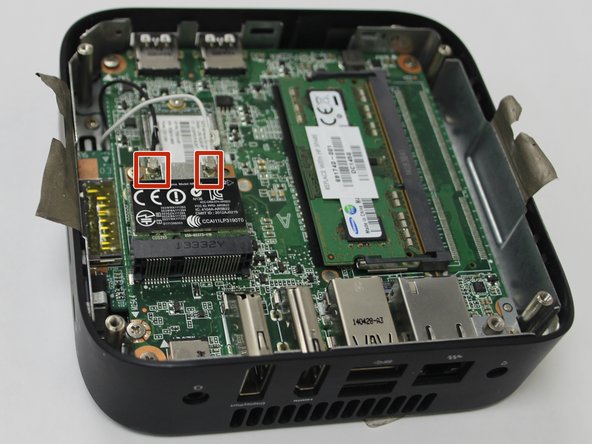
    • Position the device upside-down on a flat, level surface with the USB ports facing you.

  2. HP Chromebox J5N50UT Hard Drive Replacement: 步骤 2 中的图像 1,1
    • Using your metal spudger, lift and remove the 4 rubber “feet” from each corner.

  3. HP Chromebox J5N50UT Hard Drive Replacement: 步骤 3 中的图像 1,1
    • Using your Phillips head screwdriver, remove the four Phillips M2.5×4.0 screws that secure the bottom cover to the computer. In this step the usage of the magnetic mat will be helpful to keep up with the screws.

  4. HP Chromebox J5N50UT Hard Drive Replacement: 步骤 4 中的图像 1,1
    • Insert the flat end of your metal spudger under the bottom cover near the USB ports, then pry the bottom cover off the computer.

  5. HP Chromebox J5N50UT Hard Drive Replacement, Bottom Shield: 步骤 5 中的图像 1,1
    • Lift the two pieces of mylar tape from the bracket.

  6. HP Chromebox J5N50UT Hard Drive Replacement: 步骤 6 中的图像 1,1
    • Using your Phillips #1 screwdriver, remove the four Phillips M2.5×4.0 screws that hold the shield in place.

  7. HP Chromebox J5N50UT Hard Drive Replacement: 步骤 7 中的图像 1,1
    • Insert your spudger into the gap between the bottom shield and the ports and gently pry to lift and remove the shield.

  8. HP Chromebox J5N50UT Hard Drive Replacement, WLAN Module: 步骤 8 中的图像 1,2 HP Chromebox J5N50UT Hard Drive Replacement, WLAN Module: 步骤 8 中的图像 2,2
    • Disconnect the white and black antenna cables from the module.

  9. HP Chromebox J5N50UT Hard Drive Replacement: 步骤 9 中的图像 1,3 HP Chromebox J5N50UT Hard Drive Replacement: 步骤 9 中的图像 2,3 HP Chromebox J5N50UT Hard Drive Replacement: 步骤 9 中的图像 3,3
    • Using your Phillips #1 screwdriver, remove the M2.0×3.0 screw from the upper left corner of the module.

    • Once the screw has been removed, the module will tilt up.

  10. HP Chromebox J5N50UT Hard Drive Replacement: 步骤 10 中的图像 1,2 HP Chromebox J5N50UT Hard Drive Replacement: 步骤 10 中的图像 2,2
    • Remove the WLAN module by pulling it away from the slot at an angle.

  11. HP Chromebox J5N50UT Hard Drive Replacement, Hard Drive: 步骤 11 中的图像 1,2 HP Chromebox J5N50UT Hard Drive Replacement, Hard Drive: 步骤 11 中的图像 2,2
    • Remove the Phillips M2.0×3.0 screw.

    • The hard drive will tilt up once the screw has been removed.

  12. HP Chromebox J5N50UT Hard Drive Replacement: 步骤 12 中的图像 1,2 HP Chromebox J5N50UT Hard Drive Replacement: 步骤 12 中的图像 2,2
    • Pull the hard drive at an angle to remove it from its slot.

结论

To reassemble your device, follow these instructions in reverse order.

3等其他人完成本指南。

Ashley Marvin

于09/06/18注册

685 声望

创作了5篇指南

团队

Ohio State, Team S1-G3, Whitney Fall 2018 Ohio State, Team S1-G3, Whitney Fall 2018 的会员

OSU-WHITNEY-F18S1G3

2 名成员

创作了5篇指南

2条评论

Could you indicate the SSD brand/model/capacity/interface so we can order upgrades without having to open up and do the same twice.

When Ze - 回复

actually you can flip open metal bracket with just one mylar tape

and there is 5 screws, not 4. if you look, you will see triangle arrow stamped on bracket indicating which screws to remove.

you can swap the ssd without removing the wifi board

do this all the time, saves a lot of steps

mapatouli - 回复

添加评论

浏览统计数据:

过去 24 小时: 0

过去 7 天: 4

过去 30 天: 28

总计 2,659