跳转到主内容

HP 14-fq1025nr SSD Replacement

你所需要的

  1. HP 14-fq1025nr SSD Replacement, Back Cover: 步骤 1 中的图像 1,1
    • Flip the laptop upside down so the bottom cover is facing up.

  2. HP 14-fq1025nr SSD Replacement: 步骤 2 中的图像 1,1
    在这个步骤中使用的工具:
    Tweezers
    $4.99
    购买
    • Use a pair of tweezers to grab and pull the feet off of the cover.

  3. HP 14-fq1025nr SSD Replacement: 步骤 3 中的图像 1,1
    • Remove the two 4 mm screws using a Phillips #0 screwdriver.

    • Remove the six remaining 6 mm screws located around the edges and underneath the feet using a Phillips #0 screwdriver.

  4. HP 14-fq1025nr SSD Replacement: 步骤 4 中的图像 1,1
    • Flip the laptop right-side up and slide an iFixit opening tool and/or Jimmy inside of the bottom cover seam to pry it open.

  5. HP 14-fq1025nr SSD Replacement: 步骤 5 中的图像 1,1
    • Remove the bottom cover.

  6. HP 14-fq1025nr SSD Replacement, Battery: 步骤 6 中的图像 1,2 HP 14-fq1025nr SSD Replacement, Battery: 步骤 6 中的图像 2,2
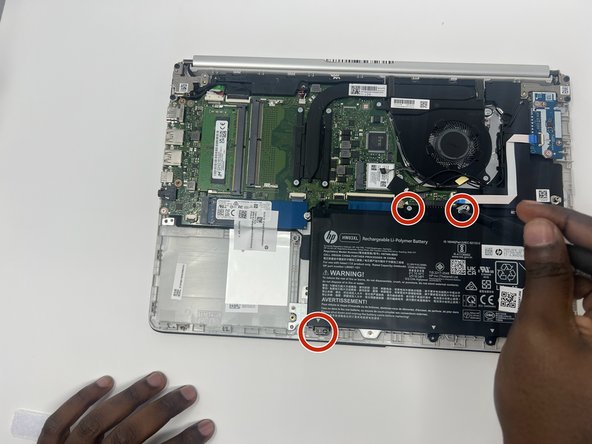
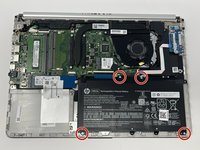
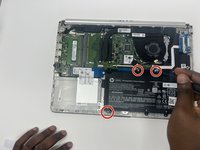
    • Remove the four gray 3 mm screws holding down the battery using a Phillips #0 screwdriver.

  7. HP 14-fq1025nr SSD Replacement: 步骤 7 中的图像 1,1
    • Remove the battery.

  8. HP 14-fq1025nr SSD Replacement, SSD: 步骤 8 中的图像 1,1
    • Remove the single 6 mm screw holding down the SSD using a Phillips #0 screwdriver.

  9. HP 14-fq1025nr SSD Replacement: 步骤 9 中的图像 1,1
    • Slide the SSD out of the slot.

结论

To reassemble your device, follow these instructions in reverse order.

Kristen Gismondi

于11/12/14注册

85,257 声望

创作了215篇指南

团队

iFixit iFixit 的会员

Staff

140 名成员

创作了18,096篇指南

0条评论

添加评论

浏览统计数据:

过去 24 小时: 0

过去 7 天: 0

过去 30 天: 13

总计 429