跳转到主内容

Google Pixel 4a 5G Battery Replacement

你所需要的

  1. Google Pixel 4a 5G Battery Replacement, Eject the SIM card tray: 步骤 1 中的图像 1,3 Google Pixel 4a 5G Battery Replacement, Eject the SIM card tray: 步骤 1 中的图像 2,3 Google Pixel 4a 5G Battery Replacement, Eject the SIM card tray: 步骤 1 中的图像 3,3
    • Insert a SIM eject tool, bit, or straightened paper clip into the SIM tray hole.

    • Press directly into the hole to eject the SIM card tray.

    • Remove the SIM card tray.

  2. Google Pixel 4a 5G Battery Replacement, Precautionary Notes: 步骤 2 中的图像 1,3 Google Pixel 4a 5G Battery Replacement, Precautionary Notes: 步骤 2 中的图像 2,3 Google Pixel 4a 5G Battery Replacement, Precautionary Notes: 步骤 2 中的图像 3,3
    • You will need to pry the screen up to remove it from the phone. Read the following notes carefully before proceeding.

    • Take note of the two seams on the edge of your phone:

    • Screen seam: This seam separates the screen from the rest of the phone. This is where you have to pry.

    • Frame seam: This is where the plastic frame meets the back cover. It is held in place by screws. Do not pry at this seam.

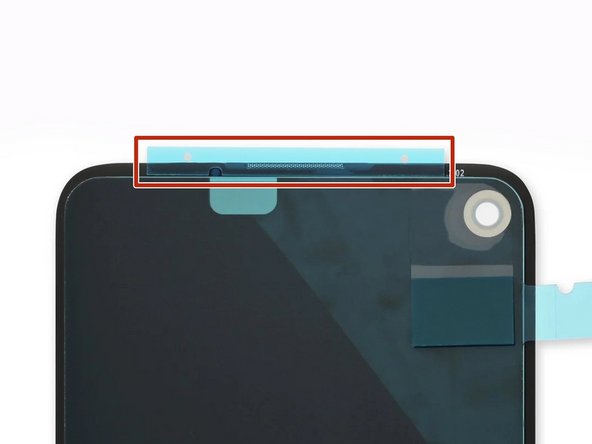
    • Before you begin, note the following areas on the screen:

    • Screen flex cable: Do not insert the opening pick deeper than instructed or you risk damaging this cable.

    • Adhesive perimeter: Prying beyond this narrow perimeter without angling the pick will damage the OLED panel.

  3. Google Pixel 4a 5G Battery Replacement, Heat the right edge of the screen: 步骤 3 中的图像 1,1
    • Apply a heated iOpener to the right edge of the display for one minute to soften the adhesive.

    • A hair dryer, heat gun, or hot plate may also be used, but be careful not to overheat the phone—the display and internal battery are both susceptible to heat damage.

  4. Google Pixel 4a 5G Battery Replacement, Insert an opening pick: 步骤 4 中的图像 1,3 Google Pixel 4a 5G Battery Replacement, Insert an opening pick: 步骤 4 中的图像 2,3 Google Pixel 4a 5G Battery Replacement, Insert an opening pick: 步骤 4 中的图像 3,3
    • If your display is badly cracked, covering it with a layer of clear packing tape may allow the suction cup to adhere. Alternatively, very strong tape may be used instead of the suction cup. If all else fails, you can superglue the suction cup to the broken screen.

    • Place a suction cup as close to the right edge of the screen as possible.

    • Lift the suction cup with a strong steady force.

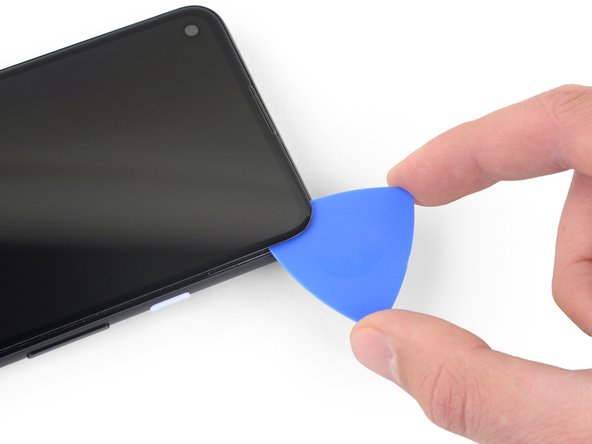
    • Insert the tip of an opening pick into the screen seam no more than 1 mm.

  5. Google Pixel 4a 5G Battery Replacement, Guide the opening pick under the OLED panel: 步骤 5 中的图像 1,3 Google Pixel 4a 5G Battery Replacement, Guide the opening pick under the OLED panel: 步骤 5 中的图像 2,3 Google Pixel 4a 5G Battery Replacement, Guide the opening pick under the OLED panel: 步骤 5 中的图像 3,3
    • This step shows how to insert your pick without damaging the OLED panel. Do this before slicing the adhesive.

    • With the pick 1 mm into the gap, pivot the pick upwards to a steep angle.

    • At a steep angle, carefully push the pick into the gap about 1/4 inch (6 mm). The pick should slide in below the OLED panel.

    • Stop if you feel the point of the pick hitting a ridge. The pick may be pressing against the edge of the OLED panel. Angle the pick and try again.

  6. Google Pixel 4a 5G Battery Replacement, Slice through the display adhesive: 步骤 6 中的图像 1,3 Google Pixel 4a 5G Battery Replacement, Slice through the display adhesive: 步骤 6 中的图像 2,3 Google Pixel 4a 5G Battery Replacement, Slice through the display adhesive: 步骤 6 中的图像 3,3
    • Slide the pick along the right edge of the screen to cut the adhesive.

    • Do not insert the pick more than 1/4 inch (6 mm) or you may damage the screen's flex cable.

    • Leave the pick in the bottom-right corner to prevent the adhesive from re-sealing.

  7. Google Pixel 4a 5G Battery Replacement: 步骤 7 中的图像 1,3 Google Pixel 4a 5G Battery Replacement: 步骤 7 中的图像 2,3 Google Pixel 4a 5G Battery Replacement: 步骤 7 中的图像 3,3
    • There's a mesh covering the earpiece speaker on the top edge of the screen. If you don’t have a replacement mesh, take care not to damage or lose this component.

    • The screen adhesive is weak, so you should not need to re-apply heat. If the screen is hard to slice, apply heat to the difficult area for one minute and try again.

    • Insert another opening pick into the right edge of the phone at an angle where a gap has already formed to prevent damage to the OLED panel.

    • Slide the opening pick around the top of the phone to cut the adhesive.

    • Leave the pick inserted along the top edge to prevent the adhesive from resealing.

  8. Google Pixel 4a 5G Battery Replacement: 步骤 8 中的图像 1,3 Google Pixel 4a 5G Battery Replacement: 步骤 8 中的图像 2,3 Google Pixel 4a 5G Battery Replacement: 步骤 8 中的图像 3,3
    • Insert another opening pick into the top edge of your phone at an angle where a gap has already formed to prevent damage to the OLED panel.

    • Use the pick to slice around the top-left corner where the camera window is.

    • If the screen is hard to slice, apply heat to the difficult area for one minute and try again.

    • Leave the pick inserted along the left edge of your phone to prevent the adhesive from re-sealing.

  9. Google Pixel 4a 5G Battery Replacement: 步骤 9 中的图像 1,3 Google Pixel 4a 5G Battery Replacement: 步骤 9 中的图像 2,3 Google Pixel 4a 5G Battery Replacement: 步骤 9 中的图像 3,3
    • Slide the opening pick to cut the adhesive along the left edge of your phone.

    • If the screen is hard to slice, apply heat to the difficult area for one minute and try again.

    • Keep in mind that you are now slicing near the screen flex cable and digitizer.

  10. Google Pixel 4a 5G Battery Replacement: 步骤 10 中的图像 1,3 Google Pixel 4a 5G Battery Replacement: 步骤 10 中的图像 2,3 Google Pixel 4a 5G Battery Replacement: 步骤 10 中的图像 3,3
    • Slide the opening pick around the bottom-left corner and across the bottom of the display to cut the rest of the adhesive.

    • If the screen is hard to slice, apply heat to the difficult area for one minute and try again.

    • Keep in mind that you are now slicing near the screen flex cable and digitizer.

  11. Google Pixel 4a 5G Battery Replacement: 步骤 11 中的图像 1,2 Google Pixel 4a 5G Battery Replacement: 步骤 11 中的图像 2,2
    • Once you have cut around the perimeter of the phone, carefully lift the right edge of the screen, partially opening the phone like a book.

    • Do not remove the screen yet.

    • Use an opening pick to carefully cut through any remaining adhesive.

  12. Google Pixel 4a 5G Battery Replacement, Flip the screen over: 步骤 12 中的图像 1,3 Google Pixel 4a 5G Battery Replacement, Flip the screen over: 步骤 12 中的图像 2,3 Google Pixel 4a 5G Battery Replacement, Flip the screen over: 步骤 12 中的图像 3,3
    • Lift from the top edge and swing the screen over the bottom edge until you can rest it glass-side down.

    • Be careful not to put any stress on the attached ribbon cable.

  13. Google Pixel 4a 5G Battery Replacement, Disconnect the display: 步骤 13 中的图像 1,3 Google Pixel 4a 5G Battery Replacement, Disconnect the display: 步骤 13 中的图像 2,3 Google Pixel 4a 5G Battery Replacement, Disconnect the display: 步骤 13 中的图像 3,3
    • Use your fingernail or a pair of tweezers to carefully peel off the tape covering the screen connector.

    • If it is in good condition, you can re-use this tape during reassembly. Otherwise, replace it with a piece of Kapton tape.

  14. Google Pixel 4a 5G Battery Replacement: 步骤 14 中的图像 1,3 Google Pixel 4a 5G Battery Replacement: 步骤 14 中的图像 2,3 Google Pixel 4a 5G Battery Replacement: 步骤 14 中的图像 3,3
    • Insert the tip of a spudger into the opening of the plastic cover securing the screen flex cable.

    • Pry the plastic cover straight up until it pops out of place.

    • The plastic cover may spring into the air.

    • Remove the plastic cover.

  15. Google Pixel 4a 5G Battery Replacement: 步骤 15 中的图像 1,2 Google Pixel 4a 5G Battery Replacement: 步骤 15 中的图像 2,2
    • Use the tip of a spudger to pry up and disconnect the screen flex cable.

    • To re-attach press connectors like this one, carefully align and press down on one side until it clicks into place, then repeat on the other side. Do not press down on the middle. If the connector is misaligned, the pins can bend, causing permanent damage.

  16. Google Pixel 4a 5G Battery Replacement, Remove the screen: 步骤 16 中的图像 1,3 Google Pixel 4a 5G Battery Replacement, Remove the screen: 步骤 16 中的图像 2,3 Google Pixel 4a 5G Battery Replacement, Remove the screen: 步骤 16 中的图像 3,3
    • Remove the screen.

    • To install a new screen:

    • Check if your replacement screen has speaker mesh and top edge adhesive pre-installed.

    • If it does, you won't need the top edge adhesive.

    • If it doesn't, remove the larger clear liner from the top edge adhesive and apply it to the screen (not the frame). Make sure the larger cutout lines up with the speaker mesh.

    • Follow this guide to apply the custom-cut adhesive.

    • Use the third photo as a reference to position your adhesives.

    • During the boot-up process after reassembly, the screen will go through a calibration sequence. Don't touch the screen during this process, as it could result in improper touch calibration and create touch issues.

  17. Google Pixel 4a 5G Battery Replacement, Remove the midframe screws: 步骤 17 中的图像 1,2 Google Pixel 4a 5G Battery Replacement, Remove the midframe screws: 步骤 17 中的图像 2,2
    在这个步骤中使用的工具:
    Magnetic Project Mat
    $19.95
    购买
    • Use a T3 Torx driver to remove the nine 4.4 mm-long screws securing the back cover to the midframe.

    • Throughout this repair, keep track of each screw and make sure it goes back exactly where it came from.

  18. Google Pixel 4a 5G Battery Replacement, Separate the back cover from the midframe: 步骤 18 中的图像 1,3 Google Pixel 4a 5G Battery Replacement, Separate the back cover from the midframe: 步骤 18 中的图像 2,3 Google Pixel 4a 5G Battery Replacement, Separate the back cover from the midframe: 步骤 18 中的图像 3,3
    • Insert an opening pick into the seam between the midframe and the back cover, right above the SIM card slot.

    • Slide the opening pick along the right edge of your phone to release the plastic clips securing the back cover to the midframe.

  19. Google Pixel 4a 5G Battery Replacement: 步骤 19 中的图像 1,3 Google Pixel 4a 5G Battery Replacement: 步骤 19 中的图像 2,3 Google Pixel 4a 5G Battery Replacement: 步骤 19 中的图像 3,3
    • Continue sliding the opening pick along the top, left, and bottom edges of your phone until all of the plastic tabs securing the back cover to the midframe are released.

  20. Google Pixel 4a 5G Battery Replacement: 步骤 20 中的图像 1,3 Google Pixel 4a 5G Battery Replacement: 步骤 20 中的图像 2,3 Google Pixel 4a 5G Battery Replacement: 步骤 20 中的图像 3,3
    • Flip your phone over so the back cover is facing up.

    • Carefully swing the back cover up to an upright position.

    • Do not remove the back cover. It is still attached by two ribbon cables.

    • Rest the back cover against an object such as a cardboard box or soda can.

  21. Google Pixel 4a 5G Battery Replacement, Remove the motherboard bracket: 步骤 21 中的图像 1,2 Google Pixel 4a 5G Battery Replacement, Remove the motherboard bracket: 步骤 21 中的图像 2,2
    • Use a T3 Torx screwdriver to remove the seven screws securing the motherboard bracket:

    • Four 4.0 mm-long screws

    • Three 2.1 mm-long screws

  22. Google Pixel 4a 5G Battery Replacement: 步骤 22 中的图像 1,2 Google Pixel 4a 5G Battery Replacement: 步骤 22 中的图像 2,2
    • Remove the motherboard bracket.

  23. Google Pixel 4a 5G Battery Replacement, Disconnect the battery: 步骤 23 中的图像 1,2 Google Pixel 4a 5G Battery Replacement, Disconnect the battery: 步骤 23 中的图像 2,2
    • Use the tip of a spudger to disconnect the battery cable from the motherboard.

  24. Google Pixel 4a 5G Battery Replacement, Remove the back cover: 步骤 24 中的图像 1,2 Google Pixel 4a 5G Battery Replacement, Remove the back cover: 步骤 24 中的图像 2,2
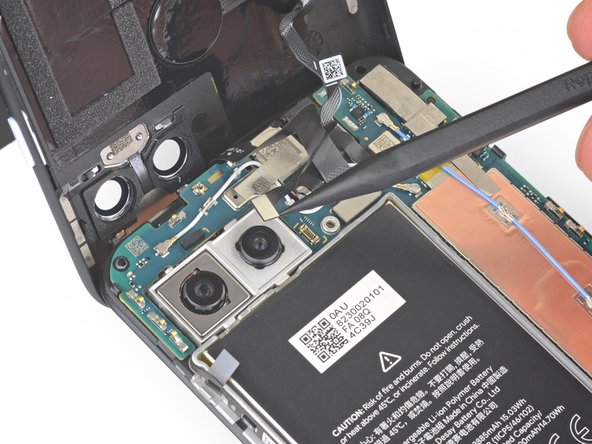
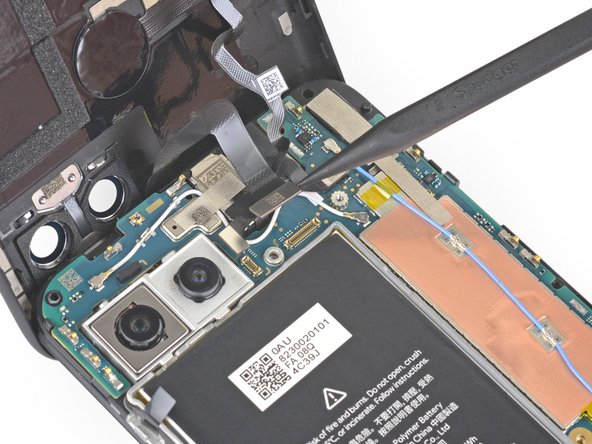
    • Use the tip of a spudger to pry up and disconnect the fingerprint sensor cable.

  25. Google Pixel 4a 5G Battery Replacement: 步骤 25 中的图像 1,2 Google Pixel 4a 5G Battery Replacement: 步骤 25 中的图像 2,2
    • Use the tip of a spudger to pry up and disconnect the front sensor array cable.

  26. Google Pixel 4a 5G Battery Replacement: 步骤 26 中的图像 1,2 Google Pixel 4a 5G Battery Replacement: 步骤 26 中的图像 2,2
    • Remove the back cover.

  27. Google Pixel 4a 5G Battery Replacement, Remove the loudspeaker tape: 步骤 27 中的图像 1,3 Google Pixel 4a 5G Battery Replacement, Remove the loudspeaker tape: 步骤 27 中的图像 2,3 Google Pixel 4a 5G Battery Replacement, Remove the loudspeaker tape: 步骤 27 中的图像 3,3
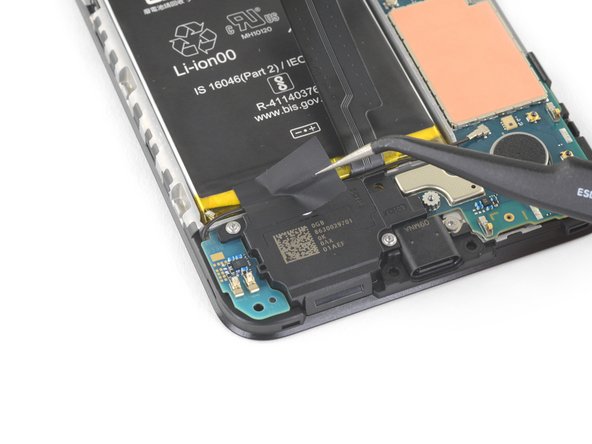
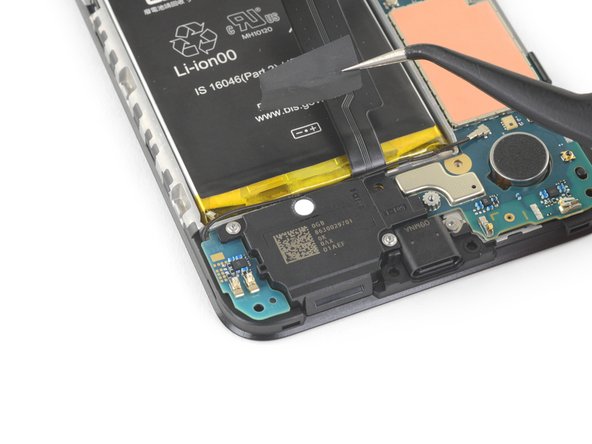
    • Use a pair of tweezers to remove the black tape covering the antenna flex cable between the loudspeaker and the battery.

    • Be careful not to puncture the battery with your tweezers.

  28. Google Pixel 4a 5G Battery Replacement, Access the stretch-release adhesive pull tabs: 步骤 28 中的图像 1,3 Google Pixel 4a 5G Battery Replacement, Access the stretch-release adhesive pull tabs: 步骤 28 中的图像 2,3 Google Pixel 4a 5G Battery Replacement, Access the stretch-release adhesive pull tabs: 步骤 28 中的图像 3,3
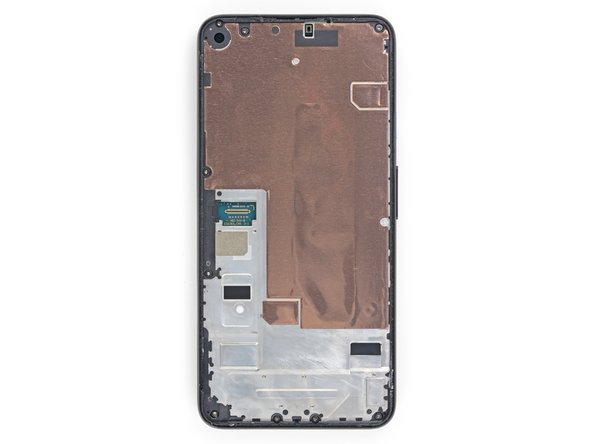
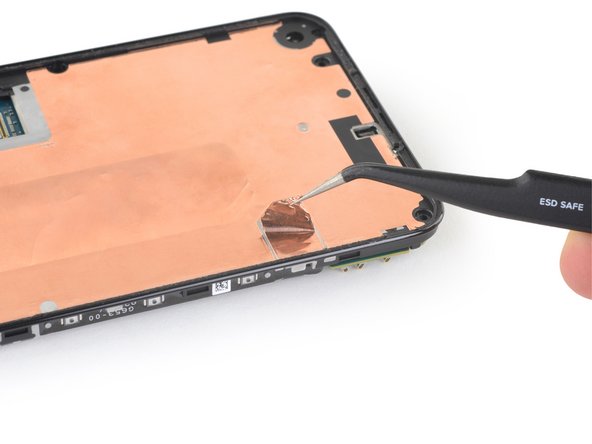
    • Flip the midframe over.

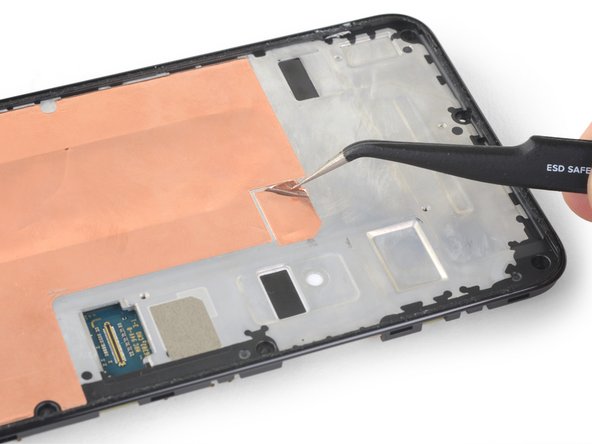
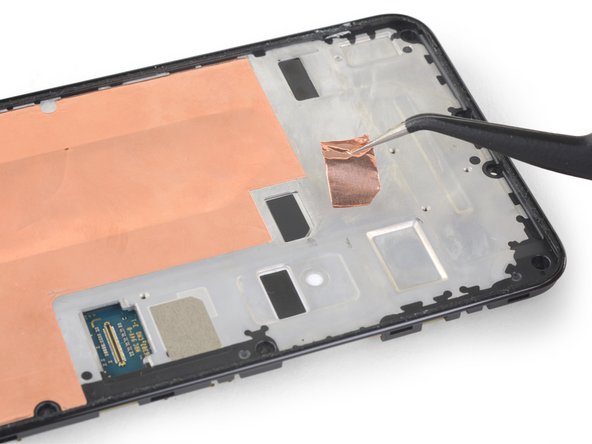
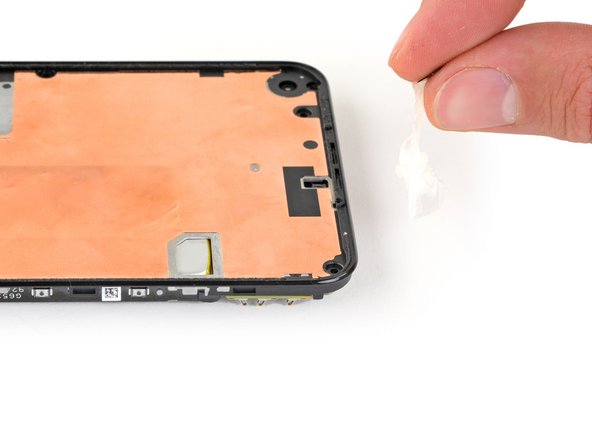
    • Use a pair of tweezers to remove the rectangular piece of copper foil closest to the edge of the phone.

    • If the copper foil remains intact, reuse it during reassembly. If not, replace it with a piece of Kapton tape.

  29. Google Pixel 4a 5G Battery Replacement: 步骤 29 中的图像 1,3 Google Pixel 4a 5G Battery Replacement: 步骤 29 中的图像 2,3 Google Pixel 4a 5G Battery Replacement: 步骤 29 中的图像 3,3
    • Use a pair of tweezers to remove the rectangular piece of copper foil closest to the center of the phone.

    • If the copper foil remains intact, reuse it during reassembly. If not, replace it with a piece of Kapton tape.

  30. Google Pixel 4a 5G Battery Replacement, Remove the stretch-release adhesive: 步骤 30 中的图像 1,3 Google Pixel 4a 5G Battery Replacement, Remove the stretch-release adhesive: 步骤 30 中的图像 2,3 Google Pixel 4a 5G Battery Replacement, Remove the stretch-release adhesive: 步骤 30 中的图像 3,3
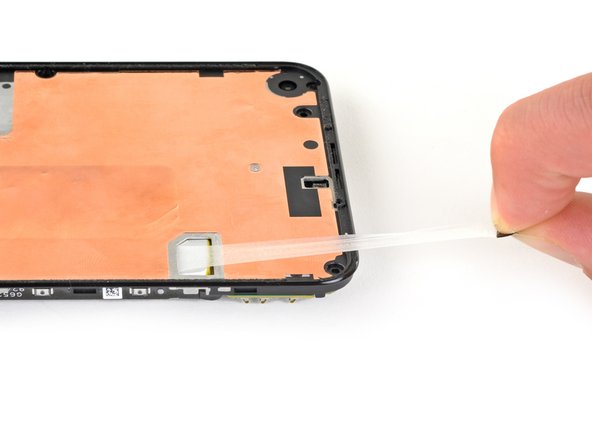
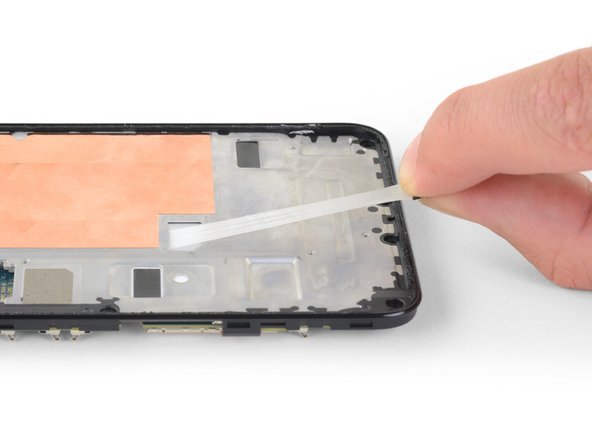
    • Use the flat end of a spudger to lift up the battery adhesive pull tab so that you can reach it with your fingers.

    • Try to keep the adhesive strips flat and unwrinkled during this procedure; twisted or wrinkled strips will stick together and break instead of pulling out cleanly.

    • Slowly pull one battery adhesive tab away from the battery, towards the bottom of the phone.

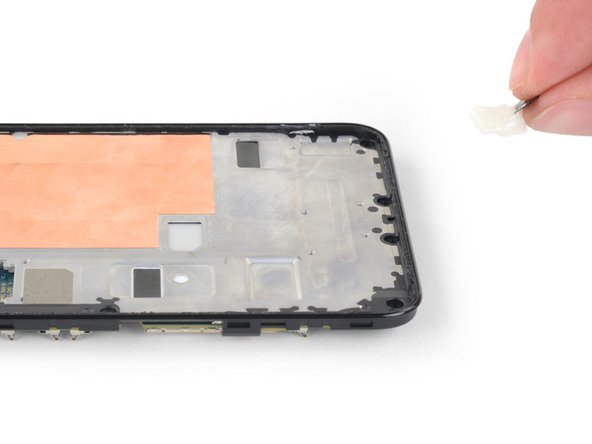
    • Pull steadily, maintaining constant tension on the strip until it slips out from between the battery and the midframe. For best results, pull the strip at as low of an angle as possible.

    • The strip will stretch to many times its original length. Continue pulling and re-grab the strip near the battery if necessary.

    • If the battery adhesive tabs break during the removal process, use your fingers or blunt tweezers to retrieve the remaining length of adhesive, and continue pulling.

  31. Google Pixel 4a 5G Battery Replacement: 步骤 31 中的图像 1,3 Google Pixel 4a 5G Battery Replacement: 步骤 31 中的图像 2,3 Google Pixel 4a 5G Battery Replacement: 步骤 31 中的图像 3,3
    • Repeat the instructions in the previous step for the second stretch-release adhesive strip.

    • If any of the adhesive strips broke off underneath the battery and could not be retrieved, apply a few drops of 90% isopropyl alcohol into the opening of the affected tab and tilt the phone towards the top edge so that the alcohol flows toward the remaining adhesive. Wait one minute for the adhesive to soften, then proceed to the next step.

  32. Google Pixel 4a 5G Battery Replacement, Remove the battery: 步骤 32 中的图像 1,3 Google Pixel 4a 5G Battery Replacement, Remove the battery: 步骤 32 中的图像 2,3 Google Pixel 4a 5G Battery Replacement, Remove the battery: 步骤 32 中的图像 3,3
    • Do not reuse the battery if it has been deformed or damaged, as doing so is a potential safety hazard. Replace it with a new battery.

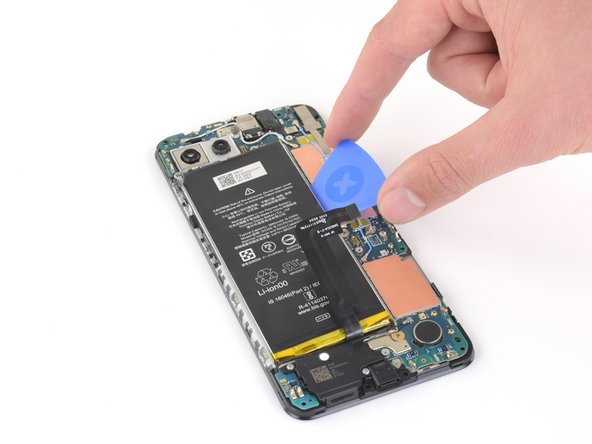
    • Insert an opening pick into the battery well along one of the long edges of the battery.

    • Pry the battery upward to remove it from the battery well.

    • If the adhesive was successfully removed, the battery should come out very easily.

    • If the battery cannot be easily extracted due to unsuccessful removal of the stretch-release adhesive, apply 90% isopropyl alcohol as directed in the previous step.

    • Once you have allowed one minute for the alcohol to soften the adhesive, use an opening pick to pry up the battery from one of the long edges.

    • Do not bend the battery as you pull it out.

结论

To reassemble your device, follow the above steps in reverse order.

Take your e-waste to an R2 or e-Stewards certified recycler.

Repair didn’t go as planned? Try some basic troubleshooting, or ask our Answers community for help.

11等其他人完成本指南。

Sam Omiotek

于02/25/19注册

72,547 声望

创作了288篇指南

8条评论

Hi Sam,

Do you know where to actually buy battery replacements for the 4a 5g? It doesn’t seem like it’s available just doing a Google search, and just wondering if you know something I don’t.

Thanks,

Sally

Sally Hoo - 回复

Hi Sally,

Not right now, unfortunately. It’s likely a matter of time before they are available, but it’s difficult to predict exactly when—especially with impacted global supply chains. Keep an eye on iFixit and eBay, and check with any repair shops if you haven’t already.

Best of luck,

Sam

Sam Omiotek -

Hi! This guide worked excellently for removing my battery. But I was hoping you could give me a bit of advice.

I disassembled my phone because I got water in it, and I wanted it to dry more effectively. Because my battery is not damaged I was planning on putting it back in now, but your guide warns against this. Is that because there is no more adhesive? Or potentially something else that I could work around?

Thanks! -Ben

Ben Hilton - 回复

Hi Ben!

We warn against reusing batteries because they are usually deformed during removal, which increases the chances of a "thermal event" happening in the future. If you were able to remove yours without deforming it at all, then you should be fine to reuse it.

That being said, with internal water exposure a battery replacement is almost always necessary. It depends on the level of contamination. If it were my phone, I would buy a new one. They are not too expensive.

Sam Omiotek -

Hi :)

I have an Ifixit essential toolkit. The guide is excellent but once i read step 22 it states that I need to use a T3 Torx in order to remove the motherboard. Unfortunately my IFIXT includes only Torx T4 and T5, so I was wondering whether i'll be able to unscrew it anyways using what I have or will I necessarily have to buy another kit?

thank you!


Marco

nanter88 - 回复

添加评论

浏览统计数据:

过去 24 小时: 13

过去 7 天: 166

过去 30 天: 724

总计 27,399