跳转到主内容

当前版本的文档还未经巡查,您可以查看最新的已查核版本

你所需要的

  1. , 后盖: 步骤 1 中的图像 1,1
    • 加热 iOpener 并将其放置在手机底部一分钟。

    • 在撬动电源按钮上方时,注意不要将工具插入太深,否则会损坏指纹传感器排线。

  2. : 步骤 2 中的图像 1,3 : 步骤 2 中的图像 2,3 : 步骤 2 中的图像 3,3
    • 在加热后的后盖底部边缘吸附一个吸盘。

    • 确保你把吸盘吸附在后盖上而不是屏幕上。

    • 如果你的后盖玻璃严重破碎,请用一层透明的胶带覆盖它,这么做会让吸盘更容易吸住。

    • 确保吸附牢固后,稳稳提起吸盘。让后盖和机身间出现一个小缝隙。

    • 取决于你的手机的新旧程度,这可能需要很大的力量。如果你有困难,请再次按照上一步骤加热底部并再次尝试。

    • 将撬片插入缝隙中。

  3. 这个步骤还没有翻译 帮忙翻译一下

    : 步骤 3 中的图像 1,1
    • When inserting an opening pick above the power button, be careful not to insert the pick too deeply, or you will damage the fingerprint sensor cable.

  4. : 步骤 4 中的图像 1,3 : 步骤 4 中的图像 2,3 : 步骤 4 中的图像 3,3
    • 沿着手机的底部边缘一直到右侧边角切开后盖与机身之间的粘合剂。

    • 将撬片放置于此,以防止粘合剂重新粘黏。

  5. : 步骤 5 中的图像 1,3 : 步骤 5 中的图像 2,3 : 步骤 5 中的图像 3,3
    • 用iOpener加热机身右边的边缘,用撬片继续切开机身侧面粘合剂。

    • 粘合剂可能是非常强力的。可以将撬片用拉大锯的方式来分离粘合剂。

  6. : 步骤 6 中的图像 1,3 : 步骤 6 中的图像 2,3 : 步骤 6 中的图像 3,3
    • 继续加热并切开手机周边的其余部分的粘合剂。在每个边缘留出一个撬片,以防止粘合剂重新粘牢。

    • 在电源按钮上方切开时,不要将撬片插入一半以上,以免损坏指纹传感器排线。

  7. : 步骤 7 中的图像 1,3 : 步骤 7 中的图像 2,3 : 步骤 7 中的图像 3,3
    • 手机四周的粘合剂切割完毕后,小心地抬起后盖的左边缘

    • 不要试图取下后盖。它仍然由指纹传感器排线连接在手机上。

    • 沿着机身侧面翻转后盖,将其放置于一侧,使指纹传感器的排线不被拉扯。

  8. : 步骤 8 中的图像 1,1
    • 卸下固定指纹连接器支架的两颗4.1毫米长的十字螺丝。

    • 在重新组装过程中,要注意不要过度拧紧这些螺丝,否则可能会损坏屏幕。

  9. : 步骤 9 中的图像 1,3 : 步骤 9 中的图像 2,3 : 步骤 9 中的图像 3,3
    • 用撬棒的尖头将指纹连接器支架从NFC线圈下滑出。

    • 拆出指纹连接器支架。

  10. : 步骤 10 中的图像 1,2 : 步骤 10 中的图像 2,2
    • 用撬棒的尖头撬起并断开指纹连接器与插座的连接。

    • 当你断开像这样的连接器时,要注意不要使插座附近元件移位。

    • 要重新安装像这样的按压式插座,要小心地对准并按下一边,直到它咔嚓一声到位,然后在另一边重复。不要压在中间。如果连接器没有对准,针脚会弯曲,造成永久性损坏。

  11. : 步骤 11 中的图像 1,3 : 步骤 11 中的图像 2,3 : 步骤 11 中的图像 3,3
    • 取走后盖。

    • 在你安装替换的后盖之前,一定要清除手机边框上的所有粘合剂残留物。用开口工具刮掉残留粘合剂,并用高浓度异丙醇清洗表面。

    • 如果你要重新使用旧的后盖,一定要清理掉任何粘合剂,并涂上新的后盖粘合剂。

    • 如果你要安装一个替换的后盖,一定要与原来的部件进行比较。将任何剩余的部件(如闪光扩散器)转移到你的新的替换部件上。

  12. , 拆解无线充电线圈: 步骤 12 中的图像 1,1
    • 卸下固定无线充电线圈的五个十字螺丝。

    • 两个1.9毫米的螺丝

    • 两个4.2毫米的螺丝

    • 一个4.3毫米的螺丝

    • 取出无线充电线圈。

  13. 这个步骤还没有翻译 帮忙翻译一下

    : 步骤 13 中的图像 1,1
    • Lift up and remove the wireless charging coil.

  14. , 断开电池: 步骤 14 中的图像 1,2 , 断开电池: 步骤 14 中的图像 2,2
    • 用撬棒的尖头撬起电池连接器,并将其从靠近手机右边缘的插座上断开。

  15. 这个步骤还没有翻译 帮忙翻译一下

    : 步骤 15 中的图像 1,2 : 步骤 15 中的图像 2,2
    • Use the point of a spudger to pry up and disconnect the loudspeaker connector from its motherboard socket near the right edge of the phone.

    • Be careful not to puncture the battery with the spudger.

  16. 这个步骤还没有翻译 帮忙翻译一下

    : 步骤 16 中的图像 1,3 : 步骤 16 中的图像 2,3 : 步骤 16 中的图像 3,3
    • Remove the following four Phillips screws:

    • One 1.9 mm screw

    • One 4.3 mm screw

    • Two 4.3 mm screws with thinner shanks

    • Remove the tiny grounding clip from the left screw hole. Be careful not to lose it.

    • The grounding clip installs such that the contoured edge faces the left side of the phone.

    • Remove the small plastic insert from the right side of the USB-C port.

    • Be sure to reinstall this insert before you screw down the daughterboard.

  17. 这个步骤还没有翻译 帮忙翻译一下

    : 步骤 17 中的图像 1,2 : 步骤 17 中的图像 2,2
    • The loudspeaker is still held in place by a strong adhesive gasket. Before attempting to remove it, pry it up in a few different places to break the adhesive seal.

    • Insert the point of a spudger under the bottom right corner of the loudspeaker.

    • Pry up to loosen the loudspeaker from the phone.

  18. 这个步骤还没有翻译 帮忙翻译一下

    : 步骤 18 中的图像 1,2 : 步骤 18 中的图像 2,2
    • Insert the point of a spudger under the top left corner of the loudspeaker.

    • Be careful not to puncture the battery with the spudger.

    • Pry up to loosen the loudspeaker.

  19. 这个步骤还没有翻译 帮忙翻译一下

    : 步骤 19 中的图像 1,2 : 步骤 19 中的图像 2,2
    • Insert the flat end of the spudger under the top edge of the loudspeaker, towards the left edge.

    • Pry up to loosen the loudspeaker.

  20. 这个步骤还没有翻译 帮忙翻译一下

    : 步骤 20 中的图像 1,2 : 步骤 20 中的图像 2,2
    • Remove the loudspeaker.

    • Before you install a replacement loudspeaker, check the adhesive gasket.

    • If it is in good condition, you can re-use the gasket. Make sure that the gasket does not cover the exit hole.

    • If the gasket is pulled out of place, remove it and replace the adhesive with a pre-cut strip or Tesa tape.

  21. 这个步骤还没有翻译 帮忙翻译一下

    : 步骤 21 中的图像 1,2 : 步骤 21 中的图像 2,2
    • Use the point of a spudger to pry up and disconnect the blue antenna cable from its socket on the charging assembly.

  22. 这个步骤还没有翻译 帮忙翻译一下

    : 步骤 22 中的图像 1,2 : 步骤 22 中的图像 2,2
    • Use the point of a spudger to carefully pry up and release the blue antenna cable from its grounding clip.

    • The cable is fragile and prone to breaking. If it feels like the wire is firmly clamped in place, use the point of a spudger to push the clip open slightly, then try again.

  23. 这个步骤还没有翻译 帮忙翻译一下

    : 步骤 23 中的图像 1,2 : 步骤 23 中的图像 2,2
    • Use the point of a spudger to pry up and disconnect the black antenna cable from its socket near the USB-C port.

  24. 这个步骤还没有翻译 帮忙翻译一下

    : 步骤 24 中的图像 1,1
    • Carefully de-route both antenna cables and move them away from the charging assembly.

  25. 这个步骤还没有翻译 帮忙翻译一下

    : 步骤 25 中的图像 1,3 : 步骤 25 中的图像 2,3 : 步骤 25 中的图像 3,3
    • Use the point of a spudger to pry up and disconnect the charging assembly's connector from its motherboard socket, near the right edge of the phone.

    • Carefully peel the flex cable from the top of the SIM card reader.

  26. 这个步骤还没有翻译 帮忙翻译一下

    : 步骤 26 中的图像 1,1
    • Remove the two 1.9 mm Phillips screws securing the charging assembly to the bottom edge of the phone.

  27. 这个步骤还没有翻译 帮忙翻译一下

    : 步骤 27 中的图像 1,1
    • Apply a heated iOpener to the bottom edge of the phone for a minute to loosen the adhesive holding the charging assembly in place.

  28. 这个步骤还没有翻译 帮忙翻译一下

    : 步骤 28 中的图像 1,3 : 步骤 28 中的图像 2,3 : 步骤 28 中的图像 3,3
    • Insert an opening pick underneath the charging assembly's flex cable.

    • Slide the opening pick below the charging assembly to loosen it from the phone.

  29. 这个步骤还没有翻译 帮忙翻译一下

    : 步骤 29 中的图像 1,1
    • Use a pair of tweezers or your fingers to remove the charging assembly.

  30. 这个步骤还没有翻译 帮忙翻译一下

    : 步骤 30 中的图像 1,3 : 步骤 30 中的图像 2,3 : 步骤 30 中的图像 3,3
    • When you are installing a replacement assembly:

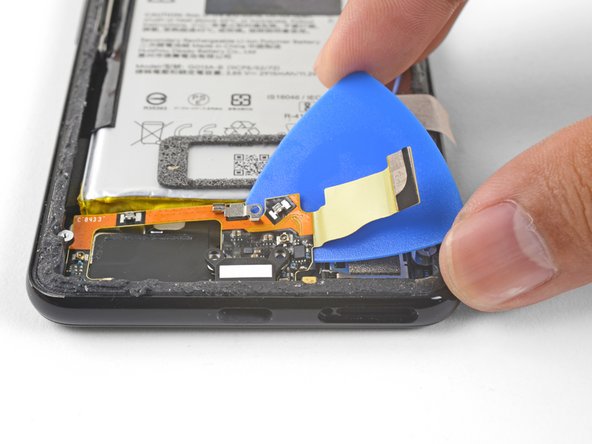
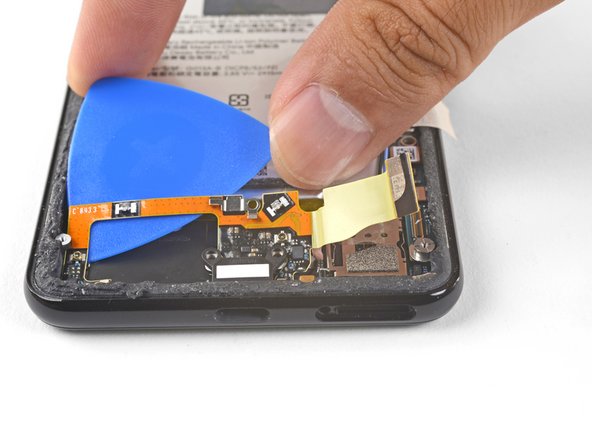
    • Be sure to remove all plastic liners from the assembly to expose the adhesive.

    • Line up the assembly's bottom left corner into place.

    • Carefully lay the rest of the assembly in place, making sure that the USB-C port is correctly seated in its respective cutout.

    • Use your fingers to press the assembly onto the frame.

终点

36等其他人完成本指南。

Arthur Shi

于01/03/18注册

252,726 声望

创作了526篇指南

团队

iFixit iFixit 的会员

Staff

135 名成员

创作了16,817篇指南

11条评论

is the adhesive for the back of the phone reusable, or do I need to buy a replacement adhesive for reassembly?

Campbell Wright - 回复

It depends on the age of your phone it seems - the older the phone, the less resuseable the existing adhesive. I used gasket maker to reseal my phone, in part because I did not want to heat my new battery up when trying to reseal the back cover. I would advise getting some additional adhesive if you want a water-tight assembly.

Andrew Williams -

Best to order a new back phone lid, as my back lid shattered when trying to prise it off, despite repeated heating to uncomfortably hot. Also, if you’re replacing the charging logic board because of the ‘unrecognised analogue device’ messsage, I still got the same message AFTER having put everything back together having replaced the logic board. If you shatter the back lid of the phone and have to replace it, the finger print scanner and lens covers are all prisable off and reapplicable to the new cover (with a little heating). But this requires care. Make sure to replace the battery also - because of the ka-fafel of opening this barely user-repairable phone (Cheers Google!). I ended up using gasket maker silicone (yes the stuff I use for reassembling my motorbike engine) to seal everything. Seems to have worked a treat. Good luck - you’ll need it!

Andrew Williams - 回复

I swapped out the USB-C charging port and battery at the same time. Hopefully I can get another two years out of the phone now. If you are just changing this port, then I would recommend changing the battery too. The battery replacement kit comes with new adhesive to reseal the back panel.

Trey Ethridge - 回复

can I do this with a heat gun instead of the iOpener? what do I set the temperature to?

Moya Alhayek - 回复

添加评论

浏览统计数据:

过去 24 小时: 2

过去 7 天: 36

过去 30 天: 200

总计 30,234