跳转到主内容

Gateway KAV60 LT2016U Netbook Cooling Fan Replacement

已存档的指南
本指南只作为历史记录保留。请使用指南的最新版本来进行维修。

你所需要的

  1. Gateway KAV60 LT2016U Netbook Cooling Fan Replacement, Battery: 步骤 1 中的图像 1,1
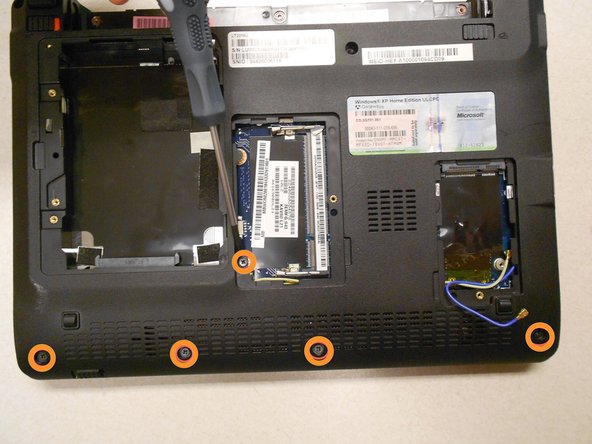
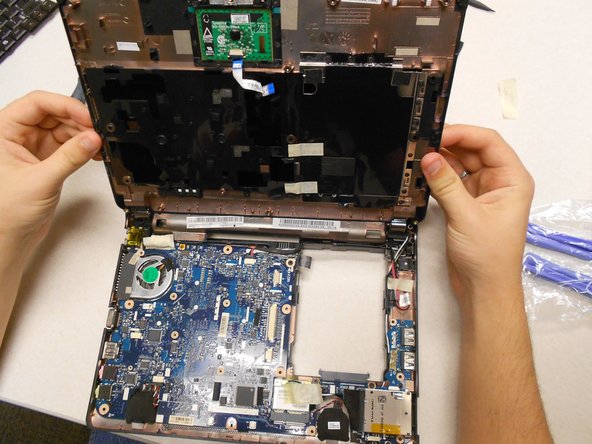
    • Unlock the button in the top left on the back of the laptop (So the red is showing).

  2. Gateway KAV60 LT2016U Netbook Cooling Fan Replacement: 步骤 2 中的图像 1,1
    • The battery should be able to be removed easily now.

  3. Gateway KAV60 LT2016U Netbook Cooling Fan Replacement, Cooling Fan: 步骤 3 中的图像 1,1
    • Start by first removing the battery of the device.

  4. Gateway KAV60 LT2016U Netbook Cooling Fan Replacement: 步骤 4 中的图像 1,1
    • Next remove the RAM, hard drive, and wifi card before continuing so they aren't damaged.

  5. Gateway KAV60 LT2016U Netbook Cooling Fan Replacement: 步骤 5 中的图像 1,2 Gateway KAV60 LT2016U Netbook Cooling Fan Replacement: 步骤 5 中的图像 2,2
    • Remove all 11 of the screw shown on the bottom of the lap top using the specified screw driver.

  6. Gateway KAV60 LT2016U Netbook Cooling Fan Replacement: 步骤 6 中的图像 1,3 Gateway KAV60 LT2016U Netbook Cooling Fan Replacement: 步骤 6 中的图像 2,3 Gateway KAV60 LT2016U Netbook Cooling Fan Replacement: 步骤 6 中的图像 3,3
    • Lift off the keyboard by doing exactly what is shown in the first picture. Get the head of the plastic opening tool under and then wedge it out.

  7. Gateway KAV60 LT2016U Netbook Cooling Fan Replacement: 步骤 7 中的图像 1,3 Gateway KAV60 LT2016U Netbook Cooling Fan Replacement: 步骤 7 中的图像 2,3 Gateway KAV60 LT2016U Netbook Cooling Fan Replacement: 步骤 7 中的图像 3,3
    • Remove the 5 circled screws with the Phillips #0 screw driver.

    • Carefully separate the back cover from the front either using your hands or a plastic opening tool.

  8. Gateway KAV60 LT2016U Netbook Cooling Fan Replacement: 步骤 8 中的图像 1,2 Gateway KAV60 LT2016U Netbook Cooling Fan Replacement: 步骤 8 中的图像 2,2
    • Unscrew this 1 screw to remove the wifi card.

    • Then unplug the wires it is attached to and take it out.

  9. Gateway KAV60 LT2016U Netbook Cooling Fan Replacement: 步骤 9 中的图像 1,2 Gateway KAV60 LT2016U Netbook Cooling Fan Replacement: 步骤 9 中的图像 2,2
    • Use the phillps #00 screw driver to remove these 3 small scows so the motherboard can be removed.

    • Then remove it from the base of th computer.

  10. Gateway KAV60 LT2016U Netbook Cooling Fan Replacement: 步骤 10 中的图像 1,1
    • Use the Phillips #00 screw driver to remove the 4 circled screws.

  11. Gateway KAV60 LT2016U Netbook Cooling Fan Replacement: 步骤 11 中的图像 1,1
    • Disconnect the wires from the motherboard.

    • The fan should now be fully disconnected and ready to replace.

结论

To reassemble your device, follow these instructions in reverse order.

另外一个人完成了本指南。

Kyle

于03/11/14注册

622 声望

创作了3篇指南

团队

UMass Dartmouth, Team 3-2, Calaway Spring 2014 UMass Dartmouth, Team 3-2, Calaway Spring 2014 的会员

UMASSD-CALAWAY-S14S3G2

4 名成员

创作了6篇指南

0条评论

添加评论

浏览统计数据:

过去 24 小时: 0

过去 7 天: 0

过去 30 天: 1

总计 109