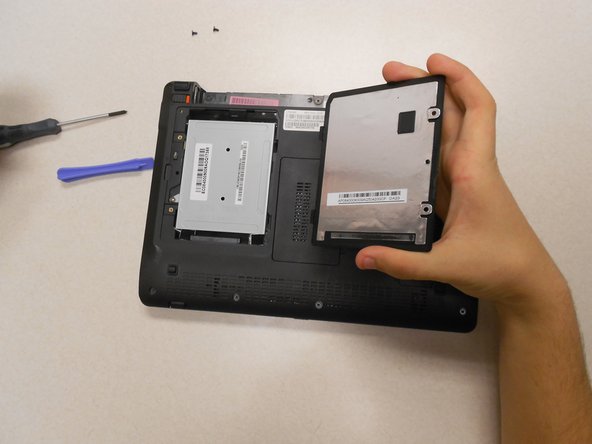
跳转到主内容

Gateway KAV60 LT2016U Hard Drive Replacement

你所需要的

  1. Gateway KAV60 LT2016U Hard Drive Replacement, Battery: 步骤 1 中的图像 1,3 Gateway KAV60 LT2016U Hard Drive Replacement, Battery: 步骤 1 中的图像 2,3 Gateway KAV60 LT2016U Hard Drive Replacement, Battery: 步骤 1 中的图像 3,3
    • Unlock the tab located in the top left corner of the netbook.

    • The red tab indicated that the battery has been properly unlocked.

    • Remove the battery.

    • When working with electronics, it is always wise to remove the power source before taking the device apart.

  2. Gateway KAV60 LT2016U Hard Drive Replacement, Hard Drive: 步骤 2 中的图像 1,1
    • The hard drive is located under this cover.

  3. Gateway KAV60 LT2016U Hard Drive Replacement: 步骤 3 中的图像 1,2 Gateway KAV60 LT2016U Hard Drive Replacement: 步骤 3 中的图像 2,2
    • Remove the two (2) 5mm screws holding the cover down using the Phillips #0 screwdriver.

  4. Gateway KAV60 LT2016U Hard Drive Replacement: 步骤 4 中的图像 1,2 Gateway KAV60 LT2016U Hard Drive Replacement: 步骤 4 中的图像 2,2
    • Use a plastic opening tool to lift the cover.

  5. Gateway KAV60 LT2016U Hard Drive Replacement: 步骤 5 中的图像 1,1
    • Using a Phillips #0 screwdriver, remove a third 5mm screw that holds the second cover that is directly protecting the hard drive.

  6. Gateway KAV60 LT2016U Hard Drive Replacement: 步骤 6 中的图像 1,3 Gateway KAV60 LT2016U Hard Drive Replacement: 步骤 6 中的图像 2,3 Gateway KAV60 LT2016U Hard Drive Replacement: 步骤 6 中的图像 3,3
    • Slide the silver cover up; the hole on the cover and the hole for the screw will no longer match up.

    • Lift the silver cover; this will expose the hard drive.

结论

To reassemble your device, follow these instructions in reverse order.

Lydia Benjock

于10/18/13注册

1,216 声望

创作了10篇指南

团队

Clemson, Team 14-3, Benson Fall 2013 Clemson, Team 14-3, Benson Fall 2013 的会员

CLEM-BENSON-F13S14G3

3 名成员

创作了22篇指南

0条评论

添加评论

浏览统计数据:

过去 24 小时: 0

过去 7 天: 3

过去 30 天: 8

总计 1,648