跳转到主内容
加入维修社区 - 创建账户

Gateway GWTC116-2BL Display Replacement

你所需要的

  1. Gateway GWTC116-2BL Display Replacement, Back Panel: 步骤 1 中的图像 1,1
    • Ground yourself before disassembling and handling the computer.

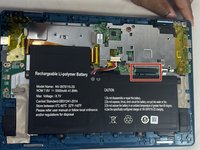
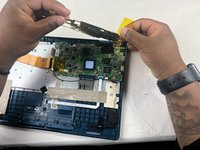
    • Remove the ten 3.0 mm Phillips #00 screws from the back panel of the laptop.

    询问修复机器人
  2. Gateway GWTC116-2BL Display Replacement: 步骤 2 中的图像 1,2 Gateway GWTC116-2BL Display Replacement: 步骤 2 中的图像 2,2
    • Use the spudger to pry the back panel away from the body of the laptop.

    询问修复机器人
  3. Gateway GWTC116-2BL Display Replacement, Battery: 步骤 3 中的图像 1,1
    • Remove the five 3.0 mm Phillips #00 screws.

    询问修复机器人
  4. Gateway GWTC116-2BL Display Replacement: 步骤 4 中的图像 1,2 Gateway GWTC116-2BL Display Replacement: 步骤 4 中的图像 2,2
    • Using your fingers, flick open the battery connector bracket.

    • Remove the connector from bracket.

    询问修复机器人
  5. Gateway GWTC116-2BL Display Replacement: 步骤 5 中的图像 1,1
    • Pull up the battery to remove from the base.

    询问修复机器人
  6. Gateway GWTC116-2BL Display Replacement, Motherboard: 步骤 6 中的图像 1,1
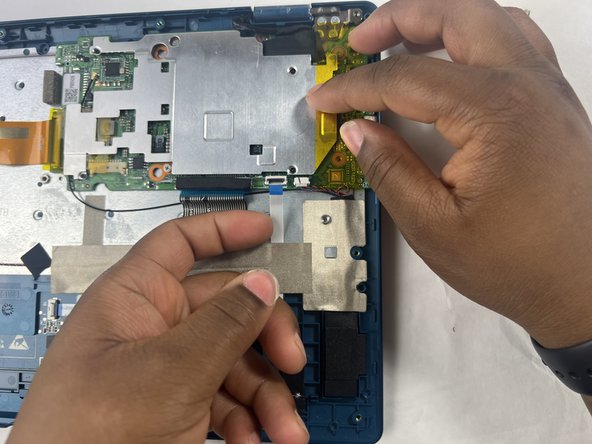
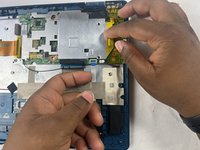
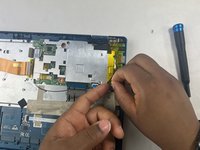
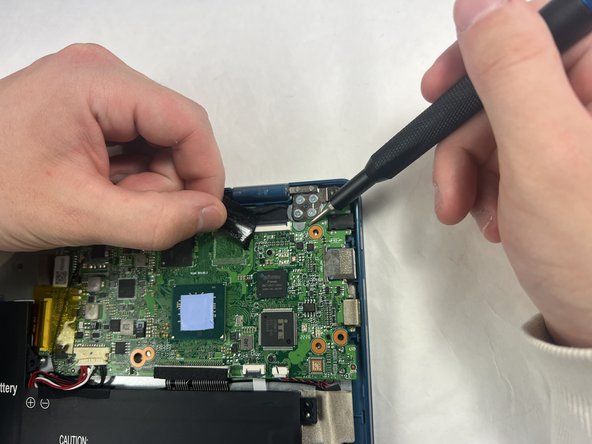
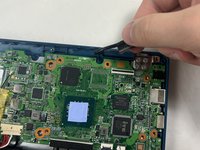
    • Using your fingers, flick the cable connector bracket open.

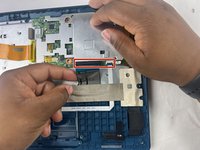
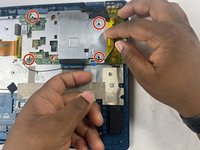
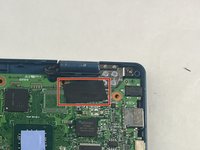
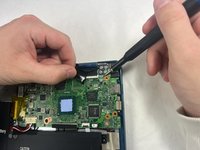
    • Remove the cable from the connector.

    询问修复机器人
  7. Gateway GWTC116-2BL Display Replacement: 步骤 7 中的图像 1,2 Gateway GWTC116-2BL Display Replacement: 步骤 7 中的图像 2,2
    • Using your fingers, disconnect the black and white connector brackets underneath the gray cable.

    询问修复机器人
  8. Gateway GWTC116-2BL Display Replacement: 步骤 8 中的图像 1,2 Gateway GWTC116-2BL Display Replacement: 步骤 8 中的图像 2,2
    • Remove the four 3.0 mm Phillips #00 screws located on the motherboard casing.

    询问修复机器人
  9. Gateway GWTC116-2BL Display Replacement: 步骤 9 中的图像 1,3 Gateway GWTC116-2BL Display Replacement: 步骤 9 中的图像 2,3 Gateway GWTC116-2BL Display Replacement: 步骤 9 中的图像 3,3
    • Peel the yellow tape off of the casing.

    • Lift the casing off of the motherboard.

    询问修复机器人
  10. Gateway GWTC116-2BL Display Replacement: 步骤 10 中的图像 1,2 Gateway GWTC116-2BL Display Replacement: 步骤 10 中的图像 2,2
    • Peel off the yellow tape.

    • Remove four 3.0 mm Phillips #00 screws.

    询问修复机器人
  11. Gateway GWTC116-2BL Display Replacement: 步骤 11 中的图像 1,2 Gateway GWTC116-2BL Display Replacement: 步骤 11 中的图像 2,2
    • Peel off the black piece of tape covering the display cable.

    询问修复机器人
  12. Gateway GWTC116-2BL Display Replacement: 步骤 12 中的图像 1,2 Gateway GWTC116-2BL Display Replacement: 步骤 12 中的图像 2,2
    • Flick open the bracket securing the display cable and disconnect the cable from the motherboard.

    询问修复机器人
  13. Gateway GWTC116-2BL Display Replacement: 步骤 13 中的图像 1,1
    • Remove the motherboard from the device.

    询问修复机器人
  14. Gateway GWTC116-2BL Display Replacement, Display: 步骤 14 中的图像 1,1
    • Remove seven 3.0 mm Phillips #00 screws from the laptop.

    询问修复机器人
  15. Gateway GWTC116-2BL Display Replacement: 步骤 15 中的图像 1,1
    • Applying some force, use your hands to pry the display of the laptop away from the base.

    询问修复机器人
结论

To reassemble your device, follow these instructions in reverse order.

另外一个人完成了本指南。

Kailey Sousa

于03/22/24注册

522 声望

创作了4篇指南

团队

UMass Dartmouth, Team 6-2, Botvin Spring 2024 UMass Dartmouth, Team 6-2, Botvin Spring 2024 的会员

UMASSD-BOTVIN-S24S6G2

3 名成员

创作了5篇指南

1指南评论

Mon écran ne s'allume pas au démarrage. Que faire ?

Youssouf SAWADOGO - 回复 分享

添加评论

浏览统计数据:

过去 24 小时: 5

过去 7 天: 13

过去 30 天: 91

总计 1,324