简介
Problems with charging the battery? Is the USB port damaged where it is no longer able to plug into the charging cable? It might be time to replace your USB port. After removing the second frame panel be sure to read the Cautions and steps thoroughly before proceeding.
你所需要的
-
-
-
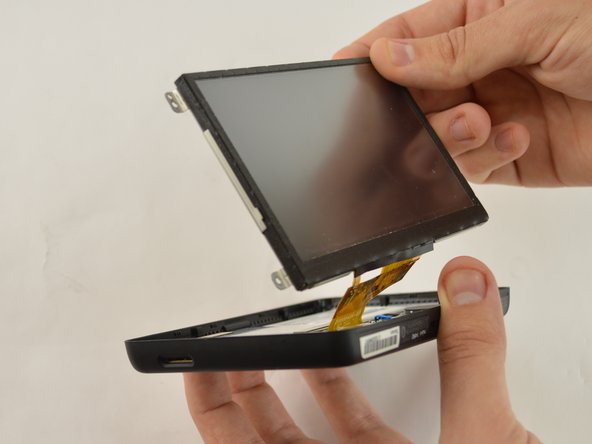
Gently lift up the display screen using your fingers to make sure the only thing connecting it to the body is the ribbon cable.
-
-
-
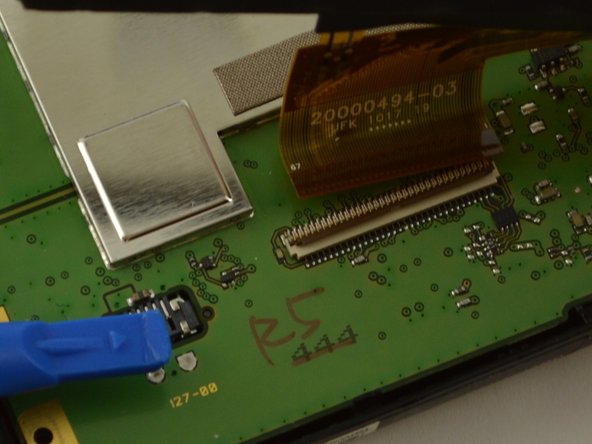
Using the plastic opening tool or your fingers, lift up the ZIF connector holding the ribbon cable in place.
-
Carefully pull the ribbon cable out of the connector with tweezers or two fingers.
-
Gently disconnect the display by pulling upward. Set display aside.
wow no idea what you are trying to say here...
You don't need to remove this. if you go to youtube there is a video of a little boy showing how to do this and it is much more helpful. This step is not clear and you can damage the device taking that ribbon off!
The ZIF (Zero Insertion Force) connector is a locking connector. You need to lift the dark plastic tab that runs across the connector so that it pivots up on the hinge located near the middle of the connector. This plastic tab is a lock that secures the ribbon cable in place for the screen to work. Once the hinge is lifted, the ribbon cable should be easy to slide out of the connector. To reassemble, you must slide the cable back into the connector as far as possible with the hinge open. Then gently close the hinge until it locks into place and reapply the tape.
In the first photo, the ZIF is shown in the locked position, and in the second photo, you can see the locking tab in the unlocked position. Be careful not to force the tab or you will break it and will have a much more serious problem.
-
-
-
Gently and delicately heat up the solder holding the USB port to the circuit board.
-
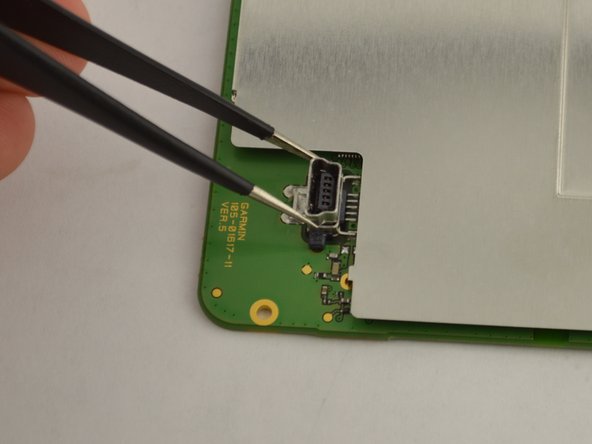
Carefully remove the USB port with your metal tweezers and set it aside
My problem was intermittent connection due to stress on this connector from outside. DO NOT pick up your Garmin by the cord!
In addition, the repair of the USB port is more difficult than mentioned in these instructions. Removal of the shield that covers the USB connections is not possible. I found it possible to unsolder the post near the connector, then peeling back the shield plate enough to access the covered USB connections. Then careful work with a pencil type soldering tip and solder wick to remove excess solder allowed me to reconnect the loosened pins on the USB port and restore normal operation. Bending the plate back and re-soldering got me back to usable operation. Tested and all good. (March 23, 2017)
-


To reassemble your device, follow these instructions in reverse order.
To reassemble your device, follow these instructions in reverse order.
7等其他人完成本指南。
团队

USF Tampa, Team 15-2, Remmell Spring 2016 USF Tampa, Team 15-2, Remmell Spring 2016 的会员
USFT-REMMELL-S16S15G2
4 名成员
创作了6篇指南
3条评论
I found one on ebay, cost about 5 USD. Search for micro USB jack.
Heliophile - 回复
those are not micro usb, there mini usb.
Did I miss something? The title implies showing how to REPLACE the port. It ends with remove port and set aside, then reverse. On the off-chance the authors are still reading the comments, sarcastic “good job”. I also marvel that it took three of you geniuses to come up with this. I’m gonna follow Heliophile’s advice and search ebay, his or her 2 line comment was way more useful then the entire piece. Thanks Heliophile.
Front panel is very fragile. Exercise extreme care.
May be able to purchase part separately from Garmin should you have a mishap.
K Alphonso - 回复